• Hey there Guest!
    If you enjoy BCF and find our forum a useful resource, if you appreciate not having ads pop up all over the place and you want to ensure we can stay online - Please consider supporting with an "optional" low-cost annual subscription.
    **Upgrade Now**
    (PS: Subscribers don't see this UGLY banner)
Tips
Tips

Installed relays for halogens yesterday

RickB

Yoda
Offline
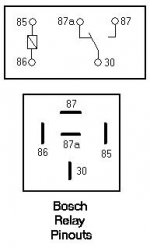
I received a set of five 12V 40A relays yesterday so I set about installing a couple for my new halogen headlights.

Looking at it I decided it would be nice if everything I did was totally reversible. So I went across the street to the True Value and bought some male & female bullet connectors, some insulated spade connectors and some lengths of 10 gauge wire.
I also got a few of grounding connectors to put under a big screw into the inside fender well for ground.

This way I was able to unplug the bullets for the lights, plug the relay + & - into the harness (turning the lights on energizes the relays) and then ran hefty 10 gauge wire from the big brown wire connector on the fusebox to each side for +12V.

I used bullet connectors from my new grounds to the lights and ran battery + through the relay. I added inline 30A fuses, one to each side to prevent anything 'really bad' from happening.

I need to dress it all up a bit, it was pretty cold work and the wind was blowing. So I tucked everything for the time being and I'll go out and tie wrap things properly when i have a bit more time.

They worked exactly the way I thought, and I feel a lot more comfortable knowing I'm not running all that current through my light switch & harness. Plus my lights got a little brighter, which is nice!
 

JPSmit

Moderator
Staff member
Silver
Country flag
Offline
congrats - I know mine make a difference
 

jvandyke

Luke Skywalker
Offline
I got my relays the other day, that set of 5 off ebay mentioned a while ago, you too? I was going to just run 1 hot from the solenoid up front for all three relays (high beam, low beam, horn) but is it smarter to do three separate? In line fuse will be there too. I wonder why it would be better. How about one line, branching to three by the rad, each with it's own inline fuse there? Just trying to avoid too much clutter in the bay outside the pretty new wrapped up harness.
 
OP
RickB

RickB

Yoda
Offline
Yes, those are the ones I got too. I just pulled the red wires out as they were to be unused anyway.

Really think about your use of connectors. What you want to avoid is having something come unplugged that is hot from the battery and that something have the possibility of grounding out or arcing to something else. Protected spade connectors are great for that.
I did one wire from the big brown to my fuses, female protected spade lug on the end and male on the end of my two fuses.

This put the fuses in the same area as the fuse box. Then on the other end of the two inline fuses another male/female spade connection to each branch, one to the passenger side and the other over to the driver side.

I thought for a moment about going from one side to the other up front, then decided I wanted to minimize the wiring across the front. I'd rather have it cross over in the back. I have some of that black split wire cover stuff that I will put over the wire where it crosses back there by the battery, just to make me feel better about the possibility of chafing.
 

JPSmit

Moderator
Staff member
Silver
Country flag
Offline
I actually made a harness for mine - I went out and bought (10?) gauge wire in one of those 4- wires together lines. Three wires (one remains a spare) went to the solenoid and the 4th to the dash for the driving light switch. I soldered the three ends to a large "washer type" connector to attach to the solenoid bolt. The harness wires split at the washer motor - I taped it there with blue tape so it wouldn't split further. The harness then went to the front of the car under the existing wire harness. at the front drivers side corner, my wires are soldered to the relay harness. The grounds are gang soldered to another "washer" connector and grounded with the ground that is there. The actual relays are screwed up under the valance that the hood release mechanism is part of. One power line is for low beam, the other for high - (then if one breaks I can still get home)- fuses are between the relay and the individual filaments (4) Power for driving light and horn are both taken from the purple horn wire. All the fuses etc are plastic tied up out of sight under the same valance - between the grille and rad. Thus, the only connections I have are the end at the solenoid and the lights themselves.

Lights are brighter and you really can't see it at all (except a few more wires in one corner
 

jvandyke

Luke Skywalker
Offline
I was hoping to do as you did, bullet connectors (Lucas) most everywhere, so I don't have to cut up my new harness, a bit anal there I guess.
How do you know which wire corresponds to which function?

This site
Hard to tell from the picture below which color wire goes to which pin.
Is it
87=yellow (to device, headlight)
87a=red (not used)
85=white (a white ground?)
30=blue (hot from solenoid)
86=black (from switch, dipswitch in this case)

relay.jpg
 

Bayless

Yoda
Silver
Country flag
Offline
If you look on the bottom of the relay, where the pins come out, their numbers should be molded in. They may be really small and sometimes hard to se but they should be there. Anyway, here is a drawing with the pinouts and the internal wiring that I use. Pin 85 is to the switch, 86 is ground. These two actuate the relay. Pin 30 is common, pin 87 is normally open and pin 87a is normally closed. If you have a 4 pin relay, 87a is omitted.
 

Attachments

  • 15481.jpg
    15481.jpg
    9.2 KB · Views: 252
OP
RickB

RickB

Yoda
Offline
Yes, it's just like the Bosch diagram above.

(from memory...)
I connected + trigger to white (86) and ground to black (85) then switched my battery + through yellow (87) and blue (30) .
Red (87a) is unused - I pulled it out of the plug to be sure no voltage would be there to potentially short out on anything.

Here's how I did the "+ trigger to white (86) and ground to black (85)" part.
I pulled the blue/red wire bullet connector out of the multi connector piece (this wire powers low beam).

The blue/red connects to the blue of the relay.

The black from the headlight (bullet) connects with black (85) directly to my new 10 gauge black wire firmly grounded to the inside fender.
The + battery lead connects to yellow (87). This way when the light switch is turned on there is + voltage to (86) triggering the relay which applies + battery from (87) to (30) feeding the headlight.

The white wire (86) got a male bullet connector and was inserted into the multi connector female piece that the blue/red was pulled from earlier.
 

Pythias

Jedi Knight
Country flag
Offline
As far as separating the wires goes. Run one for the lights and a different one for the horn. Unless you don't mind having your headlights dim when you use the horn. .. HEY! that could be an added safety at night. Flashing lights AND honking horn to really draw attention. ...

No really, ONE for the headlights works because you won't be using both high and low beams at the same time. (just like when calculating the load for a new house panel you don't have to count both the heating and air conditioning. You use one or the other, not both at once). But the horn draws so much current, you'll want it on its own fuse. You never want you headlights to share a fuse (or wires) with anything else because you don't want them to fail just because something else did.
 

jvandyke

Luke Skywalker
Offline
Bayless said:
If you look on the bottom of the relay, where the pins come out, their numbers should be molded in. They may be really small and sometimes hard to se but they should be there. Anyway, here is a drawing with the pinouts and the internal wiring that I use. Pin 85 is to the switch, 86 is ground. These two actuate the relay. Pin 30 is common, pin 87 is normally open and pin 87a is normally closed. If you have a 4 pin relay, 87a is omitted.

Interesting. 85 is usually ground, 86 to switch, 30 to 12v source, 87 to device.

Found the numbers, thanks for that, they're tiny. I guess it doesn't matter the polarity of 85/86? or 30/87 for that matter?
 
OP
RickB

RickB

Yoda
Offline
<div class="ubbcode-block"><div class="ubbcode-header">Quote:]I guess it doesn't matter the polarity of 85/86? or 30/87 for that matter[/QUOTE]

Totally correct.
 

Bayless

Yoda
Silver
Country flag
Offline
Right, 85 and 86 are interchangable. Either can be ground or switch. If you will not be using 87a then 30 and 87 are effectively interchangable too. Since 30 is "common" it can activate (connect to) either 87 or 87a but not both at the same time, depending on whether the coil (85 and 86) is energized or not.
 
OP
RickB

RickB

Yoda
Offline
Come to think of it, connecting the + battery lead to 87 is smarter as that's isolated when the relay is de-energized.
If you connect + battery to 30 then 87a will go hot when the relay is de-energized. Thus I pulled out the red wire, but smarter would be to simply put the + battery to 87 and the feed to the device on 30.
Polarity makes no difference, but the reasoning above could potentially save some future headache.
 
OP
RickB

RickB

Yoda
Offline
I just put another relay in the system, to provide my heater fan with more power.
This really helped - before there was just a bit of air, now it's a BLOWER!!!
I can't wait until tomorrow morning when I get to try all this out on the road in the dark!
 

JPSmit

Moderator
Staff member
Silver
Country flag
Offline
Oooo good idea
 

jvandyke

Luke Skywalker
Offline
I continued taking apart the old headlight wiring. The wires themselves look fine, the connections not so good. Sealed beam lights, so they took the three wires out of the bulb and on one side soldered them (good) on the other side they used spade connections wrapped in tape (bad). I'm going to undo it, resolder but with shrink tube, then wrap it all. Question is, since there's no color on any wires anymore, which pin on the headlight corresponds to which function?
I found this
"If you look at the back of the light or at the harness plug that will come with the light, the three flat terminal lugs will make a triangle with one terminal up, and two on the bottom. The top terminal should be connected to wire #18 (low beam), the bottom right to wire #17 (high beam), and the bottom left to wire #91 (headlight to ground)."
Does this sound correct?
 

Woodie

Jedi Warrior
Offline
I looked at several wiring diagrams and it appears that negative and positive ground vehicles are different. I may be mistaken, but why not use a voltmeter and verify by testing the recepticle, and trace the wires back to the original harness to find colours,
 

jvandyke

Luke Skywalker
Offline
Too late to try and decipher what various POs had done as I've stripped it all out.
This corresponds with the quote above.
bulbpinout.jpg


Another source
 

jvandyke

Luke Skywalker
Offline
First night ride with relayed headlights. If I had to guess I'd say at least 2x brighter, no kidding, it's phenomenal.
 
Similar threads
Thread starter Title Forum Replies Date
K TR2/3/3A New head gasket is installed.....did a compression check motor cold. Triumph 4
J Can a TF engine be installed in a TD body? MG 7
J Restoration Progress - Boot Installed Austin Healey 1
nichola TR6 New harness installed but have a purple problem Triumph 12
B COMPLETE DROP-IN Rebuilt 1975/6 MG Midget 1500 engine PLUS rebuilt Spitfire Overdrive trans NEVER INSTALLED Spridgets Classified 2
Zitch For Sale OE Under Dash Speaker refinished new speaker installed Triumph Classifieds 0
Martinld123 Just installed LED headlights in BN2 Austin Healey 15
Got_All_4 TR2/3/3A Has anyone installed one of these slack limiting plates Triumph 4
DornTRoriginal TR2/3/3A Checking if Timing Chain is Installed Correctly Triumph 6
Jim_Gruber Thoughts on driving Bugsy with the hardtop installed. Spridgets 32
aero3113 Wire Wheels and Top installed Austin Healey 17
K TR4/4A Running the motor witout the gearbox installed? Triumph 3
Jim_Gruber Hubs a Rocking on side where Speedi Sleeve was installed Spridgets 5
S Seat Belts Installed This Weekend Austin Healey 43
T TR2/3/3A Miata seats installed in my TR3A Triumph 14
DerekJ Another dealer installed 100 Le Mans!! Austin Healey 17
J TR2/3/3A Installing body to chassis with engine installed Triumph 7
F TR2/3/3A I just installed a rebuilt C39 Generator on my TR3 Triumph 11
Tinkerman TR2/3/3A It's installed, It fits, It looks great, I'm excited!!!!!!!!!!!!!!!!!!!!!!!!!!!!!!!!! Triumph 8
K TR2/3/3A Help!..Installed new Clutch....Trans stuck in Gear? Triumph 8
DanLewis Anyone ever installed a Mercedes hood vent on a Bugeye? Spridgets 5
JFeher TR2/3/3A Has anyone installed a TR6 OD transmission in their TR3? Triumph 8
K TR6 Flywheel installed without the locating dowels? Triumph 5
E Got the side exit exhaust installed on my Austin Healey-Video Austin Healey 21
Darrell_Walker Wedge Rimmer's front rally spoiler installed on my TR8 Triumph 22
2wrench New Solenoid Installed on J Overdrive and now no juice to the Solenoid. Triumph 3
Gliderman8 Fuel Pump Installed Triumph 0
Brinkerhoff TR6 TR6 OD gearbox installed in TR3 ? Triumph 11
Stinger TR4/4A TR4A Dealer Installed Mirrors Triumph 5
B TR2/3/3A Rad installed = TR3A no run Triumph 8
Russ Austin New Facia Installed Triumph 5
Stinger TR4/4A TR4A Padded Dash Installed Weatherstrip Question Triumph 7
MGTF1250Dave TR2/3/3A TR3 Engine Rebuilt & Installed Triumph 7
drooartz Installed my new Moto-Lita today MG 12
bugedd Just installed springs Spridgets 5
B BJ7 hood installed Austin Healey 6
G Kingpin bushings installed for $80? Spridgets 6
JohnnyO Finally got my radio installed Spridgets 11
philman Wedge Miata Seat installed in a TR7V8 Triumph 10
Nelson Windshield seal installed Spridgets 1
RickB Installed spin on adapter yesterday - 948 motor Spridgets 5
Brosky Miata seats 98% INSTALLED! Triumph 16
hondo402000 TR6 Fan Shroud Installed on TR6 Triumph 8
W Got the fuel pump installed today Spridgets 7
drooartz Progress: fuel pump installed Spridgets 2
Tinkerman Body Installed Today, YEAAAA! Triumph 8
zschicago Installed Dennis Welch brake kit Austin Healey 5
J BJ8- How is the chrome door top molding installed? Austin Healey 11
martx-5 Installed My New Steering Wheel Triumph 7
M TR2/3/3A TR3 Battery Box Installed Triumph 23

Similar threads

Top