• Hey there Guest!
    If you enjoy BCF and find our forum a useful resource, if you appreciate not having ads pop up all over the place and you want to ensure we can stay online - Please consider supporting with an "optional" low-cost annual subscription.
    **Upgrade Now**
    (PS: Subscribers don't see this UGLY banner)
Tips
Tips

Is there a sequence for inner pannel replacement?

John_Progess

Jedi Warrior
Country flag
Offline
I need to replace the gearbox tunnel edges, cockpit floors, toe boards, inner and outer sills, rocker panels, rear shut pillars, left side rear cockpit floor and rear inner fender repair panels. The Kilmartin panels are here and I was wondering if there is a BEST sequence for replacement of all these panels. I have decided to reinstall the engine and tranny to load the frame before starting. Any suggestions would be helpfull and have a good day!

John
 

bighly

Jedi Knight
Offline
John, ever consider a full Kilmartin or Jule frame?
 
OP
J

John_Progess

Jedi Warrior
Country flag
Offline
Bighly,
No, as I didn't know it existed. I imagine it is quite expensive. I'm retired so I have the time and I actually enjoy doing this stuff. Hopefully I can get an answer from someone who has done this before. It is always nice to have an experienced opinion. Thanks and have a good day!

John
 

GregW

Yoda
Platinum
Country flag
Online
Hi John,
When you say “rear inner fender repair panels”, do you mean the full inner fender, or just a section of it?
 

Cutlass

Jedi Warrior
Offline
I've replaced all of those parts, with the exception of the inner rear fender panels, and much more, including crossmembers and ourtriggers. Rather than a specific sequence, let me give you a few lessons. First, you are probably going to find more rust rot than you expect, assuming that you have not yet removed the old metal. As and before you start removing old stuff, check very carefully for rot that now may be hidden. This is especially true around the outriggers, where they attach to the frame rails. If you are lucky, you indeed will have to replace only those items you listed. If not, and you have to replace or repair frame and outrigger pieces, the job gets much more complicated.

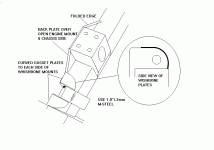
Assuming the best,however, I would replace the sills and rear dog legs first, as the floor pans attach to the sills, as do the rockers, the shut faces and the rear dog legs. But before removing these items, I would check your door fit. If it's ok, then fabricate bracing to maintain door opening measurements during the process. Cut out as little as possible at a time, because each part helps maintain the shape and alignment of the entire assembly. After the sills, dog legs and shut faces are in, I'd relpace the pans and footwell panels. If you're lucky, the footwells and floor panels have attachment nuts and bolts for the insulation and exhaust pre-welded. If not, measure and attach these items first, before installing. The rockers are probably the last thing to attach, and for my money the hardest. For one, they can't be spot welded to the sills, so you have to simulate spot welds, or seam weld. The sills are thin, can't be really clamped well to the rockers, and will warp if you are not very careful, and a good welder. But if your car is fully laden, on its suspension, with engine and transmission, with the doors hung and adjusted, with windows in, or about 15 lbs for substitute weight, you can align and clamp the rockers with the appropriate gap for the doors. I would even suggest temporarily fitting the aluminum trim pieces to ensure proper spacing. I know this is a lot, but what you're talking about is a big job. My chassis restoration took me over a year. Hindsight makes the Jule chassis look great. One more tip: After I finished the re-work on the chassis, I reassembled the car with all drive train and all exterior body panels, and took the whole thing to the body shop, where they aligned all panels with the chassis. After that, I disassembled the whole thing again, and took the chassis to the same body shop for chassis prep (including extensive seam sealing) and paint. That should be done any day now. My next step is to assemble a restored rolling chassis, strip all body panels, and return the whole package to the same body shop for final paint. The trick on these cars is getting the body panels aligned properly. With all the welding you are going to do, whether you will have all the panels align afterwards is anybody's guess. Hope this helps.
 

roscoe

Jedi Knight
Silver
Country flag
Offline
I'm not sure I would want to tackle fitting body panels to an all new chasis unless it was absolutely necessary. It was hard enough for me to fit the original panels to my frame. I replaced inner and outer sills, one rear door shut pillar, 1/2 of the other rear door shut pillar, and three out of four wing lower sections. I would point out that you should leave what sheet metal you can (for example my half rear door shut). I find it is easier to cut out just the damaged or rusted portions of some things and cut the repair panel to fit just that area as you would normally do for a skin panel. Also remember that you can fudge undetectably to correct for a door shut that leaves a small gap where the wing flange is curved around it, but you'll never stretch the wing flange to fit over it if it is misplaced in the other direction. Don't forget that when you check your door alignment, do it with trim pieces installed. I did my work with the drivetrain removed and no cross bracing on the doors. It seems to have worked OK for me. If you can maintain the shape of an opening by measurement during tack welding stages why should it matter if the engine is in or out? Maybe I was lucky. Measurement is critical and obviously what you want to avoid is removing some structure, for example cutting the weld where the wing inner liner is welded to the outer sill, and having the liner spring to a new position once free of the weld. You then have no reference for where to attach the new sill. A heavy steel ridgid jig would obviously be nice, but not practical in my garage. I used measurements that I made from before I cut anything. Make a punch mark and measure to a point on a piece you are removing. Set the new piece up the same. I have used trammel points in setting up aircraft wing ribs and spars, so I used a smaller version of these for the Healey. I would also suggest you get some cleco fasteners and a cleco pliers. They are available at any aircraft tool supply site (or Eastwood if you want to pay more). They are especially useful for attaching the rockers to the sills for trial fitting and the outer to inner sills. I used a drill bit to remove spot welds, but a spotweld drill is probably a good investment and will save you time both removing the welds and welding in the holes you make. I agree doing the sills first might be good because they are the most critical for future fits. Once you get the rockers on you can move on to more mindless cutting and hacking. I spoke to a few people who assured me that if you were to remove all of the body panels and door hinges and did nothing else except reinstall them you might well have apoplectic fits if you are new to this work on these cars. I had all original panels for the frame and had trouble fitting everything without getting someone to press here and pull there while I got a bolt started (nothing to do with the repair panels). Eventually things get worked into place and low and behold it even looks good. I have been told that on some 1950's sports cars the door gaps were actually leaded over and then cut and shaped to look impossibly good. Healey never did that sort of stuff and they don't call the guys who are pros at this panel beaters for nothing. Hope this helps, and ain't this a great web site!
 
OP
J

John_Progess

Jedi Warrior
Country flag
Offline
Roscoe,
Yes this is a great site! I was planning to only remove the rotten metal and no more than necessary to get to good metal. The PO did a repair job using brazing all over the place so many panels have to go. I am using patch panels in the rear inner fender well not the entire well. I asked about loading the frame with drivetrain and the opinion was it is good insurance for an old frame. My frame looks pretty good with very little rust thru. There is almost nothing left of the sills where they attach to the rear inner fender so I will use the cutout of the outrigger as a match point. I have a spotweld cutter that I will use where I can. The car has been totally sandblasted so the rust is very visable, I am also replacing the front right side outrigger, the trunk floor and welding cracks in the motor mounts. Did you weld the inner and outer sills together before attaching to the outriggers? My suspension has been removed so I was going to support the car at the front shock tower and rear spring attach point for proper frame loading.
Cutlass,
Are the dog legs you refer to the section of the rear inner fender well that attach to the shut panel? My floor sections did not have the necessary hardware attached, I thought they would. Just for info how much is the new chasis? It is a good idea to fab a support to maintain the inside door dimension. Thanks for everyones help and have a good day!

John
 

Keoke

Great Pumpkin
Country flag
Offline
HI John, as of March the first a complete new stronger chassis is $8000.00. Welded X Bracing of the door openings is strongly reccomended. It is my understanding that the "Dog Legs" are the lower front patch panels for the rear fenders.---Fwiw---Keoke
 

Johnny

Darth Vader
Country flag
Offline
Had to replace everything you mentioned on my BN7, and only the floors and sills and toe boards on my BJ7, so I'm familiar with what you're doing. I always do the inner sills first because they attach to the outriggers and you can see to weld better. Take careful measurements before you start removing anything, and then again immediately after, and you'll do fine. I didn't find replacing the outriggers too difficult, just again do one side at a time. If your car is like most you'll have to replace one or both of the X frame members and probably the smaller braces as well. I used 3 inch channel for this area and it worked great, really strengthened the frame. The floors can go on with just the inner sills welded in. It looks nice to have the floors welded in without being able to see any welds. I did this by drilling the inner sill and plug welded into the floor. Of course you have to do some seam welding on the portion of the floors that are exposed. When replacing the toe boards I cut the old ones just below the welded in nuts at the top. Then drill out the new toe boards where the nuts are located. Makes welding the toe boards easier.
Hope this helps somewhat.
/ubbthreads/images/graemlins/hammer.gif
 
OP
J

John_Progess

Jedi Warrior
Country flag
Offline
Johnny,
If you only weld only the inner sill to the outriggers first then attach the floor panel you could use a spotwelder which I have been able to borrow. Does this make sense?
Keoke,
I have purchased the repair panels for the "dog legs" which is what I thought they were but not sure. You refer to X bracing the door openings, is this done after replacing the sills and rear shut panel, my front "A" pillars are ok. The attachment shows that there is nothing left of the rear end of the sills. I will have to use the step in the outrigger where the sill was as the reference point. My plan is sills first,dog leg next for shut panel reference then the shut panel. I will attach fenders and door in order to position the shutpanel for best fit. Does this sound ok? Thanks to all for your comments. This is not rocket science but it is sure nice to hear from people who have done it before! I was a little surprised that the hardware that welds to the Kilmartin floor panels did not come with the panels as they did come with the trunk floor. Have a good day!

John
 

Keoke

Great Pumpkin
Country flag
Offline
Yep John, and the Spot welder is great. the X bracing should be installed before you do any other work!.---Keoke
 

Cutlass

Jedi Warrior
Offline
There was an article some time ago in a Healey club magazine, Marque I think, that showed how a race chassis was modified. It included adding extra gussets to the motor mounts, lower control arm mounts, and extra pieces to the cruciform. Since your motor mounts are cracked, as were mine, I would definitely add the extra gussets at this time. In fact, as I remember, the motor mounts were boxed (I left a 1/2" gap at the bottom for drainage) and gussets were added. The extra cruciform pieces were mirror images of those to the rear of the "X," and appear as if they were designed to be there. If your sills are rusted at their attachment points, as were mine, I would just cut back to good metal and replace with like thickness sheet metal, to give the sills good attachment points.

As far as attaching hardware for the heat shields and exhaust are concerned, I just made them by welding cut-off bolts, or nuts as the case may require, of the proper size to washers. Either keep your floor pans for reference, or buy the heat shields for a pattern. Good luck.
 

Keoke

Great Pumpkin
Country flag
Offline
Like This!. Cutlass /ubbthreads/images/graemlins/grin.gif---Keoke
 

Attachments

  • 198358-chassis_strgth.gif
    198358-chassis_strgth.gif
    7.9 KB · Views: 116

Johnny

Darth Vader
Country flag
Offline
"You refer to X bracing the door openings, is this done after replacing the sills and rear shut panel, my front "A" pillars are ok."
Sorry I misled you John. The X bracing I referred to are the frame members. I would ask around club members, most have already made a set of door braces. I would use them in your case.
/ubbthreads/images/graemlins/hammer.gif
 
OP
J

John_Progess

Jedi Warrior
Country flag
Offline
Johnny,
I will ask out club members about door braces. I have already made but not attached the bracing that Keoke mentioned. I will also just make the necessary attachments to the floor boards and footwells. The X bracing on the frame actually looks good with only light pitting on the top. I did not include an attachment as the picture was had too many kilobites...oh well. Thanks for your help!

John
 
Similar threads
Thread starter Title Forum Replies Date
petnatcar Cylinder Head Nuts - Tightening Sequence Austin Healey 2
K TR2/3/3A An alternate valve adjusting sequence? Triumph 3
M 948 Cylinder Block Studs - Sequence on Cylinder Block Spridgets 4
S TR2/3/3A Under the dash re-assembly sequence Triumph 4
G Gasket sequence manifold to carburetor Austin Healey 4
S TR4/4A Body Frame refit sequence Triumph 9
M TR4/4A Sequence for fitting door glass? Triumph 7
J Chassis general reassembly sequence Austin Healey 17
H TR4/4A 4A convertible top rebuilding sequence Triumph 8
PatGalvin TR2/3/3A Assembly Sequence, Dash and Under Dash Triumph 10
Patrick67BJ8 BJ8 - Intake Manifold, carb, gaskets sequence - Info needed Austin Healey 2
W BE door installation sequence Spridgets 3
W Sequence Spridgets 6
jdubois Somebody check my timing sequence... Triumph 18
Tinkerman TR2/3/3A TR3A Windscreen sequence of assembly Triumph 4
Tinkerman Steering wheel sequence of assembly Triumph 5
W Transmission mount sequence Spridgets 4
G TR2/3/3A TR3 windshield assembly sequence Triumph 9
ronzet 1958 AH 100-6 Torque Sequence Austin Healey 1
go_inbroke Torque sequence and spec MG 8
Ohiobugeye Hydraulic Bleeding Sequence Spridgets 7
J Electrical fault trace sequence. Austin Healey 7
W BE bumperette sequence of installation Spridgets 2
J BJ8 dash installation sequence? Austin Healey 7
tahoe healey brake bleeding sequence Austin Healey 2
Jayrz Front Suspension rebuild sequence MG 41
B Tune up sequence??? Spridgets 9
Bruce_B Bolt torque sequence on 11 bolt cylinder head 1275 Spridgets 7
M TRactor Motor Valve Adjustment Sequence Triumph 5
Bob Claffie Painting sequence Austin Healey 9
J TR4/4A Strange Problem Fitting Inner Fender Triumph 18
D TR4/4A TR4 inner ball joints Triumph 8
R 2500M Inner Fenders - are they the same as a Vixen 2500? (Also Tire Size) TVR 3
SNClocks Gap between inner and outer fenders Spridgets 0
S TR2/3/3A Distributor vacuum advance hook up to the inner plate Triumph 9
M TR2/3/3A TR3 Small Mouth Inner Fender Holes Triumph 3
J Wanted WTB Triumph TR3 inner sills Triumph Classifieds 8
R GT6 GT6 Bearing Part Number Request (Front Axle, Inner Bearing)... Triumph 3
M BJ8 Inner Body Panel Repair Austin Healey 2
chicken Inner Door Seal Trim Position Austin Healey 6
S Inner Body Alignment Austin Healey 0
G 1962 TR3A inner plate # Triumph 8
rr64 Wanted Early MGB Inner Steering Track Rods Wanted MG Classifieds 1
Jim_Stevens For Sale New TR2-3A inner sill assemblies Triumph Classifieds 3
F TR2/3/3A Inner sill opinion Triumph 38
K TR2/3/3A Inner tie rod ball joint. Triumph 6
M TR2/3/3A Front Inner Fender Doublers Triumph 2
J TR2/3/3A Body Restoration - Inner Sill Replacement Triumph 38
J TR2/3/3A inner sill rust prevention Triumph 1
71TR6 TR2/3/3A Inner sill or floor pan- which to replace first? Triumph 5

Similar threads

Top