• The Roadster Factory Recovery Fund - Friends, as you may have heard, The Roadster Factory, a respected British Car Parts business in PA, suffered a total loss in a fire on Christmas Day. Read about it, discuss or ask questions >> HERE. The Triumph Register of America is sponsoring a fund raiser to help TRF get back on their feet. If you can help, vist >> their GoFundMe page.
  • Hey there Guest!
    If you enjoy BCF and find our forum a useful resource, if you appreciate not having ads pop up all over the place and you want to ensure we can stay online - Please consider supporting with an "optional" low-cost annual subscription.
    **Upgrade Now**
    (PS: Subscribers don't see this UGLY banner)
Tips
Tips

TR2/3/3A Assembly Sequence, Dash and Under Dash

PatGalvin

Jedi Warrior
Country flag
Offline
Hello everyone

Can you help with the assembly sequence? I installed my dash. On each side/top of the dash, there are a pair of 1/4 inch studs that hold the dash to the body. In addition, there are two windscreen defroster ducts that hang from these studs. Finally, on the driver side, the steering column also has a bracket that hangs from these studs. So, I assume the dash goes on first, then the defroster ducts, and then the steering bracket, right?

Also, do the defroster ducts tuck in between the wiper tube and the top of the cowl? Or, do the ducts hang below the wiper tube? It seems like the ducts should hang below the wiper tube, as fitting them in between the wiper tube and cowl is a very tight fit indeed.

Thanks for the tips.

Pat


TFB

Jedi Knight
Country flag
Offline
Hello everyone

Can you help with the assembly sequence? I installed my dash. On each side/top of the dash, there are a pair of 1/4 inch studs that hold the dash to the body. In addition, there are two windscreen defroster ducts that hang from these studs. Finally, on the driver side, the steering column also has a bracket that hangs from these studs. So, I assume the dash goes on first, then the defroster ducts, and then the steering bracket, right?

Also, do the defroster ducts tuck in between the wiper tube and the top of the cowl? Or, do the ducts hang below the wiper tube? It seems like the ducts should hang below the wiper tube, as fitting them in between the wiper tube and cowl is a very tight fit indeed.

Thanks for the tips.

Pat


Pat,Irecently have been working in this ara and can offer the following
Finish the wiper install complete before going further.Your wheel boxes appear to be upsidedown to the way I installed with screw toward bottom and tube on top,but maybey I did it wrong.
I ran the left side defrost from the rear of the heater Y around the front of heater and up thru hole in steering wheel bracket.
Dash,defrost duct and then streering bracket was the order I used.This may not be correct or most desireable because if in future the steering supports have to come out to remove duct,wich partially blocks wheeelbox access.
Also I would recommend the dash install with capping installed.I originally set dash and the found it had to be lowered in the slots to clear the speedo bezel,and allow the grab bar to clear glove box door.Wheelboxes are above or behind ducts.
Have Fun
Tom
Tom
 
OP
PatGalvin

PatGalvin

Jedi Warrior
Country flag
Offline
Thanks Tom

Esteemed collective: Did I install the wheel boxes upside down? Sheesh.

Pat
 

TexasKnucklehead

Jedi Knight
Country flag
Offline
Did I install the wheel boxes upside down?

Compared to the way I did, yes. I had to go out and look, because I didn't have a picture in the 6 million I took during reassembly...

If it helps, it looks like I installed the demister vent before the dash. I don't know why, but then again, I don't know why I did many things I have done. I do know that I have a "cowl squeak" that stops when I press on the dash corner right about where the right most/lower nut is on the dash back side. It's easy to tighten (and is tight), but I do not want to remove that glove box again.

The hoses to the demisters are a challenge to route as well, and have a little to do with the orientation of the heater output. And the heater hoses are a pain to route, as is the wiring loom. I'm not sure there is a easy order to route them. -you are getting closer.
 

tinman58

Jedi Knight
Silver
Country flag
Offline
Pat
I did my TR3 twice, because of the assembly sequence.. Yes your wheel boxes are upside down. (Been there done that)
 
OP
PatGalvin

PatGalvin

Jedi Warrior
Country flag
Offline
Pat
I did my TR3 twice, because of the assembly sequence.. Yes your wheel boxes are upside down. (Been there done that)

Great minds think alike....... and fools seldom differ.

Sorry for cliche'

Thanks Dan

Pat
 

tinman58

Jedi Knight
Silver
Country flag
Offline
Hey Pat
I have some 250 hubcaps......
 

RC64

Jedi Hopeful
Country flag
Offline
Pat...

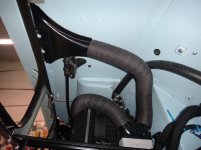
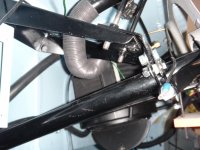
I just finished the under dash installation struggle. It took me awhile to get it all to fit right. I concur with the suggestion that your wheel boxes are upside down. I think you'll find that with the wheel boxes reversed that the demister vents will have to fit below the wiper tube. I did take a number of photos that might be of some help, two of which I'll include here...

DSC01531.jpg DSC01524a.jpg

Another issue that came up for me was the hoses on top of the heater. With the heater hose that I have (purchased locally), there was no way they were going to make the bend without crimping in time. I found a couple of 90 degree adapters that fit just right above the heater pipes. Worked out fine. You can see them just above the lower duct.

Let me know if you need any more photos. I have plenty from a variety of angles.

Rick...
 
OP
PatGalvin

PatGalvin

Jedi Warrior
Country flag
Offline
Rick

Beautiful job with putting the car back together. These photos are very helpful. Thanks for sharing them.

Pat
 
OP
PatGalvin

PatGalvin

Jedi Warrior
Country flag
Offline
I'm gonna act like Jerry and Dan (Tinman) do every day.... and not go to work tomorrow - gonna try to get this under dash work completed by Sunday. Photos to follow.

Pat
 

Jerry

Darth Vader
Gold
Country flag
Offline
Hey, we paid out time in work years already! Besides, I had to go work on my daughters rental today.
Jerry
 
Similar threads
Thread starter Title Forum Replies Date
S TR2/3/3A Under the dash re-assembly sequence Triumph 4
Tinkerman TR2/3/3A TR3A Windscreen sequence of assembly Triumph 4
Tinkerman Steering wheel sequence of assembly Triumph 5
G TR2/3/3A TR3 windshield assembly sequence Triumph 9
M TR6 Filter housing assembly? Triumph 7
B For Sale GT6/Spitfire License Plate Light Assembly Triumph Classifieds 0
N TR5/TR250 Starter Box Assembly Leak Triumph 14
D TR2/3/3A Windshield assembly question Triumph 6
K TR2/3/3A The horn and turn signal assembly. Triumph 3
G Installing New Rocker Shaft Assembly Austin Healey 3
D TR6 Rocker arm assembly , pushrod clearance Triumph 8
tr6nitjulius For Sale "PRICE REDUCED" 4Sale: TR6 (L/R) taillight assembly Triumph Classifieds 0
Rob Glasgow Check Strap Assembly Austin Healey 5
bighealeysource Drum Brakes Assembly Austin Healey 6
D BT7 Choke Assembly Austin Healey 18
B TR4/4A Ammeter Assembly Triumph 2
Popeye TR4/4A TR4A Assembly by a rookie (me!) Triumph 149
S For Sale TR-3 Tie Rod Assembly for Sale Triumph Classifieds 0
S For Sale Oil Pump Rotor Assembly for Sale Triumph Classifieds 0
M Need help removing the pinion assembly from a late 1275 steering rack Spridgets 7
SherpaPilot TR6 Choke Assembly Triumph 0
Csarneson BN4 Interior Assembly - Unidentified Holes Purpose Austin Healey 2
Kolecki TR2/3/3A engine assembly cam timing issue Triumph 8
F TR2/3/3A TR3A tub assembly Triumph 44
S TR2/3/3A tappet assembly Triumph 10
J RIB CASE MAIN SHAFT ASSEMBLY Spridgets 2
Popeye General TR FS2758 alternate - Door Pull Assembly Triumph 2
Csarneson Body panel assembly order? Austin Healey 6
T Articles by Hap Waldrop reg engine disassembly and assembly Spridgets 1
Michael Oritt SU H6 carb for Le Mans--order of assembly of fuel bowl lid Austin Healey 2
R TR2/3/3A Transmission Lever Assembly Triumph 9
Got_All_4 TR6 drill and tap for a grease fitting tr6 rear hub assembly Triumph 4
steveg Points assembly order of washers Austin Healey 13
Lin Healey assembly line - engine installation Austin Healey 19
K For Sale TR3 Gas Cap Assembly Triumph Classifieds 0
S Wanted Austin Healey heater assembly Austin Healey Classifieds 1
Lin Bonnet Striker Pin Assembly Austin Healey 5
S TR2/3/3A Slight clunk in the rear assembly somewhere. Triumph 3
P TR2/3/3A Rear axle hub dis-assembly Triumph 1
F Which Original Oil filter assembly for BN7 Austin Healey 19
D TR2/3/3A assembly, TR3A rear fender and radiator stays Triumph 22
J For Sale Triumph TR3 rear differential and rear brake assembly - Northern Illinois Triumph Classifieds 1
HighAltitudeTR3 TR2/3/3A Door Check Assembly Triumph 19
Healey Nut Mechanical tach drive assembly Austin Healey 4
B Air Deflector Assembly Austin Healey 2
T TR2/3/3A TR3 ashtray assembly Triumph 0
T Wanted WTB TR2/TR3 Hood/Bonnet Latch Assembly with Prop Rod Triumph Classifieds 0
G Fixings for liner assembly hood comparment -BJ7 Austin Healey 7
T TR2/3/3A Question on overdrive pinion & bearing assembly for speedo drive Triumph 11
K For Sale TR3 hood latch assembly Triumph Classifieds 0

Similar threads

Top