• Hey there Guest!
    If you enjoy BCF and find our forum a useful resource, if you appreciate not having ads pop up all over the place and you want to ensure we can stay online - Please consider supporting with an "optional" low-cost annual subscription.
    **Upgrade Now**
    (PS: Subscribers don't see this UGLY banner)
Tips
Tips

Installing a BJ 7 top

Brinkerhoff

Jedi Knight
Offline
I'm installing a Robbins top on a BJ 7 convertible. Can anyone send me some pictures of how it is supposed to be attached in the rear with the clips? Is the front secured and trimmed with a hidem strip and nails? Or is it pulled and wrapped under the forward bow , then secured without a hidem strip? thx. Kevin
 
Country flag
Offline
I did a BJ8 top about a year ago, so that might help you with the front bow. Can't offer much help with the rear window though, it's been at least thirty (>30) years since I worked on a BJ7 top.

I started at the "B pillar" and worked my way backwards and then forwards. With the exception of the wrinkled rear window (the top was in the box over 10 years...) I was very pleased with the results. Since the car is now in New Mexico, I expect the window will (warm up) and smooth out eventually.

https://www.spcarsplus.com/gallery3/index.php/reMKIII/top_work

IMG_3560.jpg


IMG_3565.jpg


IMG_3581.jpg


IMG_3584.jpg
 
Country flag
Offline
Only what's in the "drain-channel_by others" sub-album. Those pictures were supplied by a member here, so you might get additional respones from them.

I didn't remove the drain-channel from the car I was working on, as it was in pretty good shape.
 

bob hughes

Luke Skywalker
Country flag
Offline
Kevin

You should have an upside down J metal section, this hooks over the drain channel and is screwed to it, I fitted mine first after centering everything up without the hood. Then as Randy says work from the B post. I used temporary tacks to get the hood fixed around the rear of the side windows making sure that they cleared the edge of the hood when the doors were open and shut and I also used a couple of temporary tacks on the front bow to get the general shape and to hold the front. I then visited the back to stretch the hood and mark the edge of the upside down J on the outside of the hood. I then took everything off and clipped the back edge of the hood to the J section and then screwed the J section back onto the drain channel. I then raised the frame and refixed ( teporarily ) the hood at the B post position and also stretched the hood and tempoarily tacked it to the front Bow again. I was lucky at this point, as some times you have to revisit the back and adjust the clips having marked the problem areas and removed everything again, Once the back is satisfactory you re stretch the sides at the B post and then go to the front and stretch and tack onto the front Bow. Then you undo the front bow and remove the ali piece and wrap the hood under the bow and tack it into position there. I used some silicone sealant at this point before refixing the ali trim piece and finally the rubber seal.

I hope that all this makes sense!

:cheers:

Bob
 
OP
Brinkerhoff

Brinkerhoff

Jedi Knight
Offline
Thanks to both of you ! Sorry Randy, I hadn't looked in that great picture file of yours. I got most of the details correct from the old assy. but I figured the top would attach to the drain channel with clips , not to the two j shaped trim pieces. This little detail will help ... I can also see that I may have to shim the base of the top mechanism as my rear most hoop does not line up with the seam like yours. Kevin
 

Johnny

Darth Vader
Country flag
Offline
Kevin, I too have a BJ7 with the clips used to pull the rear window up (instead of a zipper). It's rare these days to see the original setup. I'll post a few photos of what I've done so for. It's not complete but I've just received the correct metal bar that attaches to the rear window. That will allow the rear window to slide behind the three "tongues" up against the top bar, then you can secure with the clips.
 

Attachments

  • 26567.jpg
    26567.jpg
    23.7 KB · Views: 276
  • 26568.jpg
    26568.jpg
    21.6 KB · Views: 274
OP
Brinkerhoff

Brinkerhoff

Jedi Knight
Offline
I should have been more specific. Its a BJ7 but without the rollup window in back . I've got the newer style BJ8 top with a zippered window. I was wondering mostly about how the rear edge of the top attaches or clips to the car's rain gutter. I see from Randy's pics that its clipped to the separate inner trim hoop ( J shaped). Bob, yeh I'm lookin' forward to it! Don't worry I won't be as lucky as you and get it right the first time. Randy's pictures help immensly as I could see I had to tweek the rear hoop tonight to align it with the seam like on his car. thx again everyone. Kevin
 

AUSMHLY

Obi Wan
Country flag
Offline
Hi Kevin,

The top material attaches to the rear trim rail. The trim rail is "J" shapped. The material is glued with contact cement, then clipped, to the inside of the top curve. Then the trim rail is screwed to the rain channel.

The top material is stapled to the bottom of the wood header rail.
Then the header rail seal retainer, which is also covered in material, is screwed into the wood header rail.
Then the hidem strip is stapled (center of the hidem strip) to the wood header rail to cover the gap between the header rail and the header rail seal retainer.

This topic was asked by me some time ago. Randy was nice enough to offer some photos of his BRG Healey, which I will now pay forward. Thank you Randy.

My top shows the rear and the hidem stip.

Hope this helps.
Roger
 

Attachments

  • 26570.jpg
    26570.jpg
    66.4 KB · Views: 259
  • 26571.jpg
    26571.jpg
    86.5 KB · Views: 258
  • 26574.jpg
    26574.jpg
    50.5 KB · Views: 246
  • 26575.jpg
    26575.jpg
    58.3 KB · Views: 253
  • 26576.jpg
    26576.jpg
    47.8 KB · Views: 247

bob hughes

Luke Skywalker
Country flag
Offline
Guys

My mentor from Rawles told me that you leave that top bow fixing - just above the rear window, until last and that is what I did, also there is no need to glue the rear of the hood to the J section - just clips there is enough of them to sink a battle ship, especially if you need to adjust it. The webbing must of course be fixed at the front first before the hood is fixed to the front bow - after temporary fixing all round again - for dimensional purposes.
I attach some picys of the installation - I hope

Hoodandframeinstallation016a.jpg


Hoodandframeinstallation015a.jpg


Hoodinstall004a.jpg


Hoodinstall003a.jpg


They are not in the correct order but give you an idea of what to do. Get all the centre lines on - frame, windscreen, hood and the back of the car and the J clamp - it is essential for lining things up.

You refer to two J pieces! When buying new they come as one welded piece - possibly easier to handle to line things up at the back - best of luck on that one.
I too have the zipped window in my BJ7 and I do not think that I can get the creases out of that, possibly because it is an older hood and has been stretched on before.
I used some scrap vinyl under the temporary tacks, to aid in the removal later.
You will need a white or yellow pencil - the type that will write on glass - could use a coloured pencil I suppose. Stretch that hood over the drain channel and mark the edge for clipping as best as you can. If you have to relocate the clips then gently ease them off the J bracket taking the hood material with them if possible- saves damaging the vinyl too much.
 

bob hughes

Luke Skywalker
Country flag
Offline
Kevin
<span style="color: #FF0000">I can also see that I may have to shim the base of the top mechanism as my rear most hoop does not line up with the seam like yours. </span>

String it through first and throw the hood on to see how much material you have at the front and back, it is all very well following dimensions from the hood installation guide - elsewhere on this forum, but you need enough material front and back to work with.

:cheers:

Bob
 

AUSMHLY

Obi Wan
Country flag
Offline
Guys, Bob,

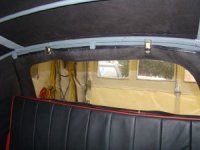
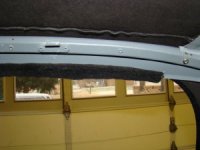
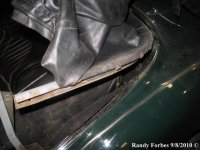
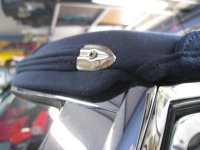
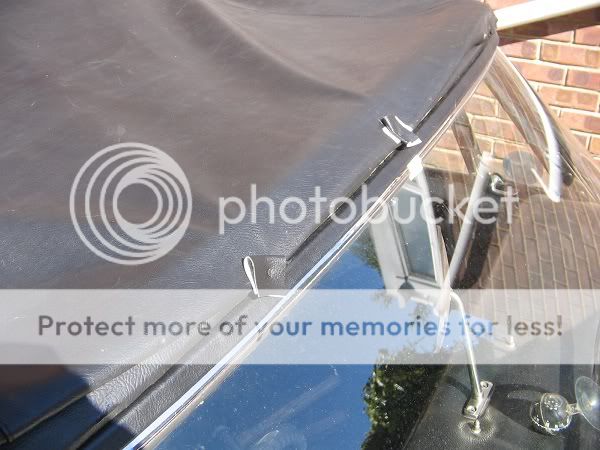
All of the top shops I questioned about installing the top, say they glue the material to the J section and use the clips. Bob's mentor does not glue. This maybe up for discussion. I worked hand in hand with my shop. They caulked and tacked all things first, then when time came to finalize, it was glued then clipped. Maybe gluing helps keep out some of the wrinkles?

Bob wrote:
You refer to two J pieces! When buying new they come as one welded piece - possibly easier to handle to line things up at the back - best of luck on that one.

Bob, where did you purchase your J piece from? I recently purchased the J piece from Moss. It came as two pieces. The owner needs to have it welded together. By the way, I ended up sending the Moss piece back, for the curve did not follow my orginal and the Moss metal was much thicker than original and was too hard to try and bend to fit the car. Had I known I would have had to weld the new pieces, I would not have ordered them, for mine required welding for a fix. Just a heads up guys.

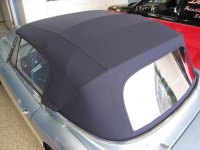
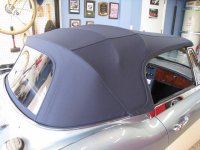
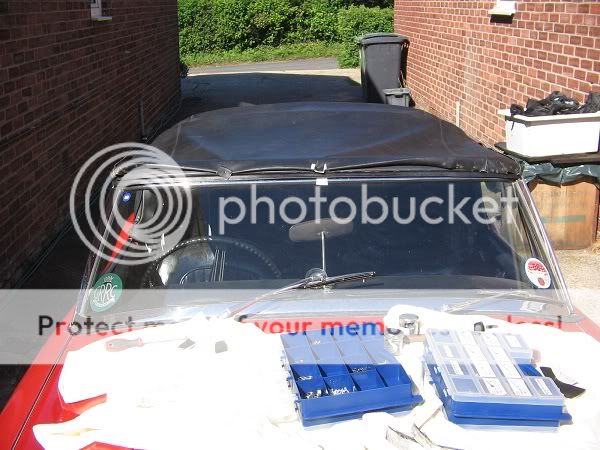
Bob, nice write up about how to install the top!

Cheers,
Roger
 
OP
Brinkerhoff

Brinkerhoff

Jedi Knight
Offline
I was referring to the J trim from Moss also , supplied in two pieces. Then I start digging around and find the original drain channel with the original one piece J trim still holding the end of the top in place. Its a long story but goes like this: we had to buy another shroud that came with its own drain channel. I thought I had thrown it out but it was in my pile of Healey 100 doors by the chicken coop. Anyways, between the J trim and the rain gutter was a thin 1" wide rubber seal with a little lip on it glued in one piece to the rain gutter. The rear edge of the top attached with 32 clips. I blasted the original one piece J trim and painted it this a.m. , I'll use it instead of the new ones. I can see how you would need a seal ( glue, rubber) of some sort to prevent water from backing up and between the J trim and rain gutter then draining into the interior. I'll figure that out once I can fit the top properly and I'm ready to finish. I can't thank you guys enough for all of the help. Kevin
 

Johnny

Darth Vader
Country flag
Offline
Kevin, if you're not going to install the original type top, do you have all the original parts for the type with the toggle switches that hold the rear window up?
Also, if you do have a top without a zipper would you consider selling it?

Send me a separate email if you have all.
 

bob hughes

Luke Skywalker
Country flag
Offline
My J section came from AH spares, and my new drain channel ( not fitted yet) came from A Head 4 Healeys. As a matter of interest, SC Parts have them in two pieces and are advertised as repair sections.
Kevin

As to the possibility of water backing up and under the J section, the sealant / glue - hood to J section will not help you here as in my case the end of the hood was inside the car ready to be trimmed back to the U/S of the drain channel. In fact there is supposed to be a J shaped rubber seal between the J section and the drain channel to prevent the possibility of ingress through backing up. This is not widely available but MacGregor in Canada do them, I was given a piece of flat rubber at AH Spares but have not used it yet as I am going to tear my car apart this winter to install the new drain channel and put in a new floor and cills on the navigators side.

I guess the reason for not glueing the hood to the J is that you may require to adjust it a tad and you do not know if it is right until you fit it all again and then you wwould have to take it all apart to glue.

:cheers:

Bob
 
Country flag
Offline
I did not glue the bottom (rear) of the top to the J-rail either. There did not appear to be any evidence that it had been glued before, but there was no rubber seal between the J-rail and the drain channel either, so no telling how many hands were in there before mine.

IMG_3102.jpg
 

bob hughes

Luke Skywalker
Country flag
Offline
Randy

Rawles do not install the rubber seal on a hood instal either, and I suspect that if you go down the seal route that you would need to glue that on to the drain channel or the J rail just to keep your sanity.

The Jury is out as far as I am concerned as to installing the seal or not, I probably will not once I have changed the drain channel.

:cheers:

Bob
 
Similar threads
Thread starter Title Forum Replies Date
J Stress Reliever while installing new top on BJ8-smashing the Christmas lights Austin Healey 5
V General TR Need help with installing glass and new seal into my surrey top. Triumph 2
S Installing New Top Spridgets 28
I Help on installing side curtains and rag top on Bugeye please Spridgets 4
A Serious help needed !!!! BJ7 Installing a new soft top Austin Healey 9
BJ8Healeys Installing Robbins canvas top on a BJ8 Austin Healey 12
John250 TR5/TR250 installing new top on a TR250 Triumph 9
M Installing soft top Spridgets 7
R installing new top Spridgets 1
bighealeysource Help with installing new top on 100-4 BN1 Austin Healey 4
D Any advice on installing new soft top? MG 20
T Installing a New Top on a 1955 BN-1 Austin Healey 7
bighealeysource Installing a new top on my BJ8 Austin Healey 2
bighealeysource installing BJ8 top Austin Healey 3
D Installing a New Soft Top Spridgets 11
6 Installing Convertible top boot Austin Healey 6
D Installing a New Top Spridgets 33
6 Installing a BJ8 Convertible Top Austin Healey 9
N installing a new top MG 9
T installing a soft top on a Healy 100-4... Austin Healey 1
J Installing Adapter Hubs for Wire Wheels on a Bugeye Austin Healey 5
S Installing a Radiator Fan Austin Healey 9
G Installing New Rocker Shaft Assembly Austin Healey 3
W Need advice on installing new side curtain glass Spridgets 1
Bayless Help please installing bonnet release cable Spridgets 8
M TR6 Installing Retrosound? Triumph 4
S TR2/3/3A Installing the distributor pedestal. Triumph 3
K TR2/3/3A Question about installing the steering wheel control head? Triumph 1
A TR6 Installing differential and transmission Triumph 10
Z Installing Toe Board Panels Austin Healey 1
K TR2/3/3A Installing Brake Caliper pistons into the bore? Triumph 21
CJ Burton MGB-GT Installing Seat Covers for 1962 - 1967 MGB GT MG 0
A Early 1967 AH Sprite - installing steering column and new directional switch? Spridgets 0
B Installing cam bearings 1275, can I do it? Spridgets 1
bighealeysource Installing stainless steel brake hose on BN2 Austin Healey 5
steveg TR6 Installing stock trailing arm bushings on the car - is it possible? Triumph 2
steveg TR6 Installing adjustable trailing arm brackets Triumph 7
T Installing Garmin GPS in a BJ7 Austin Healey 19
F Installing AC in my 1960 Healey Austin Healey 14
S TR2/3/3A technique for installing a door Triumph 5
R TR2/3/3A Installing wiring harness in steering column Triumph 59
R TR2/3/3A Installing gas tank Triumph 6
C Installing rubber grommets in firewall? Austin Healey 6
S TR2/3/3A installing a fuse in the red tail lights Triumph 4
S TR2/3/3A installing the wiring harness Triumph 8
R Installing Sprite Luggage Rack Spridgets 9
Lukens TR2/3/3A Installing a throttle. Triumph 2
J Powertune booster for a bj8 , trouble installing Austin Healey 2
B TR2/3/3A Installing dzus fastners in bonnet Triumph 8
D Prepping Floors Before Installing Interior Restoration & Tools 6

Similar threads

Top