• The Roadster Factory Recovery Fund - Friends, as you may have heard, The Roadster Factory, a respected British Car Parts business in PA, suffered a total loss in a fire on Christmas Day. Read about it, discuss or ask questions >> HERE. The Triumph Register of America is sponsoring a fund raiser to help TRF get back on their feet. If you can help, vist >> their GoFundMe page.
  • Hey there Guest!
    If you enjoy BCF and find our forum a useful resource, if you appreciate not having ads pop up all over the place and you want to ensure we can stay online - Please consider supporting with an "optional" low-cost annual subscription.
    **Upgrade Now**
    (PS: Subscribers don't see this UGLY banner)
Tips
Tips

TR2/3/3A 1960 TR3A starting chassis work

OP
F

Frank Canale

Jedi Warrior
Silver
Country flag
Offline
If anyone has a good closeup of the front and rear tabs that holds the wishbone on the lower fulcrum pin that would be a big help. I do not trust what was welded on previously. I have the removable bracket but the tab that it bolts to does not look right and the ones on the passenger side were definitely not right. Thank you, Frank
 

Graham H

Jedi Warrior
Country flag
Offline
Are these any help

Graham
P1000884.jpg
 

Attachments

  • P1000883.jpg
    P1000883.jpg
    62.5 KB · Views: 81
OP
F

Frank Canale

Jedi Warrior
Silver
Country flag
Offline
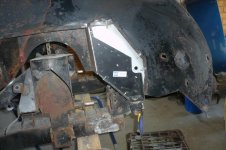
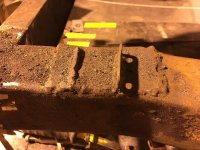
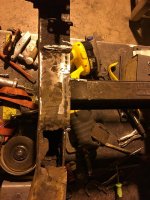
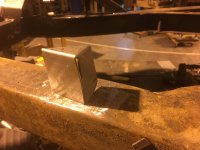
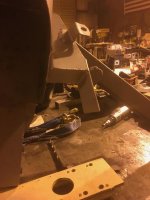
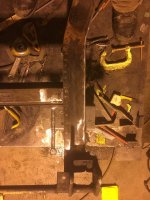
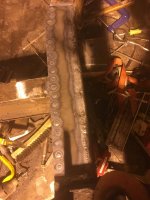
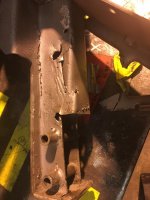
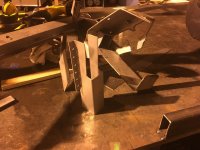
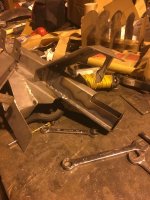
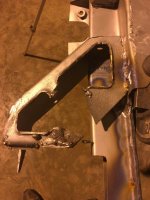
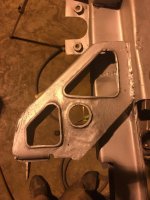
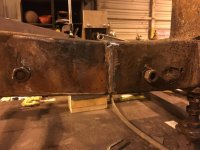
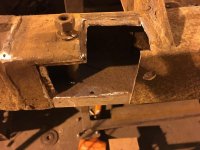
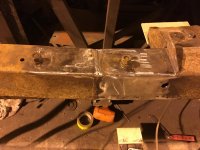
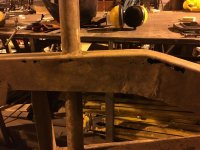
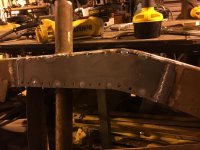
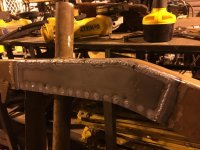
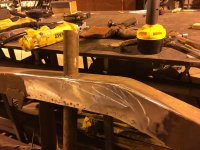
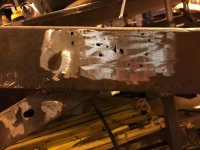
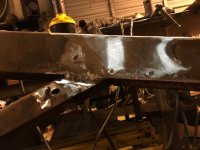
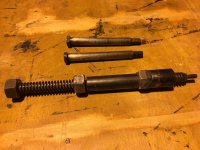
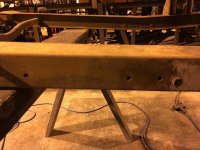
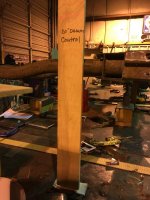
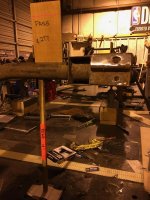
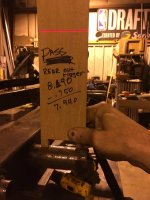
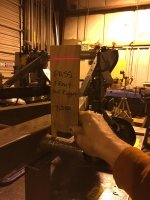
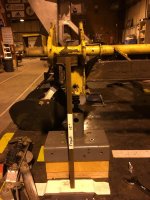
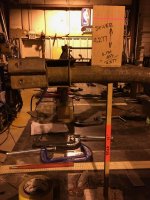
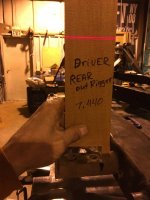
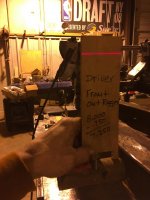
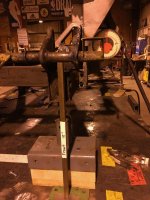
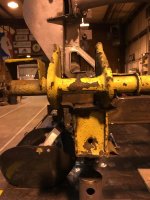
Thank you Graham, the pictures are helpful. I had an idea of how it is supposed to go but wanted to see other cars to be sure. Tonight I removed the driver side spring tower. So lets see what is behind door #1. When I saw the patch under the fulcrum pin mount I had a good idea what was behind door #1 and it was no surprise. The person that did the repair did the exact same damage to the inner channel, they just did a better job of covering it up this time. I will be doing almost the same repair as I did to the passenger side. The top of the frame will be replaced, the inner channel flange will be replaced, The inner channel of the spring tower will be replaced, new fulcrum support brackets , repair the bump stop water box, then I get to put it all back in place. When I bought the car I did not know a good frame from a not so good frame and I trusted the man , he seemed honest , he pointed out the obvious but told me the frame was good. I don't know if he really had the knowledge to say it was good or not. Now I know and hope this will help others to know what to look for. I knew I had a lot to repair but I did not know it would be from self inflicted wounds. I will tackle this bump in the road and hope to have the frame done by the end of the month. I have already done this so this time should be a little easier. Frank
 

Attachments

  • IMG_0274.jpg
    IMG_0274.jpg
    87.4 KB · Views: 90
  • IMG_0275 (1).jpg
    IMG_0275 (1).jpg
    83.1 KB · Views: 91
OP
F

Frank Canale

Jedi Warrior
Silver
Country flag
Offline
Today I am in much better frame of mind. Today I tackled the easy stuff. I cleaned the tower up and did the bump stop water box repair. Decided to try and form the box section in one piece just to see if i could. This repair has the same formed edges as the original and the other edges were welded. The repair turned out pretty good. Next I tackled the front frame rail damage. First I removed the top of the frame rail so I could see how much of the flange needed to be replaced. I ended up replacing from the front of the cross member to just past the curve in the frame. Same as the other side, used the stretcher to curve the flange. Welded the flange on from the inside so the weld could remain and the outside could be finished because there is 100% penetration of the weld. The top piece was cut to match the curve, after a good fit was achieved I punched 3/16" holes for the spot welds. I have come to like doing the spot welds and that will come in handy when I start putting the body work back together. After all had cooled I finished out the welds. Reset the frame to do a quick check and the frame is still flat. Tomorrow will be the start of the difficult stuff, repairing the channel in the tower and starting to make new brackets and aligning the tower and fulcrum pin. I got a puller made to get the rear spring pins out but they are really stuck so soaking some more and will try another day. Frank
 

Attachments

  • IMG_0276.jpg
    IMG_0276.jpg
    58.9 KB · Views: 96
  • IMG_0282.jpg
    IMG_0282.jpg
    52.7 KB · Views: 92
  • IMG_0283.jpg
    IMG_0283.jpg
    52.7 KB · Views: 87
  • IMG_0277.jpg
    IMG_0277.jpg
    55.2 KB · Views: 88
  • IMG_0281.jpg
    IMG_0281.jpg
    75.1 KB · Views: 90
  • IMG_0279.jpg
    IMG_0279.jpg
    63.3 KB · Views: 86
OP
F

Frank Canale

Jedi Warrior
Silver
Country flag
Offline
Today a little more progress. The tower had internal damage to the inner channel of the spring tower. The channel was cut out and a new channel formed. The spring tower was put back on the frame and aligned to measure for the notch in the channel, once the notch was cut I drilled the flange for the spot welds. The channel was clamped to the spring tower tacked and then welded. I still have a little bit of clean up to the welds before it gets welded to the frame. The initial fit up of the driver side is very encouraging, so much easier when you have a correct side to compare to. Tomorrow I will be working on the fulcrum pin brackets and rebuilding the spring tower where the fulcrum pin goes thru. There is not much lefty of that part like there was on the passenger side. I may end up forming that part but won't know till I grind that part off the old fulcrum pin.
 

Attachments

  • IMG_0285.jpg
    IMG_0285.jpg
    60.4 KB · Views: 84
  • IMG_0286.jpg
    IMG_0286.jpg
    58.9 KB · Views: 78
  • IMG_0287.jpg
    IMG_0287.jpg
    63.2 KB · Views: 74
  • IMG_0288.jpg
    IMG_0288.jpg
    76.2 KB · Views: 79

DavidApp

Yoda
Gold
Country flag
Offline
Hello Frank

Nice work on the frame.

If you have the cross tube that goes between the towers it may help to use it as a check on distances between the towers.

David
 
OP
F

Frank Canale

Jedi Warrior
Silver
Country flag
Offline
Hi David, I do have the cross member that bolt between the towers. I have set it in place and it looks close, as with everything on the front suspension the brackets that the cross member bolts to have been beeten on. I guess that is how they put it back together if it did not line up they just beet on it till it did. I hate to come across as a whiner but it has surprised me that someone would abuse a car like this one has been. It has become my mission to undo all the previous bad, and hope it will make the first drive a little sweeter. Frank
 

DavidApp

Yoda
Gold
Country flag
Offline
Unfortunately some "Mechanics" view a big hammer as a solution to all problems. Some don't know any better because that is all they have seen done by others.

David
 

RJCOX

Jedi Hopeful
Country flag
Offline
I feel your pain.

Found more brazing today. I also discovered an absence of cage nuts on both my fenders.

Not that it's an excuse, but being as these beauties are 60+ years old, the evil that was done in the past may have seemed a necessary evil. Lack of mechanics skilled in British cars, backyard mechanics etc. contributed to it as well. I'm seeing the damage that my dad did to his in the 70s and how he dealt with it (not pretty). Already I have face taking shortcuts (though I havent yet succumbed to the temptation).

That's the hobby unfortunately, but thankfully we have each other to lean on.

And your LBC will be that much more special when you can say "You wouldnt believe what the @#$% previous owner did to this thing, but I made it right."

Oh btw, thanks Frank for the encouragement. You made my day and got me out of my funk.
 
OP
F

Frank Canale

Jedi Warrior
Silver
Country flag
Offline
The repair to the tower took longer than expected so this is all for today. Cleanup on isle 7. The fulcrum pin showes where the support bracket was cut to get the pin out so I will not be using it over. The piece I am after is in the center of the fulcrum pin. It took a lot of grinding to get the section of the tower that was needed for the repair. Most of this weld is not doing much it is just gobbed on top of another weld. and non of it has much penetration. Then there is the tower ready for the center piece to be tacked in and then welded. I thought I had taken a picture with the center section tacked in to show how much had to be filled in but I guess I missed one. One place I had to form a filler piece, The gap was just too large to fill. It could be filled but would not be very strong. Then there is the tower repaired. The repair turned out a little better than the passenger side but this was the second time and I learned from the first one. So far the alignment still looks good with minor adjustments at the final alignment and during the wending process. First of the week I hope to be back on it making brackets and the lower bump stop tubes.
 

Attachments

  • IMG_0289.jpg
    IMG_0289.jpg
    66.2 KB · Views: 88
  • IMG_0290.jpg
    IMG_0290.jpg
    59.6 KB · Views: 88
  • IMG_0291.jpg
    IMG_0291.jpg
    59.1 KB · Views: 80
OP
F

Frank Canale

Jedi Warrior
Silver
Country flag
Offline
I am getting close to being done with the frame. It looks like on the bottom side of the frame there were the remnants of cage nuts located where the front floor pan bolts to the frame. It would be a long bolt that goes thru a tube in the frame. Should there be cage nuts here and if so what size, 5/16 or 1/4 fine thread? Pictures to come of the fun I have been having. Thank you
 

M_Pied_Lourd

Darth Vader
Country flag
Offline
Yes, there should be cage nuts there, at least on mine there were. I believe they were larger than the standard ones used on the rest of the car (going from memory and it’s been awhile).

Cheers,
Tush
 
OP
F

Frank Canale

Jedi Warrior
Silver
Country flag
Offline
Thank you Tush and Graham, just what I needed to know. I will get those made this morning. There are several repairs to the frame all on the passenger side. I was not aware that the frame is reinforced with an inner steel tube in the area of the rear axle where the frame kicks up. They weld joint is where the frame is reinforced. I had to cut the outer frame larger than the inner tube to have access to do the repair to the inner tube. I got lucky that it did not get to the over rider stud but it was close. Then the repair finished. Pictures are out of order, on to next repairs. The first finished repair shows what the damage looks like to the right is the second repair. A bulge with the metal flaking. The cutout shows the inner tube that is also cutout. This cutout shows that all the seams are offset to make the repair as strong as possible. The repair pieces were cut and formed , one piece for the inner and one for the outer. It takes a little longer but is a better repair. The pin hole on the back side of the tube was also filled before closing the repair. more of the same. The swiss cheese at the end was discovered while wire brushing. Last night I tackled the rear spring pins. They have been soaking for a week or so and with the removal tool I made and little heat they came out but there was still some resistance. Sure am glad I did not have to replace the sleeve that goes thru the frame. Thanks to all for suggestions on how to get them out. I used a little bit from everybody and was successful. Frame goes back on the table for final check, another round of measuring the frame but I am very confident that it is going to be very good.
 

Attachments

  • IMG_0293.jpg
    IMG_0293.jpg
    62.8 KB · Views: 82
  • IMG_0296.jpg
    IMG_0296.jpg
    60.1 KB · Views: 83
  • IMG_0297.jpg
    IMG_0297.jpg
    62.6 KB · Views: 86
  • IMG_0298.jpg
    IMG_0298.jpg
    64.3 KB · Views: 81
  • IMG_0300.jpg
    IMG_0300.jpg
    67.7 KB · Views: 84
  • IMG_0299.jpg
    IMG_0299.jpg
    67.3 KB · Views: 80
  • IMG_0301.jpg
    IMG_0301.jpg
    61 KB · Views: 82
  • IMG_0302.jpg
    IMG_0302.jpg
    66.8 KB · Views: 85
  • IMG_0303.jpg
    IMG_0303.jpg
    72.8 KB · Views: 86
  • IMG_0304.jpg
    IMG_0304.jpg
    66.7 KB · Views: 89
  • IMG_0305.jpg
    IMG_0305.jpg
    57.1 KB · Views: 84
  • IMG_0306.jpg
    IMG_0306.jpg
    74.4 KB · Views: 88

DavidApp

Yoda
Gold
Country flag
Offline
Hello Frank

The frame repairs look good.

It is good that the pins came out. You may never need to remove them after the car is finished but you will now be confident they can be removed.

David
 
OP
F

Frank Canale

Jedi Warrior
Silver
Country flag
Offline
Thank you David. I did not get much done tonight but have misplaced my 5/16 drill and tap set so nuts for underside of frame are on hold. I did get the cages made and the blanks for the nuts made Saturday morning. I have been working on straightening flanges on the frame and filling a few screw holes that are not supposed to be in the frame ( PO screwed the driver floor pan patches to the frame. Wire brushed the frame looking for more damage. I am happy to say we are nearing the end of this part of my car. The cross tube between the spring towers only has a weld nut at the bottom and the two upper holes use nuts and bolts but not sure if this is correct. I also have three holes on the outside of the passenger side frame rail towards the rear of the over rider studs. I am not sure if these are needed or what they are for. any help would be appreciated.
 

Attachments

  • IMG_0310.jpg
    IMG_0310.jpg
    72.1 KB · Views: 76

LionelJrudd

Jedi Trainee
Country flag
Offline
Frank, wonderful work. I think your front suspension work was a baptism of fire for you. Well done.

My chassis has only the lower weld nut as you mention and no sign that others have been removed. Interesting because the Moss catalogue shows the need for six cross tube bolts, washers and nuts in that area. I'm sure someone else will explain this.

My chassis has the three holes you show in the above photo. In the time that I have had the car, there has been nothing attached to the holes and there are no signs that anything has been removed from that part of the chassis. I would suggest you leave them as is. Again, someone will come along and provide the explanation for both of us.
Lionel
 

Graham H

Jedi Warrior
Country flag
Offline
My chassis only has one hole, the one closest to the rear mount for the axel catch strap and that one is for a clip to hold the fuel tank breather pipe. The other two on yours look factory but I don't know what they would have been for.

Graham
P1000938.jpg
 
OP
F

Frank Canale

Jedi Warrior
Silver
Country flag
Offline
The frame is back on the table and a little cleaner. It sure is nice to not be grinding. The passenger side ended up needing a little adjustment. All of the measurements were rechecked and gauge blocks were made and labeled. I found that there are so many measurements that it is easy to get confused and use the wrong measurement. The pictures are a little boring but may help someone in the future. All measurements are referenced from the frame drawing in the service manual. The laser is sitting approximately 12" to thee rear of the frame on a bucket that was shimmed to the 20" height and has not been moved. Before each measuring session the measuring pads are checked. This keeps the pads and the laser consistent. The first is the 20" datum line that I set the pads to measure off. The gauge has a line at 20" When it is on the pads the laser line should light the line on the gauge. The photo showed a pink line but the line on the gauge does not show up. The rest of the pictures just show the gauges in different positions. The frame has turned out very flat, tomorrow I will recheck it for square and recheck the towers. The final picture is of the front frame cap. There is a hole in it and on the driver side. Is this supposed to have a hole in it?
 

Attachments

  • IMG_0326.jpg
    IMG_0326.jpg
    71.5 KB · Views: 71
  • IMG_0317.jpg
    IMG_0317.jpg
    78 KB · Views: 66
  • IMG_0318.jpg
    IMG_0318.jpg
    60.2 KB · Views: 68
  • IMG_0320.jpg
    IMG_0320.jpg
    62.5 KB · Views: 71
  • IMG_0321.jpg
    IMG_0321.jpg
    71.3 KB · Views: 71
  • IMG_0322.jpg
    IMG_0322.jpg
    77.1 KB · Views: 71
  • IMG_0323.jpg
    IMG_0323.jpg
    54.8 KB · Views: 69
  • IMG_0324.jpg
    IMG_0324.jpg
    57.8 KB · Views: 65
  • IMG_0325.jpg
    IMG_0325.jpg
    74.1 KB · Views: 68
  • IMG_0314.jpg
    IMG_0314.jpg
    64.7 KB · Views: 75

Graham H

Jedi Warrior
Country flag
Offline
Both my front caps had that hole it looks like it has been punched out with a centre punch and a big hammer no idea what it was for other than to let moisture in to start the rust.

Graham
 
Similar threads
Thread starter Title Forum Replies Date
W For Sale 1960 TR3A for sale Triumph Classifieds 0
G For Sale 1960 TR3A for sale $11,999 Triumph Classifieds 0
W TR2/3/3A 1960 TR3A Radiator replacement recommendations Triumph 11
M TR2/3/3A 1960 TR3A--intake manifold-to-SUH6 carbs studs Triumph 3
M TR2/3/3A 1960 TR3A turn signal harness Triumph 6
A TR2/3/3A 1960 TR3A front brake dust covers Triumph 5
F Wanted 1960 Triumph TR3A fuel tank Triumph Classifieds 5
Tinkerman TR2/3/3A Hood stick assembly 1960 tr3a Triumph 7
Tinkerman TR2/3/3A 1960 TR3A engine compression question. Triumph 7
Tinkerman TR2/3/3A Rebuilding SU carbs 1960 TR3A Triumph 3
Tinkerman TR2/3/3A 1960 TR3A post 60000. WON"T START ???????????????? Triumph 8
Tinkerman TR2/3/3A 1960 TR3A Boot rubber seal installation? Triumph 7
Tinkerman TR2/3/3A 1960 tr3a sheet metal fitment Triumph 6
Tinkerman TR2/3/3A 1960 TR3A carpet installation Triumph 5
Tinkerman TR2/3/3A 1960 TR3A Tonneau Capping Installation Triumph 1
Tinkerman TR2/3/3A 1960 TR3A Tonneau Trim Mill board Triumph 10
M_Pied_Lourd TR2/3/3A 1960 Triumph TR3A Trunk Seal Orientation Triumph 6
Tinkerman TR2/3/3A Prepping the grill for installation for my 1960 TR3A Triumph 1
Tinkerman TR2/3/3A Sealing fender to body 1960 TR3A Triumph 15
Tinkerman TR2/3/3A Windscreen mounting tips 1960 TR3A Triumph 2
Tinkerman TR2/3/3A 1960 TR3A Bottom Rubber Seal on the Windscreen Triumph 3
Tinkerman TR2/3/3A Tunnel installation question 1960 TR3A Triumph 11
Tinkerman TR2/3/3A Another Freeby from the past. For a 1960 TR3A Gas Tank Triumph 4
Tinkerman TR2/3/3A 1960 TR3A Holes in the tranny tunnel Triumph 11
Tinkerman TR2/3/3A Carpet underlayment, TR3A 1960 Triumph 10
Tinkerman TR2/3/3A Major oil leak from original oil filter system 1960 TR3A post 600000 series Triumph 3
D TR2/3/3A 1960 TR3a front suspension Triumph 2
Tinkerman TR2/3/3A Front windscreen help needed. TR3A 1960 Triumph 9
D TR2/3/3A fitting windshield/frame to 1960 Tr3a & Brooklands screen removal Triumph 2
Tinkerman TR2/3/3A TR3A 1960 Gas on three out of four plugs ? Triumph 6
Tinkerman TR2/3/3A 1960 TR3A post 60,000 series seat pan covering Triumph 3
Tinkerman TR2/3/3A 1960 TR3A seat tack strips Triumph 1
Got_All_4 TR2/3/3A Finish on a 1960 TR3A Fluid reservoir? Triumph 6
60TR3A TR2/3/3A 1960 TR3A Small Mouth [Huh?] on eBay Triumph 63
M_Pied_Lourd TR2/3/3A 1960 TR3A Mystery G Triumph 24
Tinkerman TR2/3/3A 1960 TR3A Instrument Cluster Ground Post Screw Triumph 9
M_Pied_Lourd TR2/3/3A Restoration of TS 69891LO 1960 TR3A Triumph 36
T TR2/3/3A 1960 TR3A oil leak issue [imagine that!] Triumph 5
T TR2/3/3A 1960 TR3A engine compartment color Triumph 8
PAUL161 TR2/3/3A Colonal Tom Parkers 1960 TR3a For Sale! Triumph 3
T TR2/3/3A 1960 TR3A now with rack and pinion Triumph 22
Tinkerman TR2/3/3A Bulkhead Sealer Plate TR3A 1960 Triumph 3
D TR2/3/3A 1960 TR3A Paint Question Triumph 24
gubba TR4/4A 1960 TR3A with tr4 motor and tranny? Triumph 22
D TR2/3/3A 1960 TR3A Flasher Triumph 7
R For Sale 1960 Healey BN7 Oil Pan For Sale Austin Healey Classifieds 0
J Wanted Hood (Bonnet) for a 1960 BT7 Austin Healey Classifieds 0
G For Sale 1960 TR3 A Triumph Classifieds 0
dougie 1960 Austin Healey 3000 Works Lightweight vs. 1962 Ferrari GTO Austin Healey 6
G For Sale 1960 BugEye..Very Good..$20,500 Austin Healey Classifieds 0

Similar threads

Top