• Hey there Guest!
    If you enjoy BCF and find our forum a useful resource, if you appreciate not having ads pop up all over the place and you want to ensure we can stay online - Please consider supporting with an "optional" low-cost annual subscription.
    **Upgrade Now**
    (PS: Subscribers don't see this UGLY banner)
Tips
Tips

TR2/3/3A Overdrive question.

OP
D

DavidApp

Yoda
Gold
Country flag
Offline
Hello Graham

I was not there when the gearbox was rebuilt but it was done by a guy who is reputed to be good. He rebuilds them as a paying hobby so I hope he knew what he was doing unlike I will be when I get round to trying to fix the leak. He did say that he was not going to be using old adapter plates in the future as I was not the first leaker.
I will be running it on a test rig before reinstalling it.

I have not checked the selector shafts for leaks but I will now.

David
 
OP
D

DavidApp

Yoda
Gold
Country flag
Offline
Getting ready to pull the engine and transmission to try to get the OD sealed up. I will run the gearbox on a rig for several hours before I reinstall it to be sure it is not leaking.

I have a couple of other jobs to do while it is out.
1) Reposition the starting dog. I have several shims now.
2) Small radiator weep at the neck. Taking it to a radiator shop that does trucks and old cars.

I was thinking that if I put the gearbox in 4th and then clamp both the input and output shafts before I separate the OD from the gearbox It should make it easier to reengage the splines in the OD.
Wishful thinking?

David
 

Graham H

Jedi Warrior
Country flag
Offline
Hello David,

I have tried all those tricks and nothing worked I once spent hours trying to get the splines lined up finally succeeded looked for the next parts to assemble and found the oil pump cam sitting on the floor, back to square one? The best advice is air pressure to engage the OD turn the input shaft with any forward gear selected and it will all click together, you can even select reverse and will know its all good when the box locks as it should, but only try turning it by hand you don't want to damage it at this stage.

Graham
 
OP
D

DavidApp

Yoda
Gold
Country flag
Offline
Well it is out on the garage floor. Next up replace the adaptor plate.

Thanks to the photos Graham H posted on the Triumph Register site I got it out without too much of a struggle.
I did change the chain to one with smaller links to make rotating the gearbox easier.

David
Getting ready to remove the OD.jpg
OD out on floor.jpg
 

Graham H

Jedi Warrior
Country flag
Offline
Hello David,

The photos are there ok I think they have changed the way they load, getting the box out is probably the easy part but good to see it worked out ok.

Graham
 
OP
D

DavidApp

Yoda
Gold
Country flag
Offline
I did debate if that was the better choice or to take the motor and gearbox out together like last time. At least now I will have first hand info on both methods.

I do plan to run the gearbox on a test stand to check for leaks before I reinstall it.

David
 

sp53

Yoda
Country flag
Offline
Nice work David, I am impressed all that looks heavy and challenging right now to me. Please keep us posted and please post pictures on how the horizontal shaft fixes to the tub at both ends.
steve
 
OP
D

DavidApp

Yoda
Gold
Country flag
Offline
Hello Steve.

I will get closer photos of the setup that I am using but it is modeled on Grahams H's setup.

The firewall has a bracket bolted to the highest captive nut holding the tunnel cover and the rear support needs work for the replacement. It was a pile of wooden blocks that tended to be unstable. There is less weight on the end of the bar than I expected. I plan to do something to make rotating the gearbox easier. The chain seemed to hang up as I rotated to clear the clutch lever.

I notice that the brass plug is not very flat on the sealing surface so I have cleaned it up with a file. I seem to remember that John used an "O" ring to seal the plug instead of the very hard fiber washer.

David
 

Graham H

Jedi Warrior
Country flag
Offline
I used a large block of wood with a few thinner pieces to get the right hight, the large one is about 8 inches square.

GrahamIMG_1855.jpg
 

sp53

Yoda
Country flag
Offline
Thanks David and Graham, the block of wood is something I have a lot of practice with and was glad to hear the weight stays at the front. I guess it would be what carpenters around here call shear weight (straight down) but did not know. David would a cable work? Or would that let the trans roll too much. Anyways great work, I need to get my OD up and moving. I put it on the back burner and have had too many projects and not been focused.

steve
 
OP
D

DavidApp

Yoda
Gold
Country flag
Offline
I put the gearbox in 4 gear then clamped both the input and output of the gearbox with the hope that if nothing moved it should just side back together. Setting it up on a stand so it would not roll around.
Gearbox on stand.jpg
This was after the OD was removed obviously.
Started to get it separated but was a little suppressed that it took a lot of effort to get it apart. Removed the 4 nuts on the short bolts then started to back off the nuts on the long bolts. I was expecting the springs to push the OD away from the gearbox. It did not move so I did a little tapping then got a block of wood and tapped on the OD. Still nothing so finally I got a tool like a putty knife and tapped it into the join between the adaptor plate and the OD. A gap started to open up and with a little help the springs pushed it apart.
The gray sealant (Yamabond) I think stuck the parts together and some was in the bolt holes.
This is a photo of the adaptor surface to OD. You can see it was not making good contact. Either the face is badly distorted or the sealant dried before it was closed up.
OD sealant surface.jpg

Cleaned everything up then applied Permatex 51813 to both surfaces if the gasket between the new adaptor plate and gear box. Bolted it up having put some blue locktite n the bolts.
Luckly the OD pump cam was sitting in its minimum pumping position when I took it apart. I have seen where you have to hold the pump plunger down with a wire so the roller will clear the cam on the main shaft.
I had found a site that posted photos of a tool that is poked through the hole located under the brass plug and hooked onto the pump shaft.

Having cleaned up the OD face I applied Permxtex to both faces of the gasket and slid the OD on the shaft. It seemed to line up OK and as I pushed it together I checked the springs were located on the cast points on the adaptor plate. The short springs can be slid along the pins to do that.
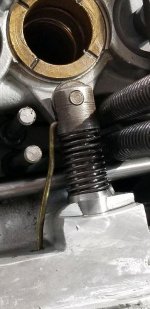
Using a board against the end of the OD I pushed it together till I got nuts on the long bolts. I continued pushing and taking up the slack till I was about 1/2" from closed up.
At this point it went tight so I thought the splines were engages so I took my clamps off and turned the input shaft a bit. It freed up so I closed it up more turning and tightening. Turned mu tool to release the pump plunger and finished tightening the bolts. I did remember the top nuts that have to go on before the long bolts are completely tight.
I plan to run it with a motor for several hours to check for leaks.
 

Attachments

  • Pump tool.jpg
    Pump tool.jpg
    52.6 KB · Views: 74

Graham H

Jedi Warrior
Country flag
Offline
That sealant must be strong stuff to hold the OD on against the push of those springs, was the adapter plate bent? That wire in the pump plunger is a good idea I did find my pump cam has a small bevel on the side and it easily pushed over the pump roller when I last assembled it.
I have been thinking about that clutch leaver and curious to know if any one has modified it so it could be removed before the box comes out. Something like a keyway with a shoulder and bolt through the end of the shaft and a roll pin to make sure there was no movement. Would certainly make life a lot simpler when taking the box out and refitting it.

Graham
 
OP
D

DavidApp

Yoda
Gold
Country flag
Offline

Graham H

Jedi Warrior
Country flag
Offline
I used the large block of wood under the box for alignment so it could just slide out and back in again, the block under the lifting bar makes a good resting place while you are thinking of some choice words to remind yourself of how its going.

Graham
 
OP
D

DavidApp

Yoda
Gold
Country flag
Offline
I think I have enough room to add blocks as needed. The support is only a more secure foundation.

I notice my clutch release bearing (New 900 miles ago) has a small amount if radial movement. Axially feels fine but if I grab the outside of it it moves side to side?

David
 
OP
D

DavidApp

Yoda
Gold
Country flag
Offline
From what I can see on the internet the release bearing is a Thrust type bearing so some radial movement is not surprising. Some may be angular contact bearings which would behave differently.


David
 

sp53

Yoda
Country flag
Offline
Wow David I am impressed, I like how the holding bar is in 2 pieces and slides onto a piece. Are there 2 bolts that hold the piece to the fire wall? Did you find out about all the holes in the gasket? Heck looks like you got it because I can how the sealant set uneven or even missed in some areas.

The throw out bearings have been argued about for a long time. I think the last one I put in I got from some European brand name on line, but have not drove the car much. You are providing much knowledge and experience with ODs, much appreciated. Plus I bet next time you rebuild yourself, great work. I put my OD in the car without a rebuild and figured I would test drive it first to help me understand ODs, and following you has really helped.

Steve
 

Graham H

Jedi Warrior
Country flag
Offline
The throwout bearings can sound rattly when you spin them but when they have pressure applied in the right direction they are quiet and smooth.

Graham
 
OP
D

DavidApp

Yoda
Gold
Country flag
Offline
Hello Steve

The bracket bolted to the firewall is simply a piece of shelving support I repurposed and drilled a couple of holes in it. One hole for the firewall bolt and one for the bolt that the ipe pivots on. I used pipe because I thought the chain might slide on it a bit easier than on angle iron.

On the gasket I just cut a new gasket and eliminated the extra hole. The guy who did the original work said he spread a coat of sealant on both faces before assembly and tit looks like poor adhesion to the surface. I think that the Yamabond may be a very thick sealant that held the faces apart across the bottom or it hardened up too much before he tightened the bolts. There is another void that is between two of the bolt holes. It has set up very hard and was difficult to separate. I had to use my hive tool to get it started.
On your OD if you have not done it already it would probable be good to do an oil change.
Too many parts that are hard to source and special tools involved for me to attempt a rebuild. Thank you though.
adaptor plate s.jpg
The void is just above the brown mark on the left hand side of the plate.

Graham.
The bearing does not sound bad in fact it is very smooth I was just surprised how much side play it had in it. The one on my old gearbox has some play and slides off the bronze carrier. Probable the reason I got all new clutch release parts when I did the OD. Had hoped to never to have to be back in the area.

David
 
Similar threads
Thread starter Title Forum Replies Date
KVH General TR Overdrive Up-date and Clutch Question Triumph 2
K Overdrive Screen Replacement Order Question Austin Healey 4
T TR2/3/3A Question on overdrive pinion & bearing assembly for speedo drive Triumph 11
D TR2/3/3A TR3A overdrive question Triumph 6
I Overdrive question..? Austin Healey 8
D TR2/3/3A how to question for overdrive Triumph 29
C BN1 Overdrive drain plug question Austin Healey 0
T TR2/3/3A Question on A-type overdrive solenoid Triumph 21
Got_All_4 TR2/3/3A Quick Overdrive Wiring Question Triumph 6
6TTR3A TR2/3/3A TR3A overdrive relay question Triumph 3
T TR2/3/3A Question on A type overdrive spec for "clutch movement from direct to overdrive" Triumph 7
R A Type Overdrive reassembly question Austin Healey 3
R TR2/3/3A A-Type overdrive question Triumph 8
K Overdrive pressure question Austin Healey 4
S TR4/4A overdrive question Triumph 1
oxford overdrive question Austin Healey 5
B Overdrive Oil Pump Installation Question Austin Healey 10
TR3TR6 TR6 Question about a TR6 J overdrive Triumph 12
stretchit2 Overdrive Question Austin Healey 5
A TR5/TR250 Overdrive question Triumph 12
M Exhaust fiasco & overdrive question Austin Healey 7
bighealeysource Overdrive question on BN2 Austin Healey 3
nevets Overdrive electrical diagnostics question Austin Healey 5
D A type overdrive question. Triumph 3
H overdrive solenoid question Austin Healey 4
J Overdrive Question Triumph 9
bighealeysource Overdrive fusing question on BN6 Austin Healey 10
J Overdrive transmission question Triumph 4
S Spitfire 76 spitfire overdrive test question Triumph 5
Coyote1 Overdrive wiring question Triumph 8
B Overdrive speedo cable question Triumph 6
TR3TR6 TR4/4A TR4 Transmission Question [non overdrive] Triumph 11
G How sweet if was AND overdrive question Triumph 22
Tinkerman TR2/3/3A Overdrive Switch question. TR3A, Problem Solved! Triumph 10
TR3TR6 J-type overdrive question Triumph 5
PAUL161 72 Overdrive rear oil seal question. MG 0
71tr J-type Overdrive Pressure Port Question Triumph 2
Monark192 MGB-GT 67 BGT - Overdrive Trouble Shooting Question MG 0
Monark192 MGB-GT 67 GT Overdrive trans oil change question. MG 6
7 question after testing a J type overdrive Triumph 5
roofman Spitfire 1975 Spitfire overdrive question Triumph 6
T MGA MGA overdrive - that is the question MG 23
T Overdrive question - electrical Triumph 14
N And Another Overdrive Question MG 6
T TR2/3/3A TR3 overdrive question Triumph 5
6 Overdrive Escutcheon Question: Reversed? Austin Healey 1
curtis 100 overdrive question Austin Healey 5
Bob McElwee Overdrive Operating Valve Question Austin Healey 6
TR_Jim GT6 GT6 overdrive question Triumph 3
S Overdrive Question Austin Healey 2

Similar threads

Top