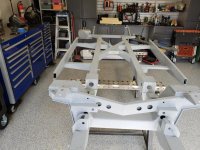
Just before of the front xmbr, and aft of the forward most LCA pivot are two (2) horizontal square tubes, each with a hole on their inboard ends; what are they for?
It's been a while, but I'm certain that my lower radiator to frame brackets sit flat on the leading edge of the crossmember, attached with two (2) bolts per side; the upper bolt holes being visible above the sq tubes in your picture below.
Custom radiator? Custom electric fan? Doesn't seem to be an ideal location for a suspension support brace, nor does it look to accommodate a removable crossmember.
You got me, I give up... ? ?
There are going to be times during your build that you'll just want to throw the whole thing in the pond (we have a couple of ponds surrounding half our lot, and "I feel like throwing *it* in the pond!" is my standard threat when some
inanimate object gives me grief...). You'll want to persevere until you've mastered the situation, but I find that if I
just walk away, what seemed insurmountable only an hour before can be more easily accomplished with a fresh outlook.
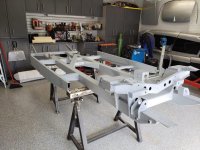
Looks like you have an ideal work setup__gorgeous shop BTW__and I'm more than a little envious, wishing I was embarking on a full scale project myself! Perhaps within the next year, as I'm winding down working on other people's cars, so maybe I can do something for myself again.
 Hey - did you know if you click on the title of a thread it will take you to the first unread post since you last visited that thread?
 but were afraid to ask:
  STOP!! Never post your email address in open forums. Bots can "harvest" your email! If you must share your email use a Private Message or use the
  smilie in place of the real @
 Pretty Please - add it to our Events forum(s) and add to the calendar! >>

 Hey there Guest!
 A friendly reminder - be careful what links you click on here. If a link is posted by someone you don't know, or the URL looks fishy, DON'T CLICK. Spammers sometimes post links that lead to sites that can infect your computer, so be mindful what you click.
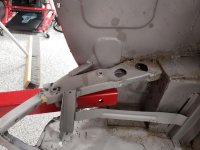

.jpg")