• The Roadster Factory Recovery Fund - Friends, as you may have heard, The Roadster Factory, a respected British Car Parts business in PA, suffered a total loss in a fire on Christmas Day. Read about it, discuss or ask questions >> HERE. The Triumph Register of America is sponsoring a fund raiser to help TRF get back on their feet. If you can help, vist >> their GoFundMe page.
  • Hey there Guest!
    If you enjoy BCF and find our forum a useful resource, if you appreciate not having ads pop up all over the place and you want to ensure we can stay online - Please consider supporting with an "optional" low-cost annual subscription.
    **Upgrade Now**
    (PS: Subscribers don't see this UGLY banner)
Tips
Tips

TR2/3/3A And so begins the body work...

raskas

Member
Country flag
Offline
Hello everyone

I have recently inherited a 1955 Tr2 that im beginning a full restoration job on, ive just got the tub back from being alkaline dipped to remove paint and rust. Ive made a quick video showing the work to be done

https://www.youtube.com/watch?v=mziSSlCKtAk

I have a question for the Tr experts here regarding the bracket welded to the chassis, that locates the handbrake cable. Mine was damaged and ive had to do a remake, but i have no idea how long it should be ? Does anyone have a measurement for me ?

Thanks, Cam
 

M_Pied_Lourd

Darth Vader
Country flag
Offline
Hi Cam,

Good luck with the Body Work..just starting the same on my 59 3A.

Do you happen to know if that bracket is the same for all sidescreens regardless of year? Are you talking about the bracket where the cable runs through with the pinch bolt?
Ok, watched the video...ill try and get a measurement today unless someone beats me to it that has a bare frame kicking around.

Cheers
Tush
 

M_Pied_Lourd

Darth Vader
Country flag
Offline

CJD

Yoda
Country flag
Offline
Hey Cam...welcome!

Dave, you are a saint, jacking up your car for a fellow Triumph owner! Wish I read this post earlier, as I just happen to have a spare TR2 frame here...in...like...my office!?!


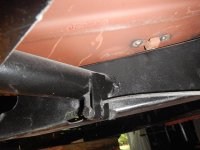
I can't really add anything Dave didn't already. But, just to confirm, I measure the total length of the long leg to be 2-1/4", and the length of the short leg is 1-1/8". Of course the short leg welds where it contacts the bottom of the tube, and the long leg is about 1/2 way up the front of the tube, so the tab is vertical. The inside edge of the tab is 3/4" outboard from the longest edge of the tube (farthest right in my pic).

Look forward to following your project!

Also, I notice you have a scuttle vent...that makes your car somewhere between #6501 and about 8500? You don't see many TR2's with the vents.
 

DavidApp

Yoda
Gold
Country flag
Offline
Hello Cam

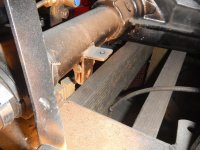
I am going to add my 2 photos. One shows the mount on the rear axle. I did not bother to measure them as John and Tush have done that already.

Looks as though you have made a good start on the car. I like the look of the alkaline dip and finish they applied.

If you have not already got a copy of Roger William's book How to restore Triumph TR2, TR3, 3A, 4, 4A you should try to get one. A lot of great information in it. I gather there was another book by Bill Piggott that is also great but out of print and goes for silly money on E Bay.

I will look forward to following your project.

David

Hand brake cable mount front..jpgHand brake cable mount rear..jpg
 
Last edited:
OP
R

raskas

Member
Country flag
Offline
Hey thanks for all the reply's, measurements are much appreciated, ive got TS8608 ... one of the last TR2s ever built i believe. I do have the Bill Piggott book Original Truimph TR which has been very useful..although does show the car to be a bit of a Frankenstein TR2 with some of its finer details !

Cam
 
OP
R

raskas

Member
Country flag
Offline
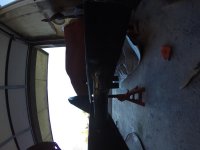
John, even more interesting in that chassis pic is the model plane, is there a story to that beast?.. i have had some experience with control line flying in my distant past
 

CJD

Yoda
Country flag
Offline
Funny, the plane has been sitting there so long I don't even notice it! The story is I used that plane to test a new servo mounting system, that I eventually got a patent to. RC planes normally have a short life-span, but I flew that one every day for 5 years demonstrating the controls. Most of my flimsy planes get crunched if I store them in the attic or shed, so out of respect for how well it held up for so long, it has been sitting on the sewing table for many, many years.

I started with control line planes too, in second grade, and have drifted in and out of the model plane hobby several times over the years. On the out years I restore a car or two, and then drift back into the RC flying. I'll likely take up RC once again when I finish this TR2 project. I'll definitely be ready for a break after 4 years on one car!

https://www.durantdirectdrive.com/
 
Similar threads
Thread starter Title Forum Replies Date
Baz 2012 Mini CEL - Now it begins........ British Motor Corp 0
longbridgehealey And so it begins....... Spridgets 6
Bayless Progress finally begins Spridgets 5
Westcoast M5 The Journey Begins - BJ8 restoration Austin Healey 74
Jim_Gruber Decopnstruction of Rear End over, Reconstruction Begins Spridgets 4
S And so it begins again Spridgets 48
Jim_Gruber And so it begins - Bugsy II - Floorpan Replacement Spridgets 1
drooartz Penny's bodywork begins Spridgets 131
bugedd The journey begins....maybe Spridgets 9
drooartz The teardown begins, follow along at home! Spridgets 51
simon1966 The BN1 resurrection begins today. Austin Healey 7
Jeepster Now the fun begins! Austin Healey 30
60Bugeye Bodywork Odyssey Begins Spridgets 3
Basil The Tank Saga begins Jaguar 9
O And so it begins...again Triumph 16
PAUL161 Restoration Slowly Begins MG 16
MadRiver And so it begins MG 1
J And so it begins! Triumph 20
hondo402000 The Painting begins Triumph 44
G MGB 1971 MGB...The Project begins! MG 24
drooartz The week of Tunebuggery begins! Spridgets 3
B Voting begins for Midget 50th National Venue!! MG 1
B Voting begins for Midget 50th National Venue!! Spridgets 26
JPSmit Wiper Motor - the saga begins Spridgets 5
S My Jaguar Adventure Begins Jaguar 22
Monark192 MGA MGA Restoration Begins MG 3
Dadandson Now the Fun Begins Spridgets 16
T The Battle Begins Triumph 104
Brosky Powder coating begins next week Triumph 2
tosoutherncars Front-End Rebuild Begins!! ['78 1500] Spridgets 8
Brosky Bumper rechroming project begins... Triumph 23
B The rebuild begins! Austin Healey 6
sideache My Barn Find Resto begins Spridgets 27
A And so it begins!! Spridgets 3
B painting begins on the BE! Spridgets 11
Brosky New Overdrive adventure begins tomorrow Triumph 15
siberian TR6 New TR6 owner, the adventure begins! Triumph 8
T Back from Daytona and Jag IRS work begins! Triumph 7
J Can a TF engine be installed in a TD body? MG 7
D Wanted Square body LCS fuel pump Austin Healey Classifieds 13
D Wanted Wanted square body fuel pump Jaguar Classifieds 0
Got_All_4 TR6 Seal To Body Mounting Bracket Welded? Triumph 7
K TR6 Goodparts Trail arm kits mounting just to the frame( no body) and shims? Triumph 9
Editor_Reid V-12 E-Type Body Number Location Jaguar 3
5 MGA Body and Chassis Separation? MG 2
Bayless How does '67 Sprite top attach to body? Spridgets 3
Rod-H TR4/4A TR4 Body Number Plate Supplier Triumph 6
1 TR2/3/3A Best Rustproofing for inside of body. Triumph 7
K TR2/3/3A The "wide body" TR3? Triumph 6
W TR2/3/3A Interior and Body Colours Triumph 14

Similar threads

Top