• Hey there Guest!
    If you enjoy BCF and find our forum a useful resource, if you appreciate not having ads pop up all over the place and you want to ensure we can stay online - Please consider supporting with an "optional" low-cost annual subscription.
    **Upgrade Now**
    (PS: Subscribers don't see this UGLY banner)
Tips
Tips

Started working on the Healey again

GregW

Yoda
Platinum
Country flag
Offline
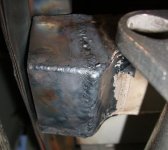
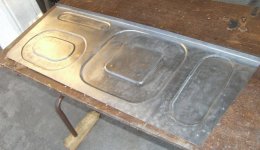
Well, the car has been sitting unloved for about 9 months and I just got back into it. The outer edge of the front outrigger had been torched off at the body shop, so I had to make a new piece. I decided to have the bottom taper up where it attaches to the sill so there wouldn't be that 1/4" gap that many cars have. I have to say, it was kinda fun using the torch again, but welding underneath is a little bit of a challenge. I also decided not to repair the main floor section. It was just easier to scrap it. I was somewhat disappointed with the Kilmartin part being thinner at 20ga., so I thought I'd try to make one. I bought a piece of 18ga. mild steel and used a bead roller I bought several years ago. Once the shapes were made, it took a lot of shrinking to get the floor back from looking like a potato chip. Here are a couple photos for fun.
 

Attachments

  • 19895.jpg
    19895.jpg
    47.8 KB · Views: 430
  • 19896.jpg
    19896.jpg
    33.9 KB · Views: 433
  • 19897.jpg
    19897.jpg
    42.7 KB · Views: 606
OP
GregW

GregW

Yoda
Platinum
Country flag
Offline
Yeah, past time. I'll blame it on creative avoidance. Trying to maximize space inna' garage. I made some shelves to span the width of the garage and get things out and off the car so I could work on it.
There are some flaws in the floor panel, but between the carpet and the heatshield, It will be fine. I wanted to get some practice on the shrinker/ stretcher before I tackle some curved pieces.
 

Barryp

Senior Member
Country flag
Offline
Hi Greg,

Nice work. What are you using for a torch? I just bought a Henrob 2000 to replace my 50 or 60 year old Airco set, and am vey happy with it.


Barry
 

dougie

Luke Skywalker
Country flag
Offline
Hey Barry-

That's the same one I have and love it. I've been able to do a lot of repairs and additional chassis gussets with it.

Dougie
 

vette

Darth Vader
Country flag
Offline
Hi Greg,
Your floor panel looks real good. Its good to hear your back on the Healey project. That quality time sure goes a long way.
Just thought I'd tell you about alittle adjustment I made when I put in the new floor panels on my Healey. I didn't like the way the floor panel lays on top of the frame rail. This just is looking for trouble with junk and water coming up from underneath and laying on top of the frame rail rotting it out again. So I took the time to bend a reverse 90 on the sides of the floor panel that meet the frame and outriggers. Bent it down to lay against the frame sides. Did continous seam welds along the frames sides to make the attachment. This then leaves the top of the frame rail inside the cockpit, with the floor panels flush with the top of the frame. It helps to make the floor alittle more ridgid as well and keeps water off the top of the frame. Of coarse the frame is then coated with the inside of the floor and all is sealed real well. IMUHO!.....

Dave C.
 
B

BUNDYRUM

Guest
Guest
Offline
Hello GregW,

Great to hear you're back at it again. There are times when for whatever reason you just need to be away from it. Starting back is a lot of fun good for you. We can see you haven't been at it a while because your fingernails are clean and trimmed. Not dirty and broken.

I have often wondered about that little mismatch at the end of the outrigger. It's almost as if it's done on purpose but we don't know the purpose.

Floor panel looks extremely good, now that's what I would call satisfaction on a job well done.

Best regards,

bundyrum.
 
OP
GregW

GregW

Yoda
Platinum
Country flag
Offline
Barryp said:
What are you using for a torch? I just bought a Henrob 2000 to replace my 50 or 60 year old Airco set, and am vey happy with it.


Barry
Yeah, I have a Henrob also. I bought it about nine years ago and has served me well. It has worked well on my aluminum projects too.
 
OP
GregW

GregW

Yoda
Platinum
Country flag
Offline
vette said:
I took the time to bend a reverse 90 on the sides of the floor panel that meet the frame and outriggers. Bent it down to lay against the frame sides.
Now there's an idea I never thought of. I guess it is too late for me, I already installed the floor. I punched a series of holes along the perimeter of the floor to make plug welds, simulating spot welds.
 
Country flag
Offline
GregW said:
vette said:
I took the time to bend a reverse 90 on the sides of the floor panel that meet the frame and outriggers. Bent it down to lay against the frame sides.
Now there's an idea I never thought of. I guess it is too late for me, I already installed the floor. <span style="font-weight: bold">I punched a series of holes along the perimeter of the floor to make plug welds, simulating spot welds.</span>
That's my preferred method of attachment too; you can do it (by skipping around) and get very little heat build up.

Once all the repaired sections are cleaned and primered (DP50/401 epoxy-chromate is, again my 1st choice) there are very good seam-sealers available that will prevent any moisture from getting between the new floor and top of the frame.

If you follow that step with a stone-chip preventing coating (Fusor 805) and then your top (color) coat, it'll be virtually bullet-proof. The Fusor 805 also dampens the panel to reduce noise, like the stones flying up.
 
OP
GregW

GregW

Yoda
Platinum
Country flag
Offline
Last night I made that piece in the trunk that covers the gas hose. Got mostly done, it was dark and I had cleaned up. I though, might as well punch the holes for welding. When I was done I realized I had punched too many sides :wall: 
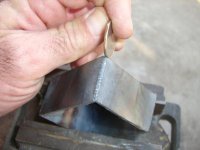
If something is worth doing right, it's worth doing twice. Doing it today only took 'bout 1½ hours. The bend at the top to clear the shroud turned out better too.
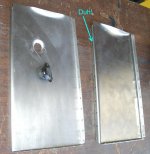
 

Attachments

  • 19923.jpg
    19923.jpg
    56.1 KB · Views: 254

bob hughes

Luke Skywalker
Country flag
Offline
Greg

Shame about that Kilmartin panel, I thought that they were supposed to be the dogs. We can get thicker units over here from AH Spares, cost a little more but better. I must dsay that you have done a great job on that floor section.

Bob
 
OP
GregW

GregW

Yoda
Platinum
Country flag
Offline
Bob Hughes said:
Shame about that Kilmartin panel, I thought that they were supposed to be the dogs.
I think for a smaller company, it has to be a trade-off between accuracy vs. strength. The cost of equipment to press thicker steel must be enormous. There is a show I like called "How Its Made". The hydraulic presses they show making pots or barbecues are huge. A sister show (Factory Made) said a company used a 900 ton press to form a casket lid.
I've seen a stack of AH Spares rear inner fenders when I was in the Moss warehouse. They looked handmade since each one was vastly different, I'm talking off by an inch in some places. So they may have opted not to buy a big press in order to use thicker stock. Just a guess.
 
Similar threads
Thread starter Title Forum Replies Date
Eeffoc TR4/4A Out of the blue - started to loose power Triumph 17
J Finally getting (re) started on the Bugeye Spridgets 27
Tr3aguy TR2/3/3A Started a Car revival channel for the TR3 Triumph 12
T TR6 Car has always started without fail.....until now Triumph 10
Bayless Started adapting the datsun gearbox today Spridgets 46
J TR2/3/3A Finally getting started Triumph 20
Jim_Gruber 210 Tranny Case Mods started this evening Spridgets 15
G TR4/4A YAY! It started!!! Triumph 16
S TR2/3/3A Frustration has started but car wont. Triumph 4
HighAltitudeTR3 TR2/3/3A Just started burning some oil... Triumph 8
M_Pied_Lourd TR5/TR250 Started my TR250 Restoration Project..... Triumph 16
J TR2/3/3A Finally started 17 year old rebuilt motor! Triumph 3
J TR2/3/3A Joe the TR3 Guy getting started with suspension Triumph 4
David Townsend Sprite Illustration Started Spridgets 31
David Townsend Sprite Illustration Started Austin Healey 7
David Townsend 100M Illustration Started Austin Healey 32
M_Pied_Lourd TR2/3/3A TS44836LO Resto Started Triumph 6
drooartz MGB-GT Conversion has started - splines to studs MG 51
jaegzie Long time since I've been here but progress has started. Bigeye rebuild Spridgets 9
Keith_M Bugeye Restoration Finally Started Spridgets 37
M My '65 suddenly started running bad today Spridgets 37
simon1966 Started to dig out the 100 Austin Healey 3
oxford New owner BN4. Work started . More questions. Austin Healey 13
T moved post from ZS 1500/started new Spridgets 4
I Help - can't get my bugeye started Spridgets 17
S TR2/3/3A TR-3 hard to start, but runs well once started Triumph 5
J Finally got my '56 started Triumph 3
R TR2/3/3A TR3A Finally started Triumph 6
Scott_Hower Hap started my head... Yay! Spridgets 13
rikiwho123 i started my 1300 Triumph 0
R MGA ITS ALIVE! MGA Started After Sitting 4 Years MG 1
I TR6 Getting a TR6 started again-where do I start? Triumph 9
M Project started-switching dash Spridgets 17
R MGB Getting started with the MGB - first questions MG 13
Nelson It started! Spridgets 5
J Rover engine that started as Buick? Rover / Land Rover 9
scoutll Car suddenly started running poorly Spridgets 17
doughairfield Trying to get my motor started Triumph 8
JPSmit It has started Spridgets 4
pjsmetana Started instantly... without my choke! How? Why? Triumph 5
doughairfield TR4/4A HELP not able to get my TR4 started Triumph 104
6 got it started Triumph 4
M It started! Triumph 5
LastDeadLast Offically started my hardtop project - Question Triumph 5
Brosky Dash panel replacement page started Triumph 0
R '67 Midget engine started for first time in... Spridgets 9
JodyFKerr Finally getting started Austin Healey 1
2wrench MY CAR HAS STARTED....PICS/VIDS NOW WHAT? Triumph 11
B started a rebuild of a 62 sprite. HELP required! Spridgets 20
B started a rebuild of a 62 sprite. HELP required Austin Healey 1

Similar threads

Top