Healey Copter
I found the following information on line relative to removing the steering wheel. I think this might be helpful.
Stretch
Removing the Big Healey Steering Wheel
by Gary Anderson
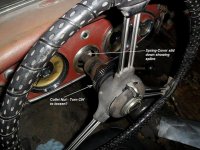
Photo 1
Removing an adjustable steering wheel to replace it or to replace the steering column wiring harness is one of those jobs that is easy, if you know the right secrets. Otherwise, it can be a frustrating Chinese puzzle with the risk of ruining a very expensive trafficator. This article walks you through the process, which takes as nearly as long to explain as the job takes to do.
Steering wheels eventually wear out and require replacement. A horn or turn signals that don't work may very well be due to a frayed or shorted wire requiring replacement of the steering column wiring har¬ness. Removing and replacing a steering wheel, or even re¬placing the harness is actually not too difficult and takes less than an hour to complete.
The only tools required are a pocket¬size flat blade screwdriver, an awl or another thin bladed screwdriver, and a small needle-nose pliers to replace the wheel, and some strong cord and electrical tape if you need to install a new harness. If you need to replace the wir¬ing harness, make sure you have a new one before remov¬ing the old one (most suppliers don't seem to have them, though Healey Surgeons was getting them made, last! heard).
The easiest place to do the job is from the driver's seat with your lap covered by a big towel to catch any errant parts. Here's the way to do it, step by step.
1. Remove the horn button by prying off the chrome retaining ring. Be careful; there is a spring between the contact plate under the horn button and the trafficator hub. Ignore the screws you uncover. These are not to be touched.
2. Remove the entire trafficator assembly by loosening the three set screws in the steering wheel hub behind the inner wheel rim. The trafficator assembly will now slide straight out of the wheel hub (Photo 1). There should be enough slack in the steering column harness to withdraw the assembly about ten inches. (If you encounter tightness, you may have to check the wire har¬ness in front of the steering box under the car to make sure the lower end of the harness isn't binding some¬where around the radiator. If there doesn't seem to be enough slack, you can dis¬connect the wires at the end of the harness from the connectors to the turn sig¬nals and horns.)
3. Unfasten the directional assembly from the back plate. This is where the first trick comes in. The directional assembly is held to the back plate by three screws that are in turn covered by a spacer and accessible through holes in the directional return plate and keeper plate (See Figure 1). The screws are exposed by pressing back the release tab on the spacer to release it from the notch in the back plate and rotating the spacer until the openings in the spacer line up with the access holes in the return and keeper plate. (See Figure 2). The three small screws can then be removed from the back of the assembly through the access holes. There is no reason to un¬fasten the directional assembly back piece from its front piece.
4. Unfasten the wires from the directional assem¬bly. Slide the return plate and stator tube back up into the steering column. The assembly should now look like Photo 2. Referring to Figure 3, rotate the directional indicator knob behind screw b (green and yellow wire,) then remove the nut as shown in Photo 3. As soon as the wire is loose, replace the nut. Moving the directional indicator to a position behind the nut you are removing prevents the screw from falling into the inside of the directional assembly. Repeat this process for the wires on screws c and d. The last wire (brown and black) can be easily removed since the head of its screw extends through the assembly into the horn button cavity. With the wires unfastened, the directional assembly can now be set aside.
5. Remove the stator assembly by sliding it down the wire and off. You might have to line up the ring fasteners of the four wires and wrap them with a little tape to get this off. At this stage, you can move the pieces to the work¬bench. They will look like Photo 4. The stator assembly is likely to be pretty grungy. You might want to clean it with some carburetor cleaner and spray it with WD-40 before replacing it. Don't take the stator assembly apart; the tabs in the back plate that fasten to the keeper plate are easily broken
6. Remove the steering wheel. Sec¬ond trick: the steering wheel is held in place with a small retaining ring in a groove in the steering column to keep it from sliding off. This is removed as shown in Photos 5 and 6 (Note that the hub in these pictures is for a wooden steering wheel which has been removed from the hub) Use an awl to lever one side up, slide a screwdriver blade under that side of the ring, then use the awl to lever up the other side. This is a little tricky but not that difficult. With the ring removed, loosen the adjuster nut and slide the wheel, hub, and adjuster nut off the steering column.
7. Removing the Steering Column Harness. If you don't need to do this, skip to step 9. If you do, then go back under the car, unfasten the connections to the wiring harness (noting where the connectors are, of course) and tie a piece of strong cord or heavy fishing line about 15 feet long (trick 3) to the end of one of the wires. Now withdraw the harness up through the steering column into the car, leaving the cord extending down through the steering column.
8. Install the new harness. Tie the end of the cord inside the car to the longest of the wire connectors on the end of the new harness. Then (next trick) wrap the connectors with electrical tape into a long thin bundle, aligning each of the connectors with the others so that the bundle is no thicker than the wiring harness and comes to a point at the end where the cord is tied on. With the help of a second person at the front of the car pulling on the cord, thread the wiring harness down into the steering column, twisting it (trick 5) with a rotating motion as you push it down into the steering column. About half-way down it may hang up since you have to get it to go into the lower stator tube, which is a smaller diameter than the steering column. Wiggle it and slide it up and down with the help of the person on the string end and you'll eventually get it to go through. Once at the end, take off the tape and connect the wires, making sure to match the colors of each of the harness wires with their respective wires behind the grille.
9. Putting it all back together. Assembly is essen¬tially the reverse of disassembly, except:
•
o a. When you slide the new steering wheel onto the column, make sure the front wheels are pointing straight ahead and the steering wheel is aligned with the spokes at the 12 o'clock, 4 o'clock and 8 o'clock positions.
o b. Be sure you get the wires fastened to the proper screws, as indicated in Figure 3, and repeat the process of lining up the turn signal knob behind each screw before removing its nut.
o c. When you slide the stator as¬sembly in, the groove in the stator tube must be at the top to mate with a ridge inside the steering column, otherwise it won't go in all the way.
o d. You may find that the set screws supplied with your new steering wheel are too short. Get longer ones or use the ones from your old wheel.
Photo 2
Photo 3
Photo 4
Photo 5
Photo 6
Austin-Healey Magazine. January 1992
 Hey there Guest!
 Hey - did you know if you click on the title of a thread it will take you to the first unread post since you last visited that thread?
 but were afraid to ask:
  STOP!! Never post your email address in open forums. Bots can "harvest" your email! If you must share your email use a Private Message or use the
  smilie in place of the real @
 Pretty Please - add it to our Events forum(s) and add to the calendar! >>
 A friendly reminder - be careful what links you click on here. If a link is posted by someone you don't know, or the URL looks fishy, DON'T CLICK. Spammers sometimes post links that lead to sites that can infect your computer, so be mindful what you click.