• The Roadster Factory Recovery Fund - Friends, as you may have heard, The Roadster Factory, a respected British Car Parts business in PA, suffered a total loss in a fire on Christmas Day. Read about it, discuss or ask questions >> HERE. The Triumph Register of America is sponsoring a fund raiser to help TRF get back on their feet. If you can help, vist >> their GoFundMe page.
  • Hey there Guest!
    If you enjoy BCF and find our forum a useful resource, if you appreciate not having ads pop up all over the place and you want to ensure we can stay online - Please consider supporting with an "optional" low-cost annual subscription.
    **Upgrade Now**
    (PS: Subscribers don't see this UGLY banner)
Tips
Tips

Upper wish bone ??

Norton47

Jedi Warrior
Offline
Hey I am home and hip deep in Triumph projects.
I went to install the new upper wishbone bushings and the wishbones are installed opposite ways from each other.
I have a picture at https://s225.photobucket.com/albums/dd50/Norton47/Engine%20Pull/
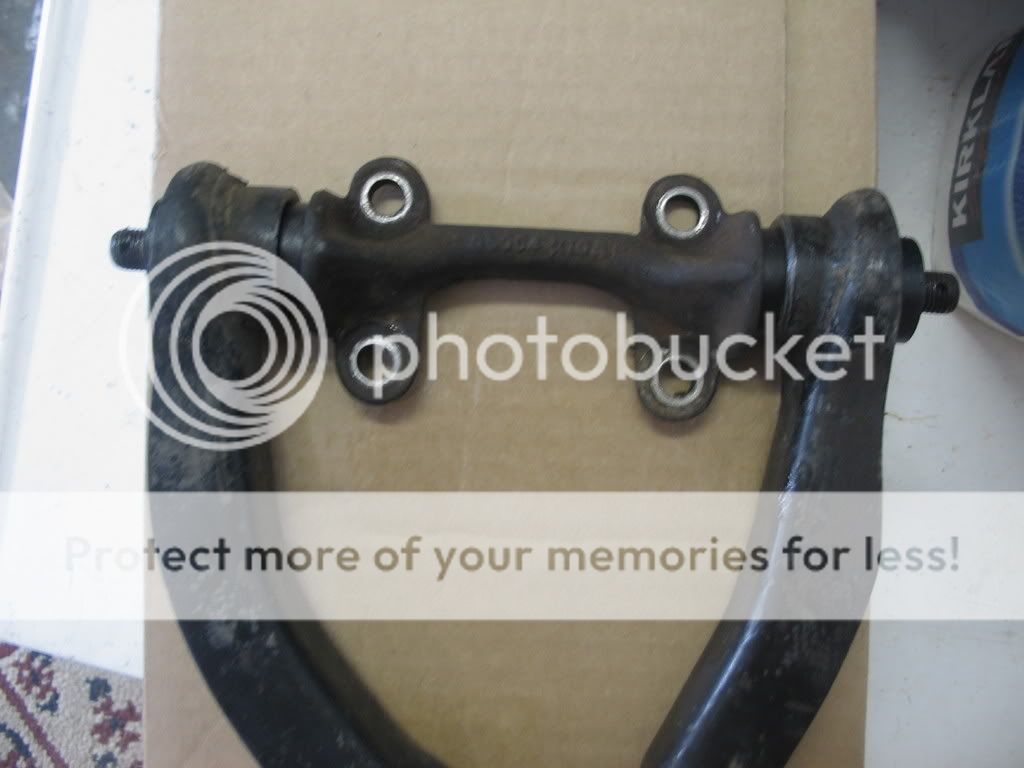
This is the left side. It is assembled in the photo to match the right side. This is the way the right side is currently. When I took the left off it was reverse to the photo. That being the mounting ears with the longer distance were on the inside. Not the outside as they are in this photo.
Are they suppose to be different or the same. It goes back together easier this way clearance wise and was a pain to get out the way it was installed.
With them installed reversed wouldn't it cause different geometry when compared to the other size?
 
T

Tinster

Guest
Guest
Offline
Norton!

I've been exactly where you are right now. I'm a
non-mechanic TR6 owner but I managed to replace my
front suspension with some kind help from the forum
and from Banjo Ben on the upper A-arm problem.

Here are a few photos and text of my install of the
upper A-arms. Might not be the best way but it seems
to hold together and rides pretty good.

I apologise to the TR gurus in advance for any obvious
blunders I might have made. But it holds together. If
you get a better solution, take it.

dale


https://www.scribd.com/doc/331575/TR6-fulcrum-bushings
https://static.scribd.com/docs/96ylntb6u4ep3.swf?INITIAL_VIEW=width
 

DNK

Great Pumpkin
Country flag
Online
IMG_8037.jpg
 

heliguy

Jedi Hopeful
Offline
The picture above shows the way the fulcrum pin should go on a TR3, with the curve following the curve of the shock turret. On a TR4 the pin can go either way depending upon the serial number of the car. On a TR4a, TR250 and TR6 the pin should go the other way, with the "curve" going against the shock turret.
 
OP
N

Norton47

Jedi Warrior
Offline
I don't understand the last part "the curve going against the shock tower.
That seems to contradict the part that says the fulcrum pin should go opposite of the way it is in the picture. The picture is now named properly as Left side.
Do you mean away from the shock tower?
Dale's picture appears to have it oriented reverse of what my photo is. Which would match I think, heliguys statement, the pin should go the other compared to a TR3. With a TR3 installation matching the photo I posted and DNK added to one of the previous replies.

Sorry still don't feel that this is totally clear to me.
Try it this way. Is the curve of the fulcrum pin towards the engine or away from the engine?
Also to confirm both sides are symmetrical?
Thanks
 
OP
N

Norton47

Jedi Warrior
Offline
Thanks Paul
That will do the trick. So the PO had one on one way and one the other.
That has to affect the front end alignment.
I assume I should plan to have a re-alignment when I get back on the road?
 

Brosky

Great Pumpkin
Offline
Yes, you should have that done before driving very much.

Also, pay attention to the bolts that go through the ball joints. They are to be installed with one facing forward and one facing to the rear on each side.

In the above picture, the rear unit is the left side arm assembly. That will put the outboard bolt heads facing the front of the car and the inboard bolt heads facing the rear.
 
OP
N

Norton47

Jedi Warrior
Offline
Thanks again.
PO had one side with the one each way and the other side both the same way.
 

heliguy

Jedi Hopeful
Offline
There you go, the picture is worth a thousand words thing again. I really need to learn how to post pics!
 
OP
N

Norton47

Jedi Warrior
Offline
Paul
Just to double check is the rear on the one to the left?
 

Brosky

Great Pumpkin
Offline
OK, here we go, based on looking at three chassis, which were all different in one way or another, but confirming the assembly process with Dave at TRF.

The fulcrum shown above in Don's picture was actually made for the TR2 & used later on the TR6's and when installed properly on the TR6, it would have the bigger portion of the cutout or the "U" shape facing inward towards the engine. So, the assembly in Don's picture is supposedly reversed as far as the fulcrum goes.

Now for each arm. Each side has one of each and they are assembled as follows. The arm with the bigger curve is installed in the front of the car, so that if you were looking down on it, it would bow away from the front, with the straighter arm in the rear. There are letters stamped into each side of that bowed arm that are and "L" on one side and an "R" on the other. When properly assembled, the letter will be matched to the side of the car that is was assembled on; i.e. looking down from the top, the left side will have and "L" in the front and the right will have an "R" arm in the front and both fulcrums will have the "U" shape facing inward towards the engine.

This is the arm, installed on my car with the "R" facing up in the forward position. I'm sorry that I didn't get the position of the fulcrum in this shot, but my previous picture above shows the correct relationship of the fulcrum to the arms as it mounts to the frame.
 

Brosky

Great Pumpkin
Offline
I just read Dale's post and reviewed his pictures and it should be just like his.

Why did I bother calling Dave at TRF, when I have Dale at BCF?????

Heliguy had it right too, I just added pictures.
 
OP
N

Norton47

Jedi Warrior
Offline
Thanks everyone for all the work.
I have pieced it all together and have everything mounted.
Checks out correct to this last information.
It really throws you when taking something apart and it had not be assembled right by the previous mechanic. Makes you question everything.
Thanks again.
 

DNK

Great Pumpkin
Country flag
Online
Paul- if the Don you speak of is me, that is actually Norton's photo. I just stuck it in so it would be easier to follow
 

Brosky

Great Pumpkin
Offline
Don,

I just wanted to point to you as the poster, so as not to confuse it with my earlier post that had pictures in them. At the time, I wasn't sure where it had come from, until I looked back at Norton's bucket photos.

Thanks for posting it, though. It served as a good reference point.
 
Similar threads
Thread starter Title Forum Replies Date
TunaJ Will MGB Upper Seat Runners work with Midget seat rails? Spridgets 1
Rut MGB 62-67 upper MGB steering shaft MG 3
Racer-X- Metalastik Lower wishbone bushings and upper fulcrum pin bushings Other British Cars 6
P MG TD Bonnet Upper Sections MG Classifieds 0
pkmh BJ8: Upper Trunnion Rebuild [Of Continuum] Austin Healey 9
R TR2/3/3A Upper Wishbone Bushings Triumph 12
L TR2/3/3A Upper steering column bushing Triumph 8
M TR2/3/3A Upper Fulcrum Orientation On TR3A with Late TR4 Upper Control Arms Triumph 6
K TR2/3/3A Upper shock mounting rubber bushs ? Triumph 1
B Wanted 100-6 or early 3000 upper and lower grille opening pieces Austin Healey Classifieds 1
D 62 tri-carb upper fulcrum pins Austin Healey 4
J TR4/4A Upper steering flex coupler Triumph 4
R TR6 Body Parts Source, Upper Midwest Triumph 6
S TR2/3/3A lube for upper A bushings Triumph 2
R TR2/3/3A Replace Upper Wishbone Ball Joint Triumph 4
R TR2/3/3A Replace Upper Wishbone Ball Joint Triumph 15
B MGB Installing new upper fulcrum bushings MG 5
B MGB Installing upper fulcrum bushings MG 0
mt10flyer TR2/3/3A poly bushings - upper wishbone Triumph 2
J TR4/4A confirm upper wishbone arms Triumph 11
KVH General TR Upper Control Arm Reversed? Triumph 5
Joe Reed MGB Another easy fix....upper radiator bracket MG 5
vickxxx TR2/3/3A Upper cylinder oiler Triumph 8
B TR2/3/3A Upper Control Arm - which overlaps which? Triumph 2
GTP1960 TR2/3/3A Tire condition, upper side wall splits...dangerous? Triumph 12
D Re-fitting vinyl on center upper console bj8 Austin Healey 3
S TR4/4A Reversing upper fulcrum link Triumph 3
T TR2/3/3A Has anyone put late TR4/4A upper A-arms and ball joints on TR3? Triumph 3
Morris OOS Upper Link Spridgets 6
TRclassic3 TR2/3/3A SU Upper jet bearing position Triumph 5
T TR4/4A Upper steering column Triumph 3
G TR2/3/3A Steering Box Upper Bearing Race Triumph 1
C Sway bar upper installation help please Austin Healey 3
B TR4/4A Help on upper radiator support rod parts - what is required on TR3 compared to TR4? Triumph 5
B TR2/3/3A Adjustable Upper Fulcrum for TR3 Triumph 9
V Upper Ball Joints Triumph 16
B Upper radiator stay rods black or body color? Triumph 11
bcbennett '74 upper radiator hose Triumph 5
T TR2/3/3A TR3A upper windshield seal Triumph 12
I TR6 TR6 upper A post seals Triumph 0
T TR2/3/3A TR3 upper A arm bushings Triumph 6
D MK2 upper radiator hose question Jaguar 3
K loctie upper rod bushings Triumph 4
memphis Door Panel - Upper Piece? Austin Healey 8
JPSmit fixer upper Spridgets 5
Morris Upper link triangulation Spridgets 0
Steve An Upper-Crust Spot Today Spotted 4
PatGalvin TR2/3/3A TR3 Upper Wishbone Fulcrum Pins? Too Worn? Triumph 6
Tinkerman TR 3 Upper Column Felt Bush Triumph 7
jerrybny Upper C arm resistance Triumph 4

Similar threads

Top