Hi,
Cool! Looks pretty good in there, actually.
Do you want a few suggestions? Maybe you've already thought of and planned some things, now that you see better what you have to work with. I'll throw out a few ideas, just in case. Please forgive me if I mention something you've already considered.
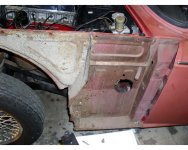
1. A little hard to tell, but it looks like you might need a new splash panel. That's the vertical part sticking out at a right angle from the inner fender, directly behind the tire. In the photo, the bottom appears to be rotted away. The splash panel inserts are very important to keep moisture and gunk out of that hidden compartment, as are the rubber seals on their outer edges and a liberal caulking of everything with seam sealer when it goes back together.
The splash panels are pretty widely available, or might just be made up relatively easily yourself, using the old one as a guide. However most that are sold or any you made up yourself would need finishing as well (semi-gloss black paint was original). On the other hand, The Roadster Factory offers splash panels already nicely powdercoated and ready to bolt in place, which might be a good deal.
2. See the plastic tube that serves as a drain for the scuttle vent? It dumps water into that hidden compartment, after which the water is supposed to drain out of a small gap between the bottom edge of the fender and the rocker where the fender bolts up. That gap is easily and often plugged up, forming a very nice trap for moisture and an ideal place for rust to get started! This is a key reason that many rockers and fenders rot out down there.
Can't be certain from the photo, but the rockers look reasonably good, too. If so - or even if you end up replacing them - you might want to rig up and attach an extension to that drain tube (first run a wire up through the existing tube to make sure it's not plugged up in any way) and route the extension down into the rocker (through a hole in that hidden horizontal area), make a turn and bring it out under the car through the inner wall of the rocker. That way, any drainage from the scuttle vent is sent right out under the car and can't get trapped. Some sealer around the new vent drain tubing where it goes through the rocker will keep that area dry inside, too.
3. Check the seam sealer around the front end cap on the rocker, too, where splash from the tire might send more moisture inside.
4. Some might try to replace that footwell wall with a new piece to correct for the speaker cutout. Since it's totally hidden on both sides, I'd be more inclined to weld in a patch.
5. The A-post looks solid, which is great. But I suggest to inspect the welds, especially at the base inside and out.
6. The rear fender will need to come off before you can completely determine if the rockers are good enough to use and sign off on them (and to inspect the B-post carefully, especially near its base, which unfortunately is more likely to rust rot out than the A-post).
7. While things are apart, its an opportunity if you wish to drill some 1/2" access holes along the inner rocker (inside the cockpit) and spray in some sort of rust protector like Waxoyl, thoroughly covering the inside of the rocker and its seams as best possible. The access holes can then be plugged up. There are kits to do this sort of rust prevention, available from various sources, complete with a sprayer to hook up to a compressor, the rust preventative materials and plastic plugs to close up the holes when done.
8. I extensively painted that hidden area behind the front fender, when my car was apart in 1979. I just used two or three heavy coats of Rust-O-Leum red primer, and then topped it off with a spray-on undercoating materials that acted as a bit of a sound deadener. That kept any rust from getting started in there and it's still in great shape today. Right from the factory, the hidden compartment (and the inside and fastening edges of the fenders themselves) got very little paint to protect them! Any extra coatings you might add can help protect the parts and are mostly hidden.
9. Note that when the fender is reinstalled, it needs to be very carefully sealed all along the top edge especially. This is to keep moisture out from both above and below.
10. If you do have to replace the rockers or floors, it can be a bit tricky on any TR4, especially on TR4A. On all models you need to watch that the A-post doesn't drop down when the old rocker is removed. On both TR4 an 4A I think it's best to replace these parts with the body on the frame, although care needs to be given to fuel and brake lines running under the floors, if any cutting or welding is being done! The door fit is critical, so it needs to be left in place or refitted frequently and checked during any work on the floors/rockers (most other TR4/4A body parts are fitted "around" the doors).
On TR4A in particular, the frame is more flexible so this sort of work needs to be done while the car is supported on it's suspension. If it's jacked up or sitting on jack stands postioned under the frame rails, for example, there's enough flex to throw everything off, which won't be apparent until the car is back down on the ground. Sitting directly on the tires and wheels as shown in the photo is great. But an alternative if a 4A needs to be raised and the wheels need to come off is to carefully use jack stands to support the car by its wire wheel extensions. (With wheels & tires on, a series of flat 2x10s can be stacked under each tire to raise the car, if that makes for easier access.)
Finally, personally I was never a fan of dipping car parts. I've seen too many nice, new paint jobs ruined when some hidden chemicals sneak out of a seam weeks or months after the job was done. I do use brushed-on and sprayed-on stripping chemicals on larger, flat panels, where I can be totally sure to get it all back off before painting. But I carefully keep it away from all joints and seams, instead prefer to media blast those areas. Just a thought and it's been a lot of years since I've even looked at the dipping process. The dippers might have worked out some effective solutions to the old problems by now.
Have fun!
/ubbthreads/images/graemlins/cheers.gif
 Hey there Guest!
 Hey - did you know if you click on the title of a thread it will take you to the first unread post since you last visited that thread?
 but were afraid to ask:
  STOP!! Never post your email address in open forums. Bots can "harvest" your email! If you must share your email use a Private Message or use the
  smilie in place of the real @
 Pretty Please - add it to our Events forum(s) and add to the calendar! >>


 Steering Rack Question / Removing a stubborn Front Shock Bolt - Progress on Bugsy II


 Removing connecting link between shock absorber and rear axle


 A friendly reminder - be careful what links you click on here. If a link is posted by someone you don't know, or the URL looks fishy, DON'T CLICK. Spammers sometimes post links that lead to sites that can infect your computer, so be mindful what you click.