• The Roadster Factory Recovery Fund - Friends, as you may have heard, The Roadster Factory, a respected British Car Parts business in PA, suffered a total loss in a fire on Christmas Day. Read about it, discuss or ask questions >> HERE. The Triumph Register of America is sponsoring a fund raiser to help TRF get back on their feet. If you can help, vist >> their GoFundMe page.
  • Hey there Guest!
    If you enjoy BCF and find our forum a useful resource, if you appreciate not having ads pop up all over the place and you want to ensure we can stay online - Please consider supporting with an "optional" low-cost annual subscription.
    **Upgrade Now**
    (PS: Subscribers don't see this UGLY banner)
Tips
Tips

TR2/3/3A TR3A -- Removing front brake pistons

deadair

Jedi Hopeful
Country flag
Offline
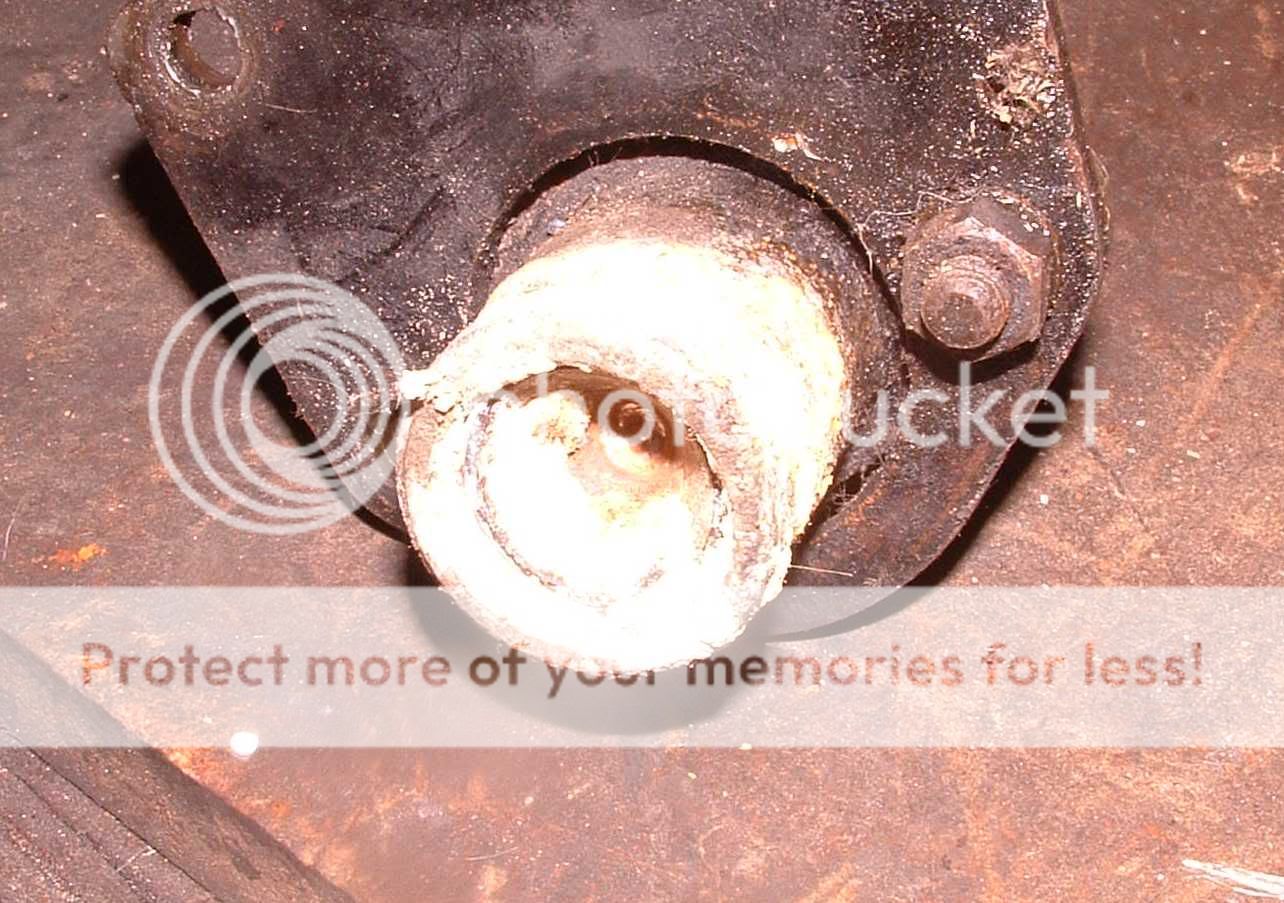
I'm having an impossible time removing one brake piston on each caliper. Here's what I've done so far:

1) Blown compressed air into the caliper. One piston comes out. It's the piston opposite the piston on the hose side on each caliper, which is the stuck one.

2) Pushed the removable piston back in and secured with a c clamp. Blow in compressed air. No joy on either caliper.

3) Removed the rubber seal on each stuck piston and sprayed WD-40 around each piston.

4) Repeat step 2. No joy.

5) Continue with steps 2 and 3 several times. No joy.

I've also tried prying the pistons out by inserting a pry bar in the piston groove and prying. No joy.

Any other ideas? I'm running out of my own.
 

TR3driver

Great Pumpkin - R.I.P
Offline
The classic method is to drill and tap a suitable bolt for a grease zerk, then pump the caliper full of grease. A standard grease gun will develop far more pressure than your air line. Be sure to clean thoroughly afterwords though, any grease left behind may cause sudden brake failure.

The method I generally use is to fill the caliper with a volatile solvent (like non-chlorinated brake cleaner), then block off both ports (the bleed valve from the other caliper will do to block off the hose port) and heat the entire caliper with a propane torch. Of course you have to restrain the piston that already moved, and it's best to have a piece of wood between the pistons (the stuck piston will come out like a bullet). Eye protection is also a good idea.

This method tends to be a bit more exciting, but is a lot easier to clean up afterwords (the heated solvent will vaporize instantly).

(Diagram from "More BS" by Bob Schaller)
 

Attachments

  • 21770.jpg
    21770.jpg
    6.1 KB · Views: 298
OP
deadair

deadair

Jedi Hopeful
Country flag
Offline
I never in a hundred years would have thought of either of those methods. It doesn't appear I could try one method and, in the event that doesn't work, would have the option to try the other method. So which method would you recommend?
 

mrv8q

Luke Skywalker
Country flag
Offline
I had good success with Randall's method of the zerk and grease gun. Messy but it works! As I recall, didn't have to tap for the zerk, just filled it with grease from the gun; going on 5 years' memory here, though. As memory serves, it wasn't too difficult....
 

TR4nut

Yoda
Country flag
Offline
Use the grease gun method. Less exciting, but safest!
 

hondo402000

Darth Vader
Offline
how about you really play it safe, hook your break line back to the caliper, and use the master cylinder to pressurize the calipers and push the piston out

Hondo
 

TR3driver

Great Pumpkin - R.I.P
Offline
TR4nut said:
Use the grease gun method. Less exciting, but safest!
Unless of course you don't get all the grease cleaned out. Having tried it both ways, I would rather something went BANG in the garage, than find I have no brakes at an inopportune moment. I lost my first TR3A because I discovered it had no brakes at all, after I was already headed down a very steep hill into an underground parking garage.
 

TR4nut

Yoda
Country flag
Offline
You and I are going to differ on this one Randall. Both methods need extreme cleanliness on the rebuild, so I don't see much disadvantage in using grease. But I do see a disadvantage when a piston flies across a room leaving a comet trail!
 

TR3driver

Great Pumpkin - R.I.P
Offline
No way can a caliper piston fly across the room; it gets stopped by the other half of the caliper. But especially on the early one-piece calipers, there are lots of nooks and crannies for the grease to hide in.

And even if it could go flying across the room (there is still a clutch slave piston hiding in my garage rafters somewhere), I'd rather dodge a flying piston than be headed for a concrete wall (or worse yet a busy intersection) with no brakes.

But that is exactly why I presented two different methods; you are welcome to take your choice. I've only been using the heated solvent method for 30 years or so, I don't really know if it works or not
grin.gif


DSCF0002_cropped.jpg
 

TR4nut

Yoda
Country flag
Offline
Not meant to be critical Randall, I know you use the method. But frankly I don't see how grease is any more a future failure risk than all the other gunk/corrosion byproducts that are already in the caliper - the heated solvent doesn't eliminate that issue. And if that logic holds the grease method is basically safer in my opinion.
 

TR3driver

Great Pumpkin - R.I.P
Offline
TR4nut said:
But frankly I don't see how grease is any more a future failure risk than all the other gunk/corrosion byproducts that are already in the caliper
Gunk & corrosion don't dissolve into the fluid to attack and soften all the seals in the system. Petroleum based grease does.
 

HerronScott

Darth Vader
Offline
Randall,

If you are heating the caliper (and possibly with the grease option as well), does this imply also splitting the calipers and replacing the seal between the halves to be sure there's no damage to it from the heat or does it take little heat to actually cause the fluid to vaporize?

I've only rebuilt 2 Triumph calipers (my TR4A and my wife's old Spitfire) and in both cases did not split the calipers so was curious.

Scott
 

TR4nut

Yoda
Country flag
Offline
Yeah, but gunk and the corrosion can lead to abrasion problems and seal failure - I think that's what killed a few of my previous attempts in the past. I just think with a thorough cleaning the grease should not be there anymore, nor should the gunk, to present a future problem.
 

TR3driver

Great Pumpkin - R.I.P
Offline
With the split type calipers, you are probably stuck separating the halves (against Girling's advice) either way. The only calipers I've ever had trouble getting apart were the earlier one piece design, and no way to split them (or seal to replace).
 

Jon80spit

Member
Offline
I was lucky. The rubber high pressure hose on my grease gun screwed right into my Spit caliper.
Be sure you put a block of wood between the pistons!
 
OP
deadair

deadair

Jedi Hopeful
Country flag
Offline
hondo402000 said:
how about you really play it safe, hook your break line back to the caliper, and use the master cylinder to pressurize the calipers and push the piston out

Hondo

That's what I ended up doing. Seemed to be the safest and least dramatic solution.

Now I've encountered other problems:

* I couldn't get the bottom lip on the dust seals to fit into the top cylinder groove AND stay put when installing the piston. What's the best way to do this.

* I also ruptured the lower seal when installing the piston. I has lubricated everything with brake fluid, so I'm not sure how to avoid this in the future.
 

TR3driver

Great Pumpkin - R.I.P
Offline
deadair said:
* I couldn't get the bottom lip on the dust seals to fit into the top cylinder groove AND stay put when installing the piston. What's the best way to do this.
It's been a long time, but ISTR I fitted the dust seal to the piston first, with the bottom lip hanging off the edge and the top lip only partway up the piston (not in the groove). I then manipulated the seal & piston into the caliper, so the lower lip was in it's groove and pushed the piston through the seal until the top lip slipped into the groove. In some places I had to tug on the seal just a bit to pull the top lip up, but in most places it just snapped into place.
<div class="ubbcode-block"><div class="ubbcode-header">Quote:]* I also ruptured the lower seal when installing the piston. I has lubricated everything with brake fluid, so I'm not sure how to avoid this in the future.
[/QUOTE]Sorry, can't help with that one other than to be certain the groove is clean. The original pistons have a bit of a radius, so they should compress the seal into the groove without damaging it.
 
OP
deadair

deadair

Jedi Hopeful
Country flag
Offline
TR3driver said:
It's been a long time, but ISTR I fitted the dust seal to the piston first, with the bottom lip hanging off the edge and the top lip only partway up the piston (not in the groove). I then manipulated the seal & piston into the caliper, so the lower lip was in it's groove and pushed the piston through the seal until the top lip slipped into the groove. In some places I had to tug on the seal just a bit to pull the top lip up, but in most places it just snapped into place.

Thanks Driver, I tried that, but the lip of the seal simply wouldn't stay put. The grooves in the cylinder were rusted, but I cleaned them up as much as I thought necessary. However, I may need to do aggressive cleaning to give the lip a good grip.

Any thoughts on how to best clean the cylinder grooves?
 

TR3driver

Great Pumpkin - R.I.P
Offline
The idea is to pull back on the dust boot as you push the piston through it; so there is no place for the lip to go except into it's groove.

With mine, I just had to clean out the remains of the old seals, which I did with a combination of solvent and some dental picks. But if the grooves are so badly rusted that the seals won't fit into them, I'd probably just look for another pair of calipers. Easier, and likely in the long run cheaper, than trying to make something to recut the groove.

Hmm, or is it possible you've got seals that just don't fit? I've not heard of bad brake seals making the rounds, but there sure are a lot of other parts around that don't fit right.
 
Similar threads
Thread starter Title Forum Replies Date
T TR2/3/3A Requesting help on removing TR3A steering column and box Triumph 21
C TR2/3/3A Removing Temp gauge Middle panel TR3A Triumph 3
Don Elliott TR2/3/3A Removing TR3A Silent-bloc Bushings Triumph 16
trglory TR2/3/3A TR3a spark plugs Triumph 1
P For Sale 61 TR3A Triumph Classifieds 1
D TR2/3/3A 59 TR3A Gearbox lever will not move. Triumph 11
Q TR2/3/3A 61 TR3A Fuel Pump Triumph 4
71TR6 TR2/3/3A TR3A Front Bumper Mount Triumph 11
mctriumph For Sale Project car 61 Tr3a Triumph Classifieds 0
71TR6 For Sale TR3A Nose Triumph Classifieds 0
71TR6 TR2/3/3A A TR3A wiring question Triumph 17
P TR2/3/3A 1958 TR3A missing on cyls 2 & 3 Triumph 8
mctriumph For Sale scrapping two 59 Tr3a's Triumph Classifieds 15
J TR2/3/3A TR3A Finally on the Road! Triumph 6
angelfj1 TR2/3/3A TR3A Boot Millboard Install Triumph 7
G TR2/3/3A TS37903F Is my engine a TR3A engine because my starter says no. Triumph 3
B TR2/3/3A TR3A Gearbox fluid capacity question Triumph 7
Hamish Racing TR2/3/3A Harewood hill climb Yorkshire TR3a Triumph 3
Hamish Racing Harewood Hill Climb Yorkshire TR3a Racing 0
J TR2/3/3A 58 TR3A Coil weak? 9KΩ on the secondary with a 1968 HA12 45208A non-ballasted coil. Triumph 4
J TR2/3/3A 58 TR3A Coil weak? 9KΩ on the secondary with a 1968 HA12 45208A non-ballasted coil. Triumph 1
T TR2/3/3A Looking for a TR3A front bumper Triumph 6
Hamish Racing General TR TR3a hillclimb Thumdrrstorm video uk Triumph 4
Hamish Racing General TR TR3a faster that a Lamborghini Huracan STO ?? Triumph 6
W For Sale 1960 TR3A for sale Triumph Classifieds 0
tr6nitjulius General TR 6/24/23 TRIUMPH TR6 (5) TR8 (2) Spitfire (1 RHD of 2) TR3A (1) Triumph 0
D TR2/3/3A tr3a occasional seat padding Triumph 10
G For Sale 1960 TR3A for sale $11,999 Triumph Classifieds 0
G For Sale NEW PHOTOS: Triumph TR3 Chassis Frame + Front Suspension, Fits TR2,TR3,TR3A,TR3B Triumph Classifieds 1
Hamish Racing TR2/3/3A Greenville TR3a V8 ? Triumph 8
T TR2/3/3A Would like a paper pattern for TR3A hood stick cover Triumph 0
W TR2/3/3A 1960 TR3A Radiator replacement recommendations Triumph 11
T TR2/3/3A TR3A Windshield Question Triumph 4
Hamish Racing TR2/3/3A Anglesey (Wales) TR3a track videos Triumph 3
RonC TR2/3/3A TR3A Hardtop Seals Triumph 7
T TR2/3/3A TR3A Disk Brake Question Triumph 10
G TR2/3/3A TR3A Front Sway Bars - Choice? Triumph 3
Hamish Racing TR2/3/3A TR3a British Hill Climb Shelsley Walsh Triumph 8
T Wanted Working Fuel Gauge for TR3A Triumph Classifieds 5
T For Sale TR3A Original Radiator Triumph Classifieds 3
Hamish Racing TR2/3/3A TR3a Faster Lap Times than a Ferrari F430 ?? Triumph 1
Hamish Racing UK hill climb TR3a Racing 0
Hamish Racing TR2/3/3A TR3a UK hill climb video Triumph 4
Hamish Racing TR2/3/3A 3 sisters fun in a TR3a ! Triumph 5
T TR2/3/3A TR3A Fuel Gauge problem Triumph 10
A SOLD!! TR3A Girling Type A brake caliper for right front Triumph Classifieds 0
M TR2/3/3A 1960 TR3A--intake manifold-to-SUH6 carbs studs Triumph 3
Hamish Racing General TR TR3a and TR7V8 Shelsley Walsh Hill climb action Triumph 0
Hamish Racing TR2/3/3A Fast and wet TR3a Triumph 0
Hamish Racing TR2/3/3A TR3a video Triumph 3

Similar threads

Top