• Hey there Guest!
    If you enjoy BCF and find our forum a useful resource, if you appreciate not having ads pop up all over the place and you want to ensure we can stay online - Please consider supporting with an "optional" low-cost annual subscription.
    **Upgrade Now**
    (PS: Subscribers don't see this UGLY banner)
Tips
Tips

TR2/3/3A Rear sheetmetal repair

DavidApp

Yoda
Gold
Country flag
Offline
Old school.

What gauge sheet metal are you getting?

I bought the Milwaukee 8" steel cutting saw for another job and found it was great for breaking up the steel sheets when I needed strips. There is a steel cutting blade that fits in a regular skill saw. The Diablo Steel Demon blade.

David
 
OP
F

Frank Canale

Jedi Warrior
Silver
Country flag
Offline
I am getting a sheet of 18 gauge. That is what most of the structural parts are. It will be sheared into 36" x 48" pieces. That is a little bigger than the boot floor. I will have enough for the boot floor and an extra piece if I mess the first one up. My shear is 36" so I can get the pieces into the shear. Frank
 

CJD

Yoda
Country flag
Offline
You are a true craftsman, Frank. I have tried many times to form parts that neatly and failed. I can't wait to see how the floor turns out...
 

sp53

Yoda
Country flag
Offline
You Go Frank! That thing is going to be beautiful. I wish I had more knowledge about sheet metal thickness and body repair when I started this last project. I ordered floor pans and inner- sills on sale, and they are cheese. I have this oil can problem behind the passenger seat because the metal is either too thin or something---- and it makes me uneasy after all the work. But, like in carpentry or really any physical craftsmanship a guy needs to pay for the education with experience.

My car is 99% done and I started on another project. This time it is my old 1966 F 100 Ford "custom cap" work truck. I bought one owner from this guy in 1975. Heck my middle son smashed it on a city bus and my daughter drove it through a fence and hit this lamp pole and it drove away from both. Hitting this thing with a hammer and dolly is not like hitting an English tea cup. Anyways, keep posting I need the wisdom and viewing pleasure.
steve
 

CJD

Yoda
Country flag
Offline
I had a 1970 F100 I bought for $100 when I went in the AF. It had over 100k mile, did not have an un-bent panel and was 5 different colors from replaced parts. I bought it thinking it would be for occasional hauling only. Turned out it was my primary transportation after every other car broke...for 10 years! I sold it when I left the AF, but should have kept it. Those were indestructible!
 

sp53

Yoda
Country flag
Offline
Frank, I meant to mention on that back panel on the tr3s I have restored, I drill about 3 or 4 inch hole, I cannot remember the exact hole saw size. Anyways, I cut the hole so I can spray wax-oil inside that rear sealed compartment. You have probably taken the whole panel off anyway, so this is non-applicable to you, but I want to put it out there.
steve
 
OP
F

Frank Canale

Jedi Warrior
Silver
Country flag
Offline
Yes, the back lower part of the apron is in bad shape so everything except the spare tire area will need either repair or replacement. Seemed strange to me that the spare tire compartment survived with no rust except where the body mounts were welded to it. I am having to do one area at a time to try and keep good references . I got a little ambitious and had to tack a panel back in place to help with a repair that had to be done first. Hope to have a post soon of a completed area. Frank
 
OP
F

Frank Canale

Jedi Warrior
Silver
Country flag
Offline
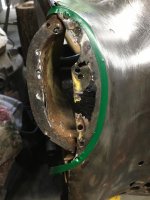
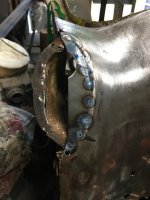
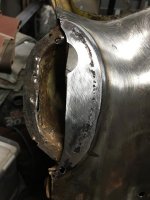
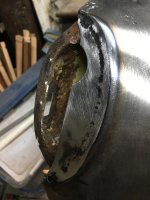
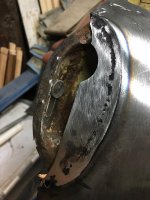
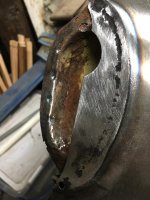
IMG_0888.jpgThis is the start of the tail light mount repair. The green tape is 1/4" and represents the cut that will be 1/4" from the crease at the edge of the tail light. This way the repair weld is never seen.
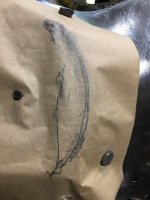
IMG_0889.jpgHere I am making a template for the repair patch.

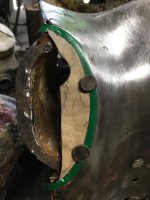
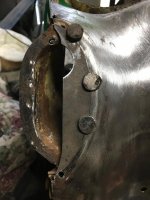
IMG_0890.jpgtemplate fitted IMG_0891.jpgPatch fitted IMG_0892.jpgpatch tacked.IMG_0904.jpgpatch finished.
IMG_0906.jpgthat hole is not supposed to be there. IMG_0907.jpg hole with patch fitted.

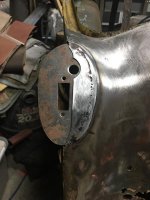
IMG_0908.jpgnow its gone. IMG_0909.jpg driver tail light mount.

The mount is not welded yet, I started to weld it in and decided I might not want to close this area off just yet. I am not sure why but something told me to wait. I have the same repairs to the passenger side so I will not bore you with more of the same. I am taking a brake from the back valance and have started the inner wheel arch flange repair, also hope to get started on boot floor next week. I will be out of town for a few days so not much more til next week. Thank you all for following and the complements. You are the only ones that have seen my car so it is a great help keeping me going. Take care and be safe, Frank
 

CJD

Yoda
Country flag
Offline
Looks good, Frank. Just checking...you did leave the hole for the boot opening drain hose?
 
OP
F

Frank Canale

Jedi Warrior
Silver
Country flag
Offline
IMG_0910.jpgHi John, You gave me a start for a minute, I was away from my shop and had to think for a minute about the drain hose. Then I remembered it goes thru at the back of the light housing. Yes it is still there and it will be fully functional. Frank
 

CJD

Yoda
Country flag
Offline
Excellent...sorry to give you a start. It gave the illusion in the other photos that the patch was where the hole is.
 
OP
F

Frank Canale

Jedi Warrior
Silver
Country flag
Offline
I have had to take some time evaluating the rear sheetmetal to come up with a plan of attack. I started repairing the passenger inner wing flange and that ended up at a dead end. The dog leg flange is pretty much gone on both sides so nothing to go by so I have decided to start at the back and work my way forward. I am starting at the driver side rear with the body mount that rusted thru the spare tire compartment.
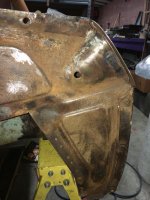
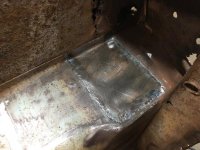
IMG_0926.jpgthe rear closing panel has been removed and now I have access to do the repair
IMG_0929.jpgThe repair turned out way better than I expected. Welding went well and zero warpage. By doing one large repair and starting at the bottom of the spare tire compartment the patch had room to move as It was tacked. The top flange is not welded to the boot floor so that helped also. The boot floor will be replaced once all the repairs to the back are completed. most of the pattern work and the forms are ready to start forming the boot floor. Looking forward to get started on that part. New territory for me.
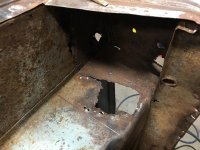
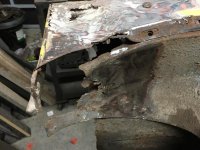
IMG_0931.jpgThis is the driver side lower inner wing. The passenger is the same so I will be looking for a car I can get some measurements and maybe a template so I can get a starting place for the middle repairs but that will be down the road.
 

TR3TR6

Jedi Warrior
Offline
Frank, I have to ask; how long have you been welding and what kind of welder are you using? Your work looks like a professional is doing it. Thanks for posting the pictures and the descriptions on how you are doing it.
 
OP
F

Frank Canale

Jedi Warrior
Silver
Country flag
Offline
Hi Terry, Thank you, I am a self taught welder for going on 40 years. I started out working after high school in a small custom fabrication job shop. The owners took on all jobs weather we knew how to build it or weather we had the right equipment for the job. With that you learn how to do things a different way. I started out doing a lot of grinding. cutting tubing, changing out gas bottles and wire and fitting up pieces for the welder in the shop. I can say when you do the grinding you learn what is a good weld and what is not. One day I asked the welder if he would teach me to weld, he said you know where the welder is go to it. He was right I had seen him weld and knew what all the adjustments were, all I needed was to do it. I have been learning ever since. I am far from a professionally trained welder. There is so much more to welding that is taught in school these days that I did not get. Enough of that. The majority of my welding is TIG welding. I use a 30 year old Lincoln TIG 300/300 welder. This welder is an old transformer welder. It is big and heavy But when I bought it new I said I want a welder that I can weld most anything I run into and it still serves me well. It is way overkill for what I am doing but It works well for heavy stuff as well as the 20 gauge sheetmetal on an old British automobile. I must give credit to a DVD by David Gardiner that shows the traditional technique of gas welding sheetmetal and how this technique can be done with the TIG torch. Frank
 

CJD

Yoda
Country flag
Offline
Interesting story, Frank. I learned on gas too...and to this day I tend to favor gas if it is an option.
 

sp53

Yoda
Country flag
Offline
I want a TIG. I worked on these natural gas pipe line pumping stations as a carpenter who built tents and staging for pipe fitters that welded with TIG welds that would take weeks. Some of the pipes where well over 5 feet in diameter and 100 feet of the ground with a 100% x-ray , so the scaffolding had to be safe and effective and not take too long to build, so we became close friends. I watched them weld all the time. These building where crazy because the last thing done was the roof on a 10 story plus building because the pipes had to be dropped in from the top.
steve
 
Country flag
Offline
Frank is good, he came by my place acouple of weeks to make a pattern off one of my cars. I normally would sawzall a piece needed from donor car. Frank measured taped and copied it all onto cardboard. I don't have that much patience.
More skill than I have for sure.
Marv
 
OP
F

Frank Canale

Jedi Warrior
Silver
Country flag
Offline
Hi David,
Yes I am a big fan of Wray Schelin and his products. I used the tape he sells for the template that I made when I visited Marvin a couple of weeks ago. Many thanks to Marvin for his generosity , sharing his knowledge and the use of one of his cars for a couple of hours to make a template. I have done some preliminary fitment of the template to what is left of the dogleg section of my car, but changed my plan of attack. I will be working on the rear apron of the car and work forward . The middle is where there is not much to work off of as both sides are about the same condition. This will give me time to try my hand at making the dogleg panels. I plan to repair as much as possible and hopefully be able to connect the dots in the middle. Right now it is slow going as I have to fix one area before I can move on to the next in order to keep references , or I have to remove something to get access to do a repair and then replace what was removed. Frank
 
Similar threads
Thread starter Title Forum Replies Date
petnatcar Rear View Mirror Relocation Austin Healey 0
Carlbanan56 MGB Rear axel torque? MG 4
petnatcar Rear View Mirror Relocation Austin Healey 0
trbby2 TR4/4A TR4A Intermittent rear wheel locking? Triumph 19
Carlbanan56 MGB Rear wheelbearing clicking MG 8
Carlbanan56 MGB MGB rear break rebuild MG 6
B BJ8 Rear Backrest Hinges Austin Healey 4
F For Sale E Type Series II front and rear bumpers good condition Jaguar Classifieds 0
bigjones TR2/3/3A Rear tail light not budging Triumph 5
5 Wanted Wanted 1966 mgb banjo type axle rear hub MG Classifieds 0
scottkilpatrick TR4/4A TR4 Rear Brake Drum Removal - Basic Question Triumph 16
J TR2/3/3A TR2 Fitting/mounting rear wing Triumph 11
Michael Oritt Rear Crank Seal Kit Austin Healey 7
BT7 Owner Rear Crankshaft Bearing Cap Austin Healey 4
O Jaguar rear window trim repair Jaguar 1
Joel Lester TR2/3/3A Is "later" style rear view mirror taller than the "early" style? Triumph 6
S Leaking HD6 Rear Carb Austin Healey 10
B Rear Brake Cylinders Austin Healey 4
WHT BJ8 Rear Seat Surround Drain Tube Grommets Austin Healey 0
Joel Lester TR2/3/3A Do rear leaf springs wear out? Triumph 11
J TR2/3/3A Rear Fuel Line Clips Triumph 3
apbos New long term project. Sprite powered rear engined race car. Spridgets 9
60BN7 Rear Wheel Opening Austin Healey 9
glemon TR5/TR250 Answering My Own Question Rear Tube Shock Conversion Numbers TR4a-TR6 Triumph 0
S TR2/3/3A rear wheel cylinder Triumph 1
K TR2/3/3A Rear tire pressure when there is an anti roll bar at the front of the car? Triumph 1
T Rear/Differential "Clunk" Austin Healey 2
AUSMHLY BJ8 Rear Seat Squab Austin Healey 0
jfarris For Sale TR3 Rear Sway Bar Triumph Classifieds 0
J 3000 Rear Seats Austin Healey 6
KVH General TR Rear Brake Shoe Orientation Triumph 12
Popeye TR4/4A Rear fender attachment: wing to lamp housing clip? Triumph 7
KVH General Tech Rear Brakes and Solid Axle Triumph 2
P Rear Springs Austin Healey 2
K TR2/3/3A Rear leaf spring brass and Delrin bushings ? Triumph 4
KVH General Tech Jacking Up The Rear of TR4 Triumph 5
J Rear Main Seal Kit Austin Healey 1
af3683 TR2/3/3A TR-2 / TR-3 Rear Bumper Wrap Around Fender Guards Identification Triumph 0
Patrick67BJ8 BJ8 Factory Hardtop Rear Window Austin Healey 6
T Looking for "BillMs rear transmission mount" Spridgets 2
R Wanted Looking For A Rear Glass For A Bugeye Hardtop Spridgets Classified 0
K Usual 1275 rear main oil leak question Spridgets 0
BN6_L1232 Rear Disc Brake Installation Instructions Austin Healey 3
Ed Foster T-Series MG-TD leaf rear leaf spring. MG 0
drooartz Bugeye jack points to remove rear axle Spridgets 18
bighealeysource Burning Smell from Left Rear Wheel Austin Healey 14
R BJ7 Rear Axle Maintenance Austin Healey 5
J Wanted MGA Coupe rear window glass center section MG Classifieds 0
D MG Midget 1275 rear oil seal. Spridgets 0
A Rear Axle Oil Seal Austin Healey 4

Similar threads

Top