• Hey there Guest!
    If you enjoy BCF and find our forum a useful resource, if you appreciate not having ads pop up all over the place and you want to ensure we can stay online - Please consider supporting with an "optional" low-cost annual subscription.
    **Upgrade Now**
    (PS: Subscribers don't see this UGLY banner)
Tips
Tips

TR2/3/3A Rear sheetmetal repair

OP
F

Frank Canale

Jedi Warrior
Silver
Country flag
Offline
Thank you, Lionel. Great to hear from you. How are things going in Australia?
 
OP
F

Frank Canale

Jedi Warrior
Silver
Country flag
Offline
rear vertical closing panel.jpgRear vertical closing panel. goes under spare tire pan and closes off rear valance
passenger rear closing panel.jpg Passenger side rear closing panel.
 

CJD

Yoda
Country flag
Offline
Dang Frank...if you pressed those yourself you are doing better than the parts you can buy.
 
OP
F

Frank Canale

Jedi Warrior
Silver
Country flag
Offline
Thank you John, yes I am having a lot of fun doing my own repair panels. Yes I believe you are correct, I can make the panels out of the correct gauge metal and make it to fit back correctly. Both panels are hammer formed and I am finding it getting easier and the finish better as I get a better feel for how hard to strike the forming tools. I have also gotten better at taking my time to figure out how the metal reacts to the panel you are making. The boot floor is almost done but I need to get the inside of the rear valance sandblasted and primed before I remove the old boot floor. Then I can work on the final fitting. I am having to figure out the best order to do repairs and starting to re assemble the new panels that I have made. Frank
 
OP
F

Frank Canale

Jedi Warrior
Silver
Country flag
Offline
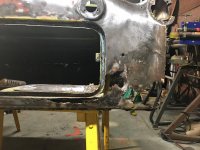
More repair to the lower rear valance. Repairing this area step by step.
lower rear valance damage.jpg The bottom right corner of the spare tire cover channel has too much rust so i decided to replace the corner section of channel.
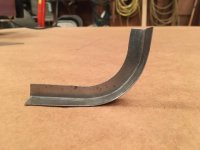
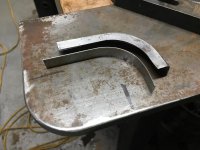
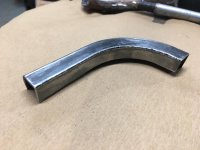
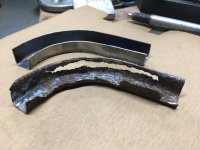
spare tire channel repair #1.jpgspair tire repair #2.jpg spare tire repair welded.jpgspare tire rapair pieces.jpg Thanks to Lionel I had an easy time fabricating the corner channel. I remembered he welded the inside leg to make his channel.I cut the corner of a heavy plate to match the radius i needed to help form the pieces. The first step was to brake a piece to form a piece of angle then I shrink the bottom leg of the angle with my Harbor Freight shrinker. It is very good for forming small pieces like this. A little bit of hammer forming on the steel plate and it was ready to weld. The fit was very good and so that made the welding much easier. The edge was fused with no filler wire, very low amperage with full penetration. Probably the best weld on my car so far.
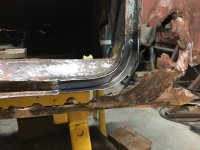
spare tire repair tacked in place.jpgRepair corner tacked in place.
 

LionelJrudd

Jedi Trainee
Country flag
Offline
All OK where I am in Australia Frank. Hope it is the same for you. Just waiting on the last of the spring rains to go so I can get into sandblasting the chassis for my 3A.
Looking forward to getting all the parts hanging off the chassis.
 
OP
F

Frank Canale

Jedi Warrior
Silver
Country flag
Offline
This was a needed confidence builder. Up till now most repairs are where they won't be seen but now time to jump into the deep end and see if I sink or swim.
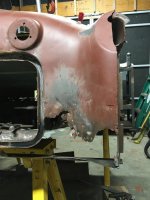
lower passenger corner established.jpg end of horizontal closing panel replaced and connected to the rear wing attachment flange. This establishes the bottom corner. some of the rust damage has been removed.
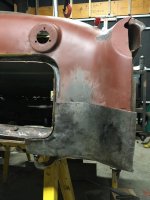
passenger rear repair panel.jpgStarting to form the repair panel. slow going continuing to plan how the repair goes.
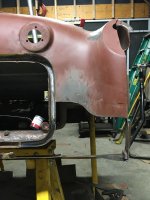
rear passenger damage removed.jpg Remaining rust damage has been removed.
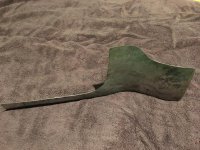
passenger rear repair panel (1).jpg2 piece repair panel before tacking in place passenger rear repair panel inside view.jpg inside of repair showing 2 pieces welded together. I welded the two together now because it is easier to weld and planish the weld.
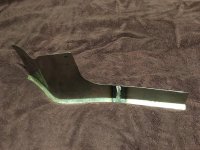
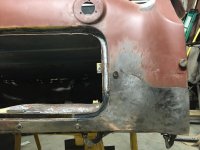
rear passenger repair panel ready to tack.jpg Repair panel in place ready to tack in place. It took longer to tack the repair in place carefully making sure the panel and repair were flush, than it did to weld it up. One thing to note that the repair is not a straight line horizontally. The curved weld line was done to help prevent warpage and it worked as planned.
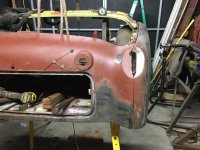
passenger rear repair after welding.jpg This is the repair after welding and planishing. The weld shrank a little and that can not be avoided but as long as it is not warped the weld can easily be planished and will need only minor sanding.Doing the repair this way is slow but in the end very rewarding. The bumperette tube will be located after the back end is on the chassis. I plan to level the raised plinths on the rear of the valance with the laser and then use the driver side for the reference to locate the passenger side. one step at a time. Frank
 

DavidApp

Yoda
Gold
Country flag
Offline
That is a great looking repair.

When I look at the first photo in that series I realize how good a TR I bought. It had rust but nothing like that.

David
 
OP
F

Frank Canale

Jedi Warrior
Silver
Country flag
Offline
Thank you Lionel, you set an example of how restorations should be done. It takes extra time but it sure is rewarding. Frank
 

M_Pied_Lourd

Darth Vader
Country flag
Offline
Really Nice work Frank.

Cheers
Tush
 
OP
F

Frank Canale

Jedi Warrior
Silver
Country flag
Offline
Thank you, Tush. Your videos are a tremendous source of information. I am so fortunate to have found the BCF. 4 great sources to refer to, Tushes videos, John’s documentation on his restoration and lionel’s documentation on his restoration. In no particular order of importance. I can’t leave out the vast resource that Randell left. Always enjoyed his responses. All questions and responses are helpful as I am sure I will encounter it down the road. Frank
 

71TR6

Jedi Hopeful
Country flag
Offline
Fantastic work on that rear valance repair, Frank! Making your own patch panels is the way to go if you have the skills and tools to do it. Buying aftermarket panels is crapshoot and there are some that fit well, some that need some minor tweaks, and others that result in parts being thrown across the shop after countless hours of trying to make them fit (and one ends up making their own anyway in the end). I've experienced all three.

Keep the posts coming!

Ron

71 TR6
59 TR3A in pieces but making headway
 
Similar threads
Thread starter Title Forum Replies Date
petnatcar Rear View Mirror Relocation Austin Healey 0
Carlbanan56 MGB Rear axel torque? MG 4
petnatcar Rear View Mirror Relocation Austin Healey 0
trbby2 TR4/4A TR4A Intermittent rear wheel locking? Triumph 19
Carlbanan56 MGB Rear wheelbearing clicking MG 8
Carlbanan56 MGB MGB rear break rebuild MG 6
B BJ8 Rear Backrest Hinges Austin Healey 4
F For Sale E Type Series II front and rear bumpers good condition Jaguar Classifieds 0
bigjones TR2/3/3A Rear tail light not budging Triumph 5
5 Wanted Wanted 1966 mgb banjo type axle rear hub MG Classifieds 0
scottkilpatrick TR4/4A TR4 Rear Brake Drum Removal - Basic Question Triumph 16
J TR2/3/3A TR2 Fitting/mounting rear wing Triumph 11
Michael Oritt Rear Crank Seal Kit Austin Healey 7
BT7 Owner Rear Crankshaft Bearing Cap Austin Healey 4
O Jaguar rear window trim repair Jaguar 1
Joel Lester TR2/3/3A Is "later" style rear view mirror taller than the "early" style? Triumph 6
S Leaking HD6 Rear Carb Austin Healey 10
B Rear Brake Cylinders Austin Healey 4
WHT BJ8 Rear Seat Surround Drain Tube Grommets Austin Healey 0
Joel Lester TR2/3/3A Do rear leaf springs wear out? Triumph 11
J TR2/3/3A Rear Fuel Line Clips Triumph 3
apbos New long term project. Sprite powered rear engined race car. Spridgets 9
60BN7 Rear Wheel Opening Austin Healey 9
glemon TR5/TR250 Answering My Own Question Rear Tube Shock Conversion Numbers TR4a-TR6 Triumph 0
S TR2/3/3A rear wheel cylinder Triumph 1
K TR2/3/3A Rear tire pressure when there is an anti roll bar at the front of the car? Triumph 1
T Rear/Differential "Clunk" Austin Healey 2
AUSMHLY BJ8 Rear Seat Squab Austin Healey 0
jfarris For Sale TR3 Rear Sway Bar Triumph Classifieds 0
J 3000 Rear Seats Austin Healey 6
KVH General TR Rear Brake Shoe Orientation Triumph 12
Popeye TR4/4A Rear fender attachment: wing to lamp housing clip? Triumph 7
KVH General Tech Rear Brakes and Solid Axle Triumph 2
P Rear Springs Austin Healey 2
K TR2/3/3A Rear leaf spring brass and Delrin bushings ? Triumph 4
KVH General Tech Jacking Up The Rear of TR4 Triumph 5
J Rear Main Seal Kit Austin Healey 1
af3683 TR2/3/3A TR-2 / TR-3 Rear Bumper Wrap Around Fender Guards Identification Triumph 0
Patrick67BJ8 BJ8 Factory Hardtop Rear Window Austin Healey 6
T Looking for "BillMs rear transmission mount" Spridgets 2
R Wanted Looking For A Rear Glass For A Bugeye Hardtop Spridgets Classified 0
K Usual 1275 rear main oil leak question Spridgets 0
BN6_L1232 Rear Disc Brake Installation Instructions Austin Healey 3
Ed Foster T-Series MG-TD leaf rear leaf spring. MG 0
drooartz Bugeye jack points to remove rear axle Spridgets 18
bighealeysource Burning Smell from Left Rear Wheel Austin Healey 14
R BJ7 Rear Axle Maintenance Austin Healey 5
J Wanted MGA Coupe rear window glass center section MG Classifieds 0
D MG Midget 1275 rear oil seal. Spridgets 0
A Rear Axle Oil Seal Austin Healey 4

Similar threads

Top