• The Roadster Factory Recovery Fund - Friends, as you may have heard, The Roadster Factory, a respected British Car Parts business in PA, suffered a total loss in a fire on Christmas Day. Read about it, discuss or ask questions >> HERE. The Triumph Register of America is sponsoring a fund raiser to help TRF get back on their feet. If you can help, vist >> their GoFundMe page.
  • Hey there Guest!
    If you enjoy BCF and find our forum a useful resource, if you appreciate not having ads pop up all over the place and you want to ensure we can stay online - Please consider supporting with an "optional" low-cost annual subscription.
    **Upgrade Now**
    (PS: Subscribers don't see this UGLY banner)
Tips
Tips

Accelerator linkage restoration

Johnny

Darth Vader
Country flag
Offline
I'm at the stage of my BJ7 restoration where I'm restoring the accelerator linkage. I ordered the felt bushings from Moss motors and am a little confused on their installation. First, the originals have a bronze bushing that fit inside a cup that had a "blackish something" surrounding the bushing. Of course the cup then fit inside a bracket that bolted to the chassis for support. After cleaning the cup out I inserted the felt bushing and realized the bronze bushing will no longer fit inside the cup with the felt bushings inside. So, do I leave the bronze bushings off and just use the felt bushing? Doesn't seem to be a very effective bushing material if used that way.
/ubbthreads/images/graemlins/tongue.gif
 
Offline
johnny,im looking at the moss picts and understand what your dooing,but moss doesnt identify any bush as being "felt" would you mind giving me the part # of that one,also befor you insert the rubber bushing into the fire wall bracket make sure the linkage rod end fits into the bronze center first,i think youll find the fit too tight requiring reaming of the center bronze bush,dont think you want to do this when in place,it takes a bit of work fitting the rubber into the bracket and have seen them disintagrate when done too forceably,i used a soap and water mixure to lube the rubber. /ubbthreads/images/graemlins/savewave.gif
 

Keoke

Great Pumpkin
Country flag
Offline
Yep John, But I think you will have better performance if begining at step #7 you use JB Weld isolating it from the footwell with a plastic bit .Because it is installed during the curing it will align itself correctly with the shaft.--Fwiw--Keoke
 
OP
Johnny

Johnny

Darth Vader
Country flag
Offline
[ QUOTE ]
Johnny,

They didn't use felt on the BJ7/8. It sounds like you ordered the felt used on the earlier linkages. Check the Moss diagrams to see the difference.

Here's a great tech article on how to refurbish the throttle link bushes ..

https://www.vintage-sportscar-touring.ca/technical/throttle1.html

Cheers,
John

[/ QUOTE ]
/ubbthreads/images/graemlins/ooo.gif Yes, you're right I did order the felt bushings. However, all the other one's (BJ7/8) are NA. BTW great article on the website. Why use silicone? Wouldn't something hard like epoxy, work better?
I think I'll just order the one's from BCS, I think their made of nylon not Delrin.
Anybody need 3 felt bushings? They're Moss part number 021-922.
/ubbthreads/images/graemlins/crazyeyes.gif
 
Offline
johnny,did mine this past summer,didnt get anything "felt". scared me for a sec.thought i midda left (something else out.) /ubbthreads/images/graemlins/smirk.gif
 

Keoke

Great Pumpkin
Country flag
Offline
[ QUOTE ]
johnny,did mine this past summer,didnt get anything "felt". scared me for a sec.thought i midda left (something else out.) /ubbthreads/images/graemlins/smirk.gif

[/ QUOTE ]

/ubbthreads/images/graemlins/savewave.gif
Johnny! He prolly did.---Keoke- /ubbthreads/images/graemlins/grin.gif
 

GregW

Yoda
Platinum
Country flag
Offline
Normally you wouldn’t get a conservative reply from me… I looked at Moss and BCS and didn’t see the bush housing for sale. Seems that JB weld would be a problem if you ever needed to replace the bushing. ( I know- who cares in 30 years) Still makes me want to think of a less permanent solution.
 
OP
Johnny

Johnny

Darth Vader
Country flag
Offline
[ QUOTE ]
Normally you wouldn’t get a conservative reply from me… I looked at Moss and BCS and didn’t see the bush housing for sale. Seems that JB weld would be a problem if you ever needed to replace the bushing. ( I know- who cares in 30 years) Still makes me want to think of a less permanent solution.

[/ QUOTE ]
/ubbthreads/images/graemlins/lol.gif I wonder what Kurt Tanner uses /ubbthreads/images/graemlins/grin.gif
I've used the BCS nylon inserts on my BN7 and they really are smooth operating. I did find the bushing/bearing on the end of the carb throttle shaft that goes up against the firewall really bad. It adds to the "slop" in the linkage considerably. Are there any permanent soloutions out there?
/ubbthreads/images/graemlins/confused.gif
 
Offline
johnny,i bent up some metal and shapped a bracket for the far end of the shaft the nylon/plastic one that sits on top of the engine,got tired of leaning over and snapping them, id though about modifying the one at the firewall as well,but oppted not to i just replaced it, the reason being ,that point of the pivoting requires some flexability when hitting bumps,hard turns or when ever the engine shifts,whatever a permanent solution is i feel it should be capable of some movement,fwiw.
 

Attachments

  • 191168-MVC-036S.JPG
    191168-MVC-036S.JPG
    28.9 KB · Views: 90

Keoke

Great Pumpkin
Country flag
Offline
/ubbthreads/images/graemlins/savewave.gif
Johnny! 7777 said he "Bent up some metal" to avoid saying he "CUT" up some metal.--Keoke- /ubbthreads/images/graemlins/grin.gif
 

GregW

Yoda
Platinum
Country flag
Offline
Just for fun, I poked around in the spare parts bin in the garage. Here’s what I came up. Bronze bushing .375” ID, .5” OD, 1” long. Standard .5” heater hose. I’ll need to cut the bushing down to the right length, but it seems to fit quite nicely.
191286-CIMG0199.jpg
 

Keoke

Great Pumpkin
Country flag
Offline
HI Greg, I initially tried that too cuz it was easy but for some reason too long ago to remember I gave up on it and used JB weld inplace of the rubber hose.--Fwiw---Keoke
 

bighly

Jedi Knight
Offline
Here is a helpful article from Mr Finespanner. Replace all bushings to eliminate play in the shaft. Bushings in nylon are available from Bill Bolton. I cannot find the original article, here is a cut and paste.
DEAD SPOTS AND THE POURED BUSHING BED
or
SIX CYLINDER THROTTLE LINKAGE
REPAIR AND ADJUSTMENT
by Mr. Finespanner®©

PART ONE: REPAIR
One problem with six cylinder Healeys very often overlooked in the course of a service or restoration is the condition of the throttle linkage, particularly the bushing assemblies through which the gas pedal and linkage cross shafts pass. It’s easy to understand why these can be neglected, since the cross shaft is basically invisible on a finished car, and you can’t tell by just looking at the other bushings if they need work.
So try this test sometime: get an observer to watch the link from the manifold to the carb shafts while you slowly depress the gas pedal, and have him tell you the exact point the link begins to move after the gas pedal begins its travel. On a car with tight linkage the gas pedal should move no more than ¼” down before the carb butterflies begin to open. If the pedal travel is in excess of ½” it indicates wear or slop somewhere in the throttle linkage. If you have an inch or more of movement before the carb shafts are affected then you have a severe dead spot, which not only limits the top speed but also causes a significant lag in the throttle response. This can have a very negative effect on your ability to avoid or escape nasty traffic situations.

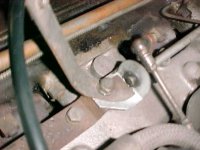
So what causes this dead spot? Basically, it’s a function of rot caused by heat and time. The shaft bushings are packed in a steel housing that the mounting brackets can hold. Originally the packing material was felt, which was changed to a rubber compound called “compo” on later cars. The felt, or compo as the case may be, dries out and deteriorates over time, especially in those bushing assemblies closest to the exhaust manifold. These are the bushing on the outside of the footwell where the gas pedal shaft goes through to the engine bay (Fig. 1), and the bushing on the left end of the linkage cross shaft (Fig. 2). When the packing dries out it just turns to chunky black bits and disappears, leaving the bushing flopping in the housing when the gas pedal is pressed (Fig. 3). The free play caused by the missing packing must be taken up by the bushing contacting the housing before any of the movement is transferred to the rest of the linkage. Thus the dead spot. Another more obvious slop location is the bushing on the firewall (Fig. 4) for the top linkage shaft running forward on the intake manifold. This
one is not rebuildable, but is the easiest to replace

There are a number of ways to deal with the other shaft bushings. Unfortunately, the linkage cross shaft is virtually inaccessible with the motor in place (see Fig. 5). It IS possible to get it in and out by yanking the gearbox cover and working from behind, but it’s a royal pain. So my recommendation is to tackle that aspect with the motor out if you can. The gas pedal shaft is much easier. You just take the yoke off the end in the engine bay and remove the two screws inside the footwell holding the pedal shaft bracket to get the entire pedal shaft assembly out. At that point the bushing housing for the yoke end of the shaft can be removed from the outside of the footwell. Note the gas pedal shaft has a bushing for the holding bracket (Fig. 6) as well as one for the yoke end. Now, it is possible to get replacement bushings from some suppliers. The ones I’ve seen are nice, made from Delrin and a good permanent fix. However, the Delrin bush and housing sell for around $43.00. The following is a good fix at a fraction of the cost, and even more concours. First a simple alignment tool is required. Get a tall-shouldered 3/8” bolt about an inch and a quarter long, with some flat washers and a nut (Fig. 7). Then clean out all the old packing from the steel housing and the bushing so they are both down to clean, bare metal. Rough the outside of the bushing with a file or hacksaw to give the silicone a better gripping surface Then use an RTV silicone gasket material like Permatex Ultra-Black to lay down a thick bead of silicone sealer in the housing and another around the bushing. Put the bushing into the housing and then fill in any low spots (Fig. 8). Smear a little grease on the side of the flat washer that will go against the wet silicone and then assemble the alignment tool (Fig. 9), centering the flat washers on the bushing housing and tightening the nut finger-tight. Then just set the whole deal aside to dry for a day or so. It does take a while to set up. After a day, remove the aligning bolt and let the silicone continue to dry uncovered until it is all completely firm. Scrape off any excess dry silicone from the housing and bushing bore and you are ready for painting and reassembly (Figs. 10, 11, & 12).

fig01.jpg

fig02.jpg

fig03.jpg

fig04.jpg

fig05.jpg

fig06.jpg

fig07.jpg

fig08.jpg

fig09.jpg

fig10.jpg
 
OP
Johnny

Johnny

Darth Vader
Country flag
Offline
Whoa!, thanks "bighly" that kinda says it all!! Now I wish I hadn't ordered those nylon bushing replacements. What's a mudda to do?
/ubbthreads/images/graemlins/crazyeyes.gif /ubbthreads/images/graemlins/crazyeyes.gif /ubbthreads/images/graemlins/crazyeyes.gif
 

John Loftus

Darth Vader
Offline
[ QUOTE ]
What’s that? twice this month, so far?

[/ QUOTE ]

yea .. Rodney Dangerfield gets more respect /ubbthreads/images/graemlins/confused.gif

Maybe everyone else but you has me on "ignore" /ubbthreads/images/graemlins/grin.gif

Cheers,
John
 
Similar threads
Thread starter Title Forum Replies Date
DocDup1 Wanted TR4A Accelerator Linkage Lever Triumph Classifieds 0
mgedit TR2/3/3A Link Rod Lengths Accelerator Linkage Triumph 2
J TR2/3/3A accelerator linkage for Weber 45 DCOE Triumph 4
TR6oldtimer TR6 TR6 accelerator linkage help needed Triumph 9
Jim_Gruber Accelerator Cable termination on carb linkage Spridgets 10
R Accelerator linkage removal Triumph 2
G Accelerator Linkage Slop Triumph 14
CARSINC MKIII Accelerator Pedal Spridgets 0
Popeye TR4/4A Accelerator shaft install - location of bushing plates? Triumph 2
FlyingCat Spitfire Accelerator cable Triumph 4
B LHD to RHD accelerator controls Austin Healey 15
K For Sale TR3 Accelerator pedal assembly Triumph Classifieds 1
T TR2/3/3A Accelerator Say 1960 TR3 Triumph 11
TomMull Post-War Other Herald: Holy Moly! [Why it took me so long to make the accelerator bracket] Triumph 2
Got_All_4 TR2/3/3A Accelerator shaft question Triumph 2
M Accelerator Pedal Position Austin Healey 4
R TR2/3/3A TR-3A accelerator return spring Triumph 9
PatGalvin TR2/3/3A Accelerator Pedal Advice Needed Triumph 21
G Best way to remove accelerator bar part # 106762 Triumph 3
K TR2/3/3A TR3A...Kicking accelerator pedal lowers idle? Triumph 20
S XKE Accelerator Ppedal Position Jaguar 2
B Accelerator relay rods on RHD Austin Healey 2
bcbennett TR6 TR6 accelerator vibration Triumph 9
ArcticOne GT6 GT6 Accelerator Pedal Removal Triumph 8
ArcticOne GT6 Accelerator Pedal - GT6 MKI Triumph 2
bigjones MGB MGB accelerator cable MG 8
I Source for Bugeye accelerator return spring? Spridgets 2
ArcticOne Accelerator Pedal Triumph 0
I TR6 TR6 accelerator bar busing replacement help please Triumph 10
KVH TR4/4A Sticking Accelerator or SU Jets: TR4A Triumph 7
H TR2/3/3A TR3 Accelerator Shaft -- Straight or Bent? Triumph 9
B accelerator cable Spridgets 6
Tinkerman TR2/3/3A TR 3A Accelerator Bushing Placement Triumph 21
Tinkerman TR2/3/3A Accelerator Assembly Installation TR3A Triumph 3
Tinkerman TR2/3/3A TR3A Accelerator Assembly Triumph 6
Tinkerman TR2/3/3A TR3A Accelerator Pedal Assembly Triumph 9
Tinkerman TR2/3/3A Accelerator Pedal Assembly ,TR 3A Triumph 6
Tinkerman TR2/3/3A TR3A Accelerator Rod Dissasembly HELP! Triumph 1
glemon TR5/TR250 TR250/6 accelerator shaft bush Triumph 5
D MK2 accelerator pedal Jaguar 0
Morris 1500 Accelerator cable Spridgets 7
angelfj1 TR2/3/3A TR3A accelerator pedal/shaft Triumph 9
T Clutch and Accelerator return springs are missing Triumph 6
Tinkerman TR2/3/3A Accelerator Pedal Question TR3A Triumph 5
B Accelerator Cable Spridgets 4
M TR2/3/3A TR3 Accelerator Pedal Triumph 7
Tinkerman TR2/3/3A TR3 accelerator pedals Triumph 8
Atrus Accelerator Pedal Spridgets 7
Musicman That Dreaded Accelerator Bushing Triumph 5
J Spitfire Spitfire MK3 accelerator bushings Triumph 3

Similar threads

Top