 Hey there Guest!
 Hey - did you know if you click on the title of a thread it will take you to the first unread post since you last visited that thread?
 but were afraid to ask:
  STOP!! Never post your email address in open forums. Bots can "harvest" your email! If you must share your email use a Private Message or use the
  smilie in place of the real @
 Pretty Please - add it to our Events forum(s) and add to the calendar! >>

Offline
Today was a 1/2 Tunebuggery day, as I had a morning full of other errands to take care of. The afternoon was warm and sunny, but I successfully fought down the urge to take the Triumph out for a ride (even though it's supposed to snow for the next couple of days. So back in to the garage I went.
I took advantage of being down in Orem for a service on the Fit in the morning and stopped by Harbor Freight for a few odds and ends that I needed. One of those bits was a 4-1/2" angle grinder, needed for modifying the brake drums to fit with my later-style backing plates. Thanks to advice from the good folks here (especially spritenut) I knew that I needed to make the brake drums about 1/16" less deep. The method is to grab the handy grinder and grind away. I marked one Sharpie-width around the outside of the drum so I'd know when I'd gone far enough.
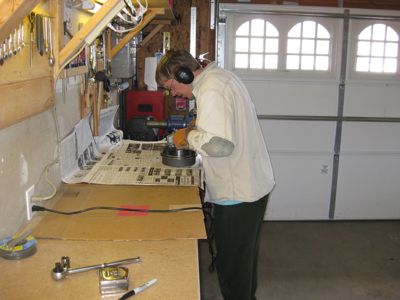
<span style="font-style: italic">Drew with a power tool, showing that drum who's boss</span>
This process proved to be relatively simple, although a bit messy. I did happen to have a test drum on hand -- one that I have modified a bit to use as a rear hub puller. I practiced on that one first to make sure I knew what I was doing.
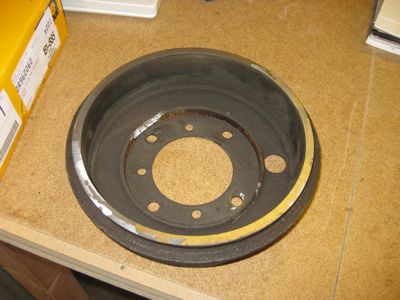
<span style="font-style: italic">Test brake drum, showing where I was grinding</span>
Once I had ground the Sharpie line away it was off to the car for a few test fits. I think I've ground enough off, but it's easy enough to pull the drum again and do a bit more if there is still rubbing once everything is fully assembled and adjusted.
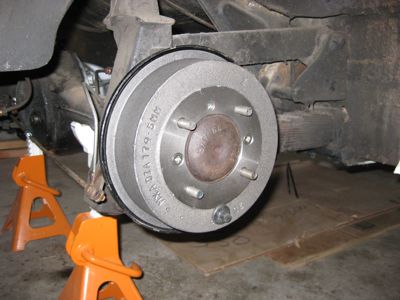
<span style="font-style: italic">New brake drum on and fit properly</span>
The last step was the most fun, as I finally got to put the rear wheels back on for the first time in many months, maybe as much as a year or so! The wheels were torqued up and seemed spin freely. They'll be off and on many more times as I get everything sorted out, but at least for one night the back of the car looks like a car again!

<span style="font-style: italic">If you squint a bit it looks like a car</span>
Tomorrow is all about putting in the new brake lines. I have a set of hard lines that just need to be bent into the proper shapes. I did one of the lines when I first bought the car, but still have all the rest to get to. I'll do a bit of cleanup around the lines as well while I'm at it, and will put in the soft lines as well. If there is time, I'll get the front A-arms and shocks installed, but that may wait until Wednesday depending on how fast the brake lines go.
Not bad for just 1/2 a day!
I took advantage of being down in Orem for a service on the Fit in the morning and stopped by Harbor Freight for a few odds and ends that I needed. One of those bits was a 4-1/2" angle grinder, needed for modifying the brake drums to fit with my later-style backing plates. Thanks to advice from the good folks here (especially spritenut) I knew that I needed to make the brake drums about 1/16" less deep. The method is to grab the handy grinder and grind away. I marked one Sharpie-width around the outside of the drum so I'd know when I'd gone far enough.
<span style="font-style: italic">Drew with a power tool, showing that drum who's boss</span>
This process proved to be relatively simple, although a bit messy. I did happen to have a test drum on hand -- one that I have modified a bit to use as a rear hub puller. I practiced on that one first to make sure I knew what I was doing.
<span style="font-style: italic">Test brake drum, showing where I was grinding</span>
Once I had ground the Sharpie line away it was off to the car for a few test fits. I think I've ground enough off, but it's easy enough to pull the drum again and do a bit more if there is still rubbing once everything is fully assembled and adjusted.
<span style="font-style: italic">New brake drum on and fit properly</span>
The last step was the most fun, as I finally got to put the rear wheels back on for the first time in many months, maybe as much as a year or so! The wheels were torqued up and seemed spin freely. They'll be off and on many more times as I get everything sorted out, but at least for one night the back of the car looks like a car again!
<span style="font-style: italic">If you squint a bit it looks like a car</span>
Tomorrow is all about putting in the new brake lines. I have a set of hard lines that just need to be bent into the proper shapes. I did one of the lines when I first bought the car, but still have all the rest to get to. I'll do a bit of cleanup around the lines as well while I'm at it, and will put in the soft lines as well. If there is time, I'll get the front A-arms and shocks installed, but that may wait until Wednesday depending on how fast the brake lines go.
Not bad for just 1/2 a day!


 A friendly reminder - be careful what links you click on here. If a link is posted by someone you don't know, or the URL looks fishy, DON'T CLICK. Spammers sometimes post links that lead to sites that can infect your computer, so be mindful what you click.