• The Roadster Factory Recovery Fund - Friends, as you may have heard, The Roadster Factory, a respected British Car Parts business in PA, suffered a total loss in a fire on Christmas Day. Read about it, discuss or ask questions >> HERE. The Triumph Register of America is sponsoring a fund raiser to help TRF get back on their feet. If you can help, vist >> their GoFundMe page.
  • Hey there Guest!
    If you enjoy BCF and find our forum a useful resource, if you appreciate not having ads pop up all over the place and you want to ensure we can stay online - Please consider supporting with an "optional" low-cost annual subscription.
    **Upgrade Now**
    (PS: Subscribers don't see this UGLY banner)
Tips
Tips

TR2/3/3A lower small brass bushing

sp53

Yoda
Country flag
Offline
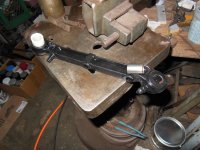
Well I have sent those little brass bushing out to be pressed and honed in the past. This time I thought I would try myself. Would I need a press? Should I push one out as I try pushing the new bush in place? Anybody have any luck with DIY method.

Thanks Steve
 

Attachments

  • DSCN0427.JPG
    DSCN0427.JPG
    3.3 MB · Views: 79

bobhustead

Senior Member
Gold
Country flag
Offline
Never try to drive a piece of soft metal with another piece of equal softness. New piece will be destroyed. You have to take care to get the grease hole in the bush lined up with the grease hole in the wishbone. The bushes are slotted, so no real effort is needed to move them. Flat tip punch to get them out and a wood block should get the new ones in.
Bob
 

DrEntropy

Great Pumpkin
Platinum
Country flag
Offline
Wood block and a good vise or press.
 

CJD

Yoda
Country flag
Offline
I tapped out with a long socket that matched up. A slightly larger socket was fine to tap in. Of course, if you have a press, that makes it a bit easier.

I have always reamed to size...9/16", if I remember right. I've always been told honing bronze leaves grit in the bushing that is hard on the pin.
 

DrEntropy

Great Pumpkin
Platinum
Country flag
Offline
Bronze tends to "chunk" when cut with reaming, a stone hone is a bit better to use. But it takes a long time.
 

CJD

Yoda
Country flag
Offline
The consensus in the machining world is that reaming or boring bronze to size is preferred. Honing closes the pores that make the bronze self lubricating, and will leave abrasives on the bearing surface. Even the Moss site for the bearing says to "ream":


Honing is usually reserved for iron or steel parts, like cylinders and iron valve guides.
 

DrEntropy

Great Pumpkin
Platinum
Country flag
Offline
The consensus in the machining world is that reaming or boring bronze to size is preferred. Honing closes the pores that make the bronze self lubricating, and will leave abrasives on the bearing surface. Even the Moss site for the bearing says to "ream":


Honing is usually reserved for iron or steel parts, like cylinders and iron valve guides.
I sit corrected.

We've always used a brake cylinder hone on problem pilot bushings, haven't had any issue. 🤷
 

CJD

Yoda
Country flag
Offline
The perfect driver would be a steel rod with a step, so the step goes into the bushing and protects it while the larger step drives it in.

Assuming you don't have a driver like that, you will need a steel driver (like the back side of a socket), that you can place on the bushing and makes full contact...then either press to tap into place. The danger is if the bushing gets cocked at an angle, it will wedge and jam, so further tapping will distort and ruin it. Start straight and always keep the driver in full contact, but tap on the side of the driver that is higher as you go. Once the bushing is far enough in that cocking is no longer an issue, then you can tap a bit harder...but never BFH hard!

There is a chance that, without the perfect tool, the edge you tap may develop a burr. So long as the burr is not into the steel shell, you can ream it out afterwards.
 
Last edited:

CJD

Yoda
Country flag
Offline
Who knows, Doc. Like I said, it's the consensus now to ream...but someone may eventually prove that honing is better, LOL.
 

DrEntropy

Great Pumpkin
Platinum
Country flag
Offline
I've a number of shouldered steel drifts, some had to be turned on a lathe for particular uses. Some brass ones as well. Also a "collection" of bearing inner and outer races, ground on I.D. or O.D to use as drifts for pressing the same diameter ones into or out of place. Sockets have been used as well. All's fair, whatever works!

Assuming you don't have a driver like that, you will need a steel driver (like the back side of a socket), that you can place on the bushing and makes full contact...then either press to tap into place. The danger is if the bushing gets cocked at an angle, it will wedge and jam, so further tapping will distort and ruin it. Start straight and always keep the driver in full contact, but tap on the side of the driver that is higher as you go. Once the bushing is far enough in that cocking is no longer an issue, then you can tap a bit harder...but never BFH hard!

Best advice for the task.
 
OP
S

sp53

Yoda
Country flag
Offline
I used a deep well 10mm socket that had a beveled edge that hit the bushing edge, but nothing is moving. I was able to hit the socket with strong force. I thinking I might need a 90 edge to sit right on top of the bushing 90 degree edge flat. The 10mm socket has a beveled edge and as the socket hits bushing perhaps the energy force is being push to the side and not straight down.

I looked around on line for a tool with a 90 edge but no luck. I probably do not know the correct name for the tool. Anyone have a pic.

steve
 

CJD

Yoda
Country flag
Offline
For going in, you want a flat surface to contact the bushing, so go with a little larger socket and turn it around so the flat side fully contacts the bushing. You will drive it in until the bushing edge is even with the arm edge. The bevel will distort the bushing...flat is best for driving. I often even use a flat plate of aluminum to start the driving, to prevent distorting the bushing during the critical start.
 
OP
S

sp53

Yoda
Country flag
Offline
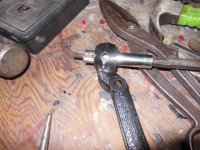
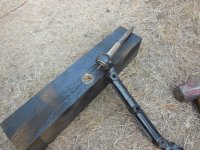
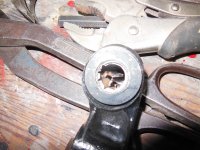
I pounded the bushings out. I got one to come out just by smacking into a hole I drilled in 4x4 using a beefy punch and 13 mm socket. The others were more difficult there I made some relief cuts with a hacksaw blade, and then took a long punch and drove the punch through zerk fitting hole and split and cracked the bushing.

Now I need to get the new bushings installed. Perhaps pull them in with a bolt and socket.

steve
 

Attachments

  • DSCN0437.JPG
    DSCN0437.JPG
    3.4 MB · Views: 54
  • DSCN0433.JPG
    DSCN0433.JPG
    3.3 MB · Views: 58
  • DSCN0436.JPG
    DSCN0436.JPG
    3.3 MB · Views: 53
Similar threads
Thread starter Title Forum Replies Date
Racer-X- Metalastik Lower wishbone bushings and upper fulcrum pin bushings Other British Cars 6
S TR2/3/3A steel bushings for the lower Arms Triumph 10
newmexTR3 TR2/3/3A How to remove thrust washer from lower wishbone & trunion Triumph 7
Endoscaper TR2/3/3A Lower Front Suspension Overhaul Triumph 2
R TR6 Lower A-arm trunnion bushings Triumph 18
edkap2002 TR6 lower radiator hose fitting Triumph 2
K TR2/3/3A Advise on previously botched front end lower fulcrum support bracket. Triumph 5
B Wanted 100-6 or early 3000 upper and lower grille opening pieces Austin Healey Classifieds 1
Jim_Gruber PS Steering Rack Lower Bracket Needed - Some DA over torqued and snapped it in half Spridgets 9
B TR2/3/3A lower wishbone installation Triumph 5
L TR2/3/3A Bent lower wishbone arms Triumph 6
K TR2/3/3A Front suspension inner Lower wishbone bush area? Triumph 3
KVH TR4/4A Should I Cut the Lower Windshield Gasket Triumph 2
KVH TR4/4A Lower Control Arm Front Pivot Bolt Triumph 9
KVH General TR Pressing in the Lower Control Arm Bushing Triumph 6
C TR6 Lower A-arms Triumph 8
wangdango BJ8 lower radiator hose! Austin Healey 2
W TR2/3/3A Tell me there is a trick to removing lower control arm pin... Triumph 45
I General TR Lower wishbone arm attachment bracket advice needed Triumph 8
Rut TR4/4A Lower fulcrum brackets Triumph 3
M TR2/3/3A FRONT SUSPENSION: Rusted lower control arm fulcrum Triumph 17
Tr3aguy TR2/3/3A Lower control arm question Triumph 2
aero3113 100 lower windshield seal Austin Healey 4
RCarr BN1 Lower Control Arms Austin Healey 0
C BN1 sitting lower at left rear - I'm told that's normal - really? Austin Healey 13
K TR2/3/3A The "air vent"on the lower part of the front apron below the grille.... Triumph 5
Jeepster Lower wishbone bush replacement. Austin Healey 33
H Post-War Other Herald rear suspension lower block installation Triumph 3
KVH General TR Pressing in the lower/inner control arm bushings Triumph 3
Scotsman TR4/4A Lower steering flex joint upgrade to TR6 Universal joint Triumph 2
Martinld123 Want to lower car about an inch Austin Healey 4
Rut TR4/4A Lower crash pad Triumph 9
KVH General TR Lower Control Arms Triumph 1
BoyRacer BN1 lower control arms Austin Healey 1
B TR2/3/3A Removing front lower wishbone confusion Triumph 3
M TR4/4A Left lower dash crash pad. Triumph 5
Geo Hahn TR2/3/3A lower generator bolt Triumph 7
K TR2/3/3A Refresh...main reson why idle will lower when kicking the gas pedal? Triumph 3
M TR4/4A Lower crash pads for dash....help. Triumph 4
sqbsprite TR6 Frame cracking around lower control arm mount, have you checked yours? Triumph 3
Keith_M Lower wishbone recondition? Spridgets 5
PAUL161 T-Series Windshield lower rubber MG 5
J TR2/3/3A Lower windshield rubber seal Triumph 3
B Lower Steering Column Bush - Where does it go and how? Austin Healey 14
madhouse RF Fender and Lower Cowel Body Parts needed Austin Healey 10
J Poly Lower A-Arm Bushings - One easy question as I am confused Austin Healey 1
CJD TR2/3/3A Lower Inner Wishbone Bushings Triumph 2
gubba TR4/4A Lower Trunnion question Triumph 8
W Etype lower ball joint removal Jaguar 14
R TR2/3/3A Windshield lower seal orientation, again... Triumph 9

Similar threads

Top