• The Roadster Factory Recovery Fund - Friends, as you may have heard, The Roadster Factory, a respected British Car Parts business in PA, suffered a total loss in a fire on Christmas Day. Read about it, discuss or ask questions >> HERE. The Triumph Register of America is sponsoring a fund raiser to help TRF get back on their feet. If you can help, vist >> their GoFundMe page.
  • Hey there Guest!
    If you enjoy BCF and find our forum a useful resource, if you appreciate not having ads pop up all over the place and you want to ensure we can stay online - Please consider supporting with an "optional" low-cost annual subscription.
    **Upgrade Now**
    (PS: Subscribers don't see this UGLY banner)
Tips
Tips

Etype lower ball joint removal

why

Jedi Trainee
Country flag
Offline
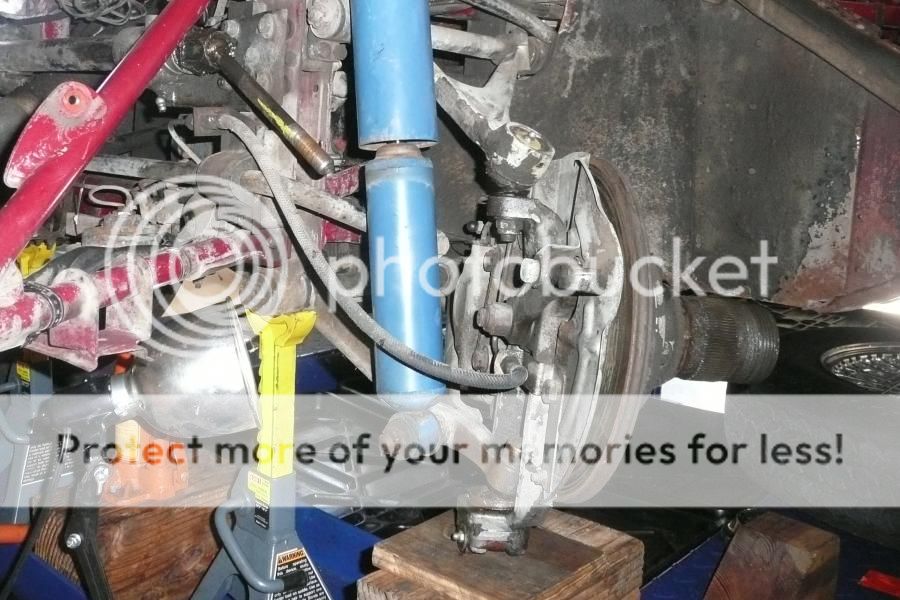
Well, it took days and days to replace the brake servo master cylinder (many fittings never touched in life of car), all seems well; however just about time the one resevoirs brake fulid disappeared I noticed a clunk in the front L going over bumps, did the test and movement in lower ball joint. Probably original (67), had to make nut swiss cheese and hammer it off with chisel, took bottom fitting off, tried all the usual (no special tools) tricks that I have used in past to push out ball joints, such as tapping lower arm with hammer, arranging jack point to use cars own weight to push out while tapping madly, much liquid wrench, general tapping on top of bj, grabbing with vice grip to turn (silly me), nothing budges. Google search said this was typical. One way is to use an apparatus that is like a vice grip- C-Clamp, ball joint fork that allows you to turn something that inceases torque to pry the thing apart--at that when it worked guy said it sounded like a gun going off. Thought perhaps this greatest of all forums might have some advice--by the way, all else still attached. Oh, some comments mentioned a metal ring that goes in the bottom of the side walls on the bottom plate (with 4 bolts). The ball joint kit I have (bought many years ago) has no such ring, any help on that one. Thanks, Jay ('67 series I)
By the way, thanks to all those who helped with the brake fluid disappearing problem, by the way, I found taking off rear shock to do bleeding took just about 5 min per shock, and just as straightforward putting back on. Also person who added pic of modified wrench, yeah, I have almost a full set of such, tghey really come in handy, but used a brake bleed screw wrench that is like the round end of standard wrench but with a slot in it for the brake line to pass through and then you get one extra flat when you lower it around the bleed screw.
 
D

Deleted member 8987

Guest
Guest
Offline
So....reading this three times....you have the stud out of the spindle, right?
So no need to unload the torsion bars.
Most of the original UPPERS had a snap ring, I thought.
Lowers on early Jags anyway are four bolts, with shims for loading the joint initially.
You don't have four bolts, or are you still trying to get the stud out?
 

trrdster2000

Luke Skywalker
Country flag
Offline
Why, go to Advance Auto or what ever place you use and get a Pinion bearing puller, big square piece of metal with a inch or so cut out and a bolt. Just had to do the same on the F150 lower, price $19.00, could have saved me hours of banging and clanging. Very heavy duty tool, and yes it will come out like a gun shoot.

Wayne
 
D

Deleted member 8987

Guest
Guest
Offline
So, are we talking the tapered stud or the mount to the lower control arm?
I did front end work as part of my normal, everyday work for decades.
Find yourself a BFH. Turn the spindle out of the way...remove brake components as needed (you'll need the rotor off anyway, if I recall) and HIT the spindle horizontally on the outside of where the stud goes through.
The shock will knock it free.
Hopefully your shocks will keep the torsion bar from whipping the control arm down and ripping your leg off.

We always did it with the nut still on...about 1/2 way backed off.
Never failed me yet.
 
OP
W

why

Jedi Trainee
Country flag
Offline
My '67 has bottom of ball joint system,under spindle at end of lower wishbone, a metal housing with what looks like fiber material cup inside that is socket for the ball, this metal housing is held with four nuts, each two of which have a metal plate through which bolts go with a tab that bends up to keep bolts from turning. I have the main nut off the top of the ball joint post and the whole bottom system apart. by adjusting jack in right position, the ball itself can be made to stick out. Big idea was to use huge plumbers wrench which did get a tight grip on exposed ball (keep it clean folks) but could not rotate it. TOC, what is BFH? Also, with spindle turned & all brakes attached, can get hammer to side of where the upper ball tapered stud goes through at end of lower wishbone, but can not access straight on. Will check with nearby 45 min drive auto stores (downside of living in little S.CA beach town) for Pinion Bearing Puller. By the way, is wear in system of fiber cup or on metal. Must confess that if all else fails was thinking of just putting new bottom components on, shimming as necessary or is that ridiculous?
Thanks again for all the comments.--Will take day off and let old arthritic joints recover, upside of little S.CA beach town.
 
D

Deleted member 8987

Guest
Guest
Offline
Not straight on. You may (will?) mushroom the end and maybe enough you can't get it out (doesn't take much).
BFH is a standard automotive (and other term ) for Big Freaking Hammer.
You should have some downforce on the control arm from the torsion bars. You need a little. May require another person with a crowbar applying force between control arm and spindle.
Hit the spindle on the side.
The shock virtually always knocks them loose.
I have several sizes of pickle forks that work usually if you can't hit the spindle.

Dave
 
D

Deleted member 8987

Guest
Guest
Offline
Make sure you follow you factory manual on setting up your new ball joints before you grease them or install the boot and bolt it to the control arm.
There are selectable shims that need to be right on initial installation.
Dave
 
D

Deleted member 8987

Guest
Guest
Offline
I don't know how you're progressing, or how much you have disassembled to do this.

One thing that can be a problem is letting the lower arm hold fast against the shock.

You have no downward force.

What I have done on recalcitrant ball joint studs is to jack up the lower control arm enough to fit a block of wood between the bump stop and the upper control arm. This retains torsion bar pressure (down) on the ball joint stud and keeps you out of the shock. When it pops, the shock stops the arm (we're not talking a 4X4 here...usually a scrap of 1X).

Waiting to hear how you progressed.
Dave
 
OP
W

why

Jedi Trainee
Country flag
Offline
The nut is off the ball joint, the bottom cap is removed as is the brake line running to the caliper. PB Blaster soaked daily for almost a week, jacks put everywhere imaginable in terms of shifting weight, tapped on both sides wishbone end, tried 2jaw gear puller--no fit, tried pittman arm puller which fit just great other than hub carrier not allowing puller to center the main bolt over the top of ball joint stud-covered about 1/2. Stopped in local shop with experience and said heat is next thing, propane unit would not do it, so x that. No advanced auto parts in my area, all 3 chains did not have and big general auto shop store showed me on computer pinion bearing pullers that would not fit. Since Etype has lower ball joint positioned differently than most cars, anyone with any additional hellp used specifically on Etype lower ball joint please let me know. Will work a little more and then hope I can get nut back on banged up ball joint threads, and having chipped out most of liner from bottom ball cap, I can get it the 2 mi to a shop.
Came across a permanently lubricated replacement ball joint, even though I already have new replacement kit, the lubed one is only $18 so does anyone have experience with it, also no shimming involved in putting it back on.
Thanks again, all, J
 

trrdster2000

Luke Skywalker
Country flag
Offline
J, if worse comes (and it generally does),drill a hole in the exposed stud and stick a big nail or split pin through it, that should get you to a shop with no worry about coming apart. We had to use locking pins on race cars back in the day..


Wayne
 
D

Deleted member 8987

Guest
Guest
Offline
The nut is off the ball joint, the bottom cap is removed as is the brake line running to the caliper. PB Blaster soaked daily for almost a week, jacks put everywhere imaginable in terms of shifting weight, tapped on both sides wishbone end, tried 2jaw gear puller--no fit, tried pittman arm puller which fit just great other than hub carrier not allowing puller to center the main bolt over the top of ball joint stud-covered about 1/2. Stopped in local shop with experience and said heat is next thing, propane unit would not do it, so x that. No advanced auto parts in my area, all 3 chains did not have and big general auto shop store showed me on computer pinion bearing pullers that would not fit. Since Etype has lower ball joint positioned differently than most cars, anyone with any additional hellp used specifically on Etype lower ball joint please let me know. Will work a little more and then hope I can get nut back on banged up ball joint threads, and having chipped out most of liner from bottom ball cap, I can get it the 2 mi to a shop.
Came across a permanently lubricated replacement ball joint, even though I already have new replacement kit, the lubed one is only $18 so does anyone have experience with it, also no shimming involved in putting it back on.
Thanks again, all, J

I read this twice. No place did I see you actually hit the spindle next to the ball joint stud, much less hard enough to "jolt" the inner circle.
You ain't getting it out with a puller, full stop.
Why go away from factory? Originals lasted you this long.
My experience over the years with permanently greased ball joints and tie rod ends is not good, long-term.
Slap them in to sell it is about all one should do with it.

Pull the torsion bars, pop the upper ball joint, remove the lower control arm and spindle for transport to the machine shop.
 

Geo Hahn

Yoda
Country flag
Offline
No place did I see you actually hit the spindle next to the ball joint stud, much less hard enough to "jolt" the inner circle...

^^That impact^^ is what I recall got it done.

BallJoints_zpsed8c9cf7.jpg


With the nut off that lower ball joint I used this to apply pressure:

https://www.harborfreight.com/3-4-quarter-inch-forged-ball-joint-separator-99849.html

Then used two hammers on opposite sides of the fitting, one held against it as the other smacks it. I think the idea is that you momentarily knock the circle out of round and the taper fit releases.
 
OP
W

why

Jedi Trainee
Country flag
Offline
Mechanic took air impact hammer to it, zippo. Then he froze it and welding torched it and air impact hammer worked. Had him put permanently lubricated ball joint in (will keep replacement kit for next owner if he wants it original--LOL). Mechanic pointed out that top shock bushing on same side shot, driving home made same-old noise that made me suspect ball joint. However, I am sure I saw movement on ball joint when tire off ground and levered around with 2X4, I have decided never to think about that again. Just ordered new front shocks, had both off within 10 min.
Thanks for all the support and ideas along the way, J
 
OP
W

why

Jedi Trainee
Country flag
Offline
Geo, good for you for fiinding that tool, it was the answer that showed up frequently in UK forums, but could not find in U.S. I searched Harbor but did not find, anyway by then I had just "plum wore out." Not available at any of standard chain auto stores or even stand-alone hard core shop. Glad you posted it and link, I guess the other side will wear soon. J p.s. multiplicity of jack stands and wood blocks look very familiar, hitting both sides simultaneously I saw "Ed" of Wheelers Dealers show use.
 
Similar threads
Thread starter Title Forum Replies Date
AngliaGT Bugeye,Jag eType,Citation,Fiesta,etc. Spotted 1
Basil Series 1 EType Spotted 2
Basil Back to the EType finally Jaguar 5
W Etype Ser. I front crossmember jacking Jaguar 3
Basil Wow - EType breaks auction record! Jaguar 0
HEALEYJAG 73 etype roadster seat belts Jaguar 1
W EType Temp Gauge Jaguar 6
Basil EType Tie-rods Jaguar 2
Basil More Drool. A 3.8 Flat Floor EType! Jaguar 13
Basil Met a local guy with an EType Jaguar 7
Basil POsted pics of 63 EType Jaguar 0
W Etype Chrome Strip Windshield Gasket Jaguar 2
D retro-fit 1970 etype with three carb set-up Jaguar 3
Basil Jaguar EType Documentary Jaguar 1
B EType steering question Jaguar 6
C Battery for my 64 Etype coupe 3.8 Jaguar 10
KenASh Etype mufflers Jaguar 0
Basil MGB MGB beat my beloved EType! MG 13
KenASh Etype rear brake calipers Jaguar 13
Basil Slight problem with rear hubs [EType] Jaguar 7
Basil Gun metal gray EType spotted Jaguar 12
Basil EType Owners List Up-dated Jaguar 0
Basil EType Owners list Latestd Jaguar 2
Basil Ok, I've started back on the EType! Jaguar 23
J Shopping for a EType - what to watch for? Jaguar 13
D Purchasing a 66-68 EType Jaguar 5
P etype roadster interior Jaguar 0
P classic auto insurance 69 etype Jaguar 5
P etype OTS 69 seat pans Jaguar 1
J What is a Series 1 1/2 EType ?? Jaguar 13
Basil Finally back to my EType Project Jaguar 11
Racer-X- Metalastik Lower wishbone bushings and upper fulcrum pin bushings Other British Cars 6
S TR2/3/3A lower small brass bushing Triumph 13
S TR2/3/3A steel bushings for the lower Arms Triumph 10
newmexTR3 TR2/3/3A How to remove thrust washer from lower wishbone & trunion Triumph 7
Endoscaper TR2/3/3A Lower Front Suspension Overhaul Triumph 2
R TR6 Lower A-arm trunnion bushings Triumph 18
edkap2002 TR6 lower radiator hose fitting Triumph 2
K TR2/3/3A Advise on previously botched front end lower fulcrum support bracket. Triumph 5
B Wanted 100-6 or early 3000 upper and lower grille opening pieces Austin Healey Classifieds 1
Jim_Gruber PS Steering Rack Lower Bracket Needed - Some DA over torqued and snapped it in half Spridgets 9
B TR2/3/3A lower wishbone installation Triumph 5
L TR2/3/3A Bent lower wishbone arms Triumph 6
K TR2/3/3A Front suspension inner Lower wishbone bush area? Triumph 3
KVH TR4/4A Should I Cut the Lower Windshield Gasket Triumph 2
KVH TR4/4A Lower Control Arm Front Pivot Bolt Triumph 9
KVH General TR Pressing in the Lower Control Arm Bushing Triumph 6
C TR6 Lower A-arms Triumph 8
wangdango BJ8 lower radiator hose! Austin Healey 2
W TR2/3/3A Tell me there is a trick to removing lower control arm pin... Triumph 45

Similar threads

Top