 Hey there Guest!
 Hey - did you know if you click on the title of a thread it will take you to the first unread post since you last visited that thread?
 but were afraid to ask:
  STOP!! Never post your email address in open forums. Bots can "harvest" your email! If you must share your email use a Private Message or use the
  smilie in place of the real @
 Pretty Please - add it to our Events forum(s) and add to the calendar! >>
Guys,
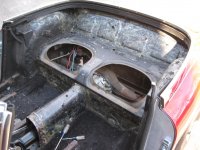
I am hoping to get some advice on installing a new panel for the back seats on a BJ7. I am doing a pretty extensive rust removal campain on my car. I am in the process of removing the original rear seat deck panel and installing a new Kilmartin panel. I have not cut out the original yet. Before removing I started checking the way the back seats fit in the openings on the original panel Vs. the way they fit into the new Kilmartin.
They seem to nest very nicely in the old rusted panel, but when I try to place them into the new panel (which is nto installed yet), they don't appear to nest in properly. Some of the angles on the Kilmartin are slightly different than the original, and the rim/edge lip around the seat opening for the Kilmartin is much taller than the original.
Before doing too much cutting/trimming or bending the Kilmartin, I wanted to ask if anyone has had experience fitting in a new one of these panels....and if there are any techniques or fitting tricks that would make the job easier. None of my fitting has been done with the rear deck carpeting in place.
I truely appreciate or any advice or help. thank you
Bill
![IMG_0554[1].jpg](/community/data/attachments/24/24612-9490dab1dd7d10818a8b96a7f64ed7aa.jpg)
![IMG_0560[1].jpg](/community/data/attachments/24/24613-414d19b7abd7ea718709c4474af6486c.jpg)
![IMG_0555[1].jpg](/community/data/attachments/24/24614-7d03e58a6ffcabd900623dc67ea5a613.jpg)


 A friendly reminder - be careful what links you click on here. If a link is posted by someone you don't know, or the URL looks fishy, DON'T CLICK. Spammers sometimes post links that lead to sites that can infect your computer, so be mindful what you click.