 but were afraid to ask:
 I have read numerous past posts about steering box adjustments and the one Randall posted measuring end float using a dial indicator is excellent. My question is, is there any way to measure end float without totally dismantling the steering with the unit still in the car? For instance, is it somehow possible to make the measurement after loosening the horn/direction signal assembly to get to the top of the shaft. I would rather not remove the wiring running down the inner tube if at all possible. Trying to do something the easy way usually doesn't work but I can hope anyway.

-
 Hey Guest!
British Car Forum has been supporting enthusiasts for over 25 years by providing a great place to share our love for British cars. You can support our efforts by upgrading your membership for less than the dues of most car clubs. There are some perks with a member upgrade!**Upgrade Now**
(PS: Upgraded members don't see this banner, nor will you see the Google ads that appear on the site.)

Tips
- We have a special forum called "Member Articles" where you can submit actual articles for consideration for publication. Learn More
- Don't have an Avatar? If not, your avatar will default to the 1st character in your username. Go into "Account Details" to change your Avatar.
- Some basic forum navigation info: click
 Hey - did you know if you click on the title of a thread it will take you to the first unread post since you last visited that thread?
- Hey Guest - Is your British Car Club in our Clubs database? If not, send me a PM - Basil

- Looking for a local club? Click the "Clubs" tab above and browse hundreds of clubs world-wide.
- Add Android or iPhone APP: click
- Did you know - any picture or video you add in your posts in any marque-specific forum will also get added to the Media Gallery automatically.
- A few more tips about posting and replying: click
- Hey there Guest - be sure to keep your profile page up to date with interesting info about yourself: learn more
- More tips and tricks on Posting and Replying: click
 STOP!! Never post your email address in open forums. Bots can "harvest" your email! If you must share your email use a Private Message or use the
  smilie in place of the real @
- Want to mention another member in a post & get their attention? WATCH THIS

- So, you created a "Group" here at BCF and would like to invite other members to join? Watch this!
- Hey Guest - A post a day keeps Basil from visiting you in the small hours and putting a bat up your nightdress!
- Hey Guest - do you know of an upcoming British car event?
 Pretty Please - add it to our Events forum(s) and add to the calendar! >> Here's How <<
- Hey Guest - you be stylin' Change the look and feel of the forum to fit your taste. Check it out
- If you run across an inappropriate post, for example a post that breaks our rules or looks like it might be spam, you can report the post to the moderators: Learn More
- If you would like to try some different "looks" or styles for the site, scroll to the very bottom, on the left and click the Style Selector.
You are using an out of date browser. It may not display this or other websites correctly.
You should upgrade or use an alternative browser.
You should upgrade or use an alternative browser.
TR2/3/3A Another Steering Box Question
- Thread starter BobbyO
- Start date
Sorry Randall. When I said "nut" I meant the gland (olive). Anyway, I have now gotten myself totally confused. I have an extra half steering column so I went out, removed the lid, the shims from the end (three measuring 0.012 total, two 0.003 and one 0.006) and replaced the end piece. Now, exactly what are we measuring the end float of? It seems to me if you add shims it would increase the distance between any pieces in the steering box thereby increasing an end float. Where am I wrong? What is the float we are taking out by adding shims?
CJD
Yoda
Offline
The plate which has the olive is shimmed to set the play in the worm gear roller bearings. Any play in the worm gear, so the steering shaft can move in and out is lost motion in the box, and results in play. Shim this plate to have 0 play to a very slight preload. You do not want enough preload to bind the rollers, or they will fail.
The plate on the top, having the adjuster and lock nut, does not get shimmed. You set the position of the steering peg in relation to the worm gear with this adjuster. You must have the gear in the center position to set this adjustment, as it is machined to be the tightest at center. It will have increasing play as you turn the gear off-center. Set the peg adjuster so there is only slight resistance at the center position. The resistence is so slight that the book recommends removing the steering linkage to set it properly.
Clear as mud?
TR3driver
Great Pumpkin - R.I.P
Offline
You're not wrong at all, that is exactly right. Add shims to increase float (or reduce preload). We're adjusting the end float of the worm between the two ball bearings.It seems to me if you add shims it would increase the distance between any pieces in the steering box thereby increasing an end float. Where am I wrong? What is the float we are taking out by adding shims?
In general, add a shim, measure the end float (how far the column moves in and out when you wiggle the drop arm back and forth), then remove shims equal to (or .001" larger) than what you measured. Don't forget to back off the screw on the top first, as it can cause a false reading.
FWIW, I've got an old book on Bishop steering that suggests removing shims until the shaft will "spin round when turned, but not too freely." But I still suggest using the dial indicator.
Also FWIW, Enco almost always has a dial indicator and magnetic base set on sale for under $25. Today it's only $19.95
https://www.use-enco.com/CGI/INSRIT...MKANO=402&PMKBNO=3680&PMPAGE=48&PARTPG=INLMPI
Or Harbor Freight sells for about the same price.
Great explanation John. After I removed the final two steel shims and put the end plate back I could see it was not flush against the end of the steering box. After awhile it dawned on me that the end plate was shimmed in order to allow for adjustment for "end float" caused by wear on the plate. By removing shims you could take out any float caused by that wear. With Randall's method of using a dial indicator and adding a shim you're introducing additional false float, measure the total with the dial indicator and remove the necessary shims. Great job guys. Now I need to work on the steering box in the car, not the one on the bench. Sadly the one in the car is not a split column.
CJD
Yoda
Offline
Yep, good luck getting a dial indicator on the long shaft! Remember that the worm gear is held by ball bearings, so the play should not change unless the balls are damaged or incorrectly installed to begin with. The balls should not wear if they are in good shape.
Most play in the gear is from wear of the peg on the pitman arm that engages the worm inside the box. This would be taken up by the adjusting nut, but more than a little wear cannot be adjusted out. The peg is easy to replace ( or just remove and re install 90 degrees off), but the box will have to come out of the car to do it.
Most play in the gear is from wear of the peg on the pitman arm that engages the worm inside the box. This would be taken up by the adjusting nut, but more than a little wear cannot be adjusted out. The peg is easy to replace ( or just remove and re install 90 degrees off), but the box will have to come out of the car to do it.
In case you did not know, the long shaft has to have the apron removed to get the shaft out and the pitman arm removed. The pitman arm itself is stuck very tight to the splines, so even if you get the nut off, the arm is the biggest challenge. I am curious what adjust concerns you most? If the box is steering difficultly, the problem is often the idler arm right across from the box. You can fix some leaks with the shaft in, but any major service needs to have the box out.
steve
steve
TR3driver
Great Pumpkin - R.I.P
Offline
Even the long column will come out without removing the drop arm (aka Pitman arm). You do have to remove the apron, though.
IMO the adjustments are NOT to take up wear, rather they are to compensate for manufacturing tolerances. The ball bearings won't wear at all (less than one shim thickness) until they start to fail and need to be replaced (which should be about forever). The peg and worm certainly wear, but they don't wear evenly. If you try to get a tight spot in the center with worn components, there will be places where it is too tight and the result will be damage to the peg & worm (from overloading, tight spot plus steering force).
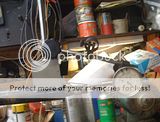
Here's a shot of a dial indicator mounted on a long column.
IMO the adjustments are NOT to take up wear, rather they are to compensate for manufacturing tolerances. The ball bearings won't wear at all (less than one shim thickness) until they start to fail and need to be replaced (which should be about forever). The peg and worm certainly wear, but they don't wear evenly. If you try to get a tight spot in the center with worn components, there will be places where it is too tight and the result will be damage to the peg & worm (from overloading, tight spot plus steering force).
Here's a shot of a dial indicator mounted on a long column.

CJD
Yoda
Offline
In case you did not know, the long shaft has to have the apron removed to get the shaft out and the pitman arm removed. The pitman arm itself is stuck very tight to the splines, so even if you get the nut off, the arm is the biggest challenge. I am curious what adjust concerns you most? If the box is steering difficultly, the problem is often the idler arm right across from the box. You can fix some leaks with the shaft in, but any major service needs to have the box out.
steve
I always just take the body off first!
Now I'm into a whole new ball game. I understand I would have to remove the column in order to rotate the peg 90 degrees but that brings me to another question. What is the best way to remove the drop arm? I have two spare split column steering boxes with drop arms attached but no upper portions of the column. Consequently I installed the rigid column. There was no drop arm on that column so I attempted to remove one from the other columns. No luck. Was able to remove the nut but the drop arm wouldn't move. Even took one to a machine shop and they couldn't remove it either. Didn't have much confidence in that machine shop but gave up and purchase a drop arm on ebay. It's installed so now I'll have to remove it to rotate the peg.
CJD
Yoda
Offline
A well equipped shop would have no problem removing the arm. I use a pitman shaft puller that I bought many years ago. It has a couple clamp arms that grab the steering arm and a center screw that pushes on the shaft. Takes less than a minute, and most of that is finding the tool in the box. Even at todays rates it shouldn't be that much...
Just googled "pitman shaft puller" and at least a dozen different designs popped up, starting at $19. Good investment for dealing with all your boxes!
Just googled "pitman shaft puller" and at least a dozen different designs popped up, starting at $19. Good investment for dealing with all your boxes!
TR3driver
Great Pumpkin - R.I.P
Offline
A purpose-made Pitman arm puller is the only way to go. The opening was a little small on the one I got (they do come in different sizes), so I machined it to fit the TR. I'm pretty sure this is the one I started with
https://www.harborfreight.com/tie-rod-and-pitman-arm-puller-62708.html
but I opened the jaws up to 1.5" (from 1.3125") to fit the TR arm. (I used the mill, but you could do it with a file and lots of elbow grease. Be sure to cut the same amount from each arm, so the opening stays centered under the forcing screw.)
I have done it using a common 2-arm puller, but I had to make up brackets to lock the puller arms onto the tabs on the Pitman arm (otherwise they kept slipping off) and it was close to breaking by the time the arm came loose. The purpose-made tool works much better.
TR3driver
Great Pumpkin - R.I.P
Offline
+1 Unless it has been replaced recently, I would always change the bushing and seal.When you remove the shaft and arm, there will also be a brass bushing in the case of the steering box that probably/should needs replacing to get your box tight again.
IMO, wear in that bushing is one of the main reasons for hard steering. It lets the rocker arm tilt, which causes the peg to bind in the worm (only when steering force is applied). A friend of mine even added a second bushing in the web above the first one, which sounds like a good modification (I plan to try it next time I have the box apart).
Wear in the bushing also causes them to leak.
IIRC the book says the bushing should be reamed after installation, but I've not found it to be necessary. YMMV