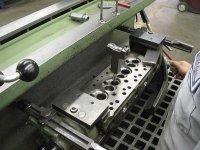
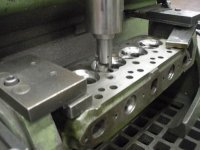
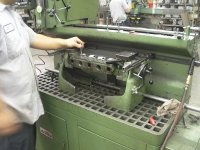
Kim set up is not too bad, it take maybe 5 minutes to set up this machine. I looked at getting this same sort of set up for my bridgeport mill, it about $2500 for the set, but Chris Dover at Dover Cylinder heads deas the job dozens of time each day, and is expert at it, and it leaves me to do things I do and let experts do things for me that they excell in.
I once read something on one of the forums, ironicly put out there by someone that post here, and I'd think this is as good as time as any to address this.
Oh by the way Kim, this has nothing to do with you, just so you know.
It went a little something like this.
"Hap at Acme Speed Shop does not do all his own machine work, I think I would prefer to deal with a shop that does all it own machine work, and suggest you to do the same"
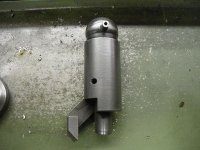
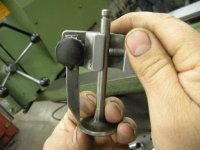
This may have been one of the most moronic things I ever read on a forum posted by someone who thinks he knows what he is talking about. Here's the truth for you that rely on one machine shop to do it all for you, especially assemble your engine. Normally a machine shop does not assemble engines, nor are most machine experts on every apsect machine work, or a given engine, most high end engine builders are not fully equipped machine shops. Asking a single machine shop to do it all for you is like asking the your general doctor to do open heart surgery on you. I do some machine work inhouse for example I have Sunnen connecting rod hone, and AG300 rod gauge, this was important to me, because it lets me the last guy in the equation to nail the rod bearing clearence on my bluprinted engines. With that being said I use experts in their field, and that's not one stop shopping, I use Spartan Cranksaft for grinding cranks,(so does most machine shops in this area as well) thats all they do and are one of the best cranks shops in the country, they get work from everywhere, luckily they are my friends, and only 25 miles from me. When I take a crank to my crank shop, it's probably alot different than when most of you do it, the instructions are far from "hey grind my crank", it more like grind my crank to this exact 1/10th of thousands of a inch, because I've already done my caculations on exact journal size to get to my target journal size and nail my clearence, then of course I double check it all, most can not even read a mic consistently in that small of range, it's a skill set for sure and one I excell in, becaue I want to learn that and own that skill set. Chris at Dover Cylinder heads does my hardend valve seat installation and about 2 years ago starting cutting my seats with the above pictured machine, as the machine does a better job than a human could ever do with stones or a Neway cutters, running and setting up the machine is no biggie, the bigger issue is the $100K it cost. I do some machine operation in other shops on my own or assist in the job, for example I always assist in the boring of my blocks, and balancing of my cranks, where I personally use the machines. I worked in full service machine shop, and have pretty much done it all, when I decided to open Acme it was never my intentions to become a full service machine shop and have never stated such, that's 1 million dollar investment these days , and if I did that, I wouldn't have time to build these engines, I would be doing machine work on whatever walked in the door to pay for all that equipment, so no thank you, not what I want to do, or how I want to spend my money.
Long story, short, I, over time have developed a system of engine building, that includes experts in their field in certain machine operations, and as past full time machine shop worker, I dictate what and how it is to be done. So there ya go, thats something I wanted to get off my chest for awhile, the person who posted this nonsense over on the old MG BBS, and does post here, has long tried to convince people he knows what he's talking about, maybe this person would better serve the LBC community by sticking to subjects he might actually know what he is talking about, and machine shop work and building engines is not that.
I was once told by a good friend, some of the best advice I think I ever got. "The smartest 3 words a man can say is, I don't know". There are no truer words ever spoken, but it seems that some people, especially on forums, try to convince everyone they know everything. I guess it makes them feel smart, but the truth of the matter is while none of us are always correct, when you respond on forum by the seat of your pants on a given topic, you really don't know, you may fool the majority of the people, but for the people who really know, you will be immediately indentified as a fool.
Whew, I wanted to say that for some time now, it felt good to finally say that.
 Hey there Guest!
 Hey - did you know if you click on the title of a thread it will take you to the first unread post since you last visited that thread?
 but were afraid to ask:
  STOP!! Never post your email address in open forums. Bots can "harvest" your email! If you must share your email use a Private Message or use the
  smilie in place of the real @
 Pretty Please - add it to our Events forum(s) and add to the calendar! >>


 A friendly reminder - be careful what links you click on here. If a link is posted by someone you don't know, or the URL looks fishy, DON'T CLICK. Spammers sometimes post links that lead to sites that can infect your computer, so be mindful what you click.