• The Roadster Factory Recovery Fund - Friends, as you may have heard, The Roadster Factory, a respected British Car Parts business in PA, suffered a total loss in a fire on Christmas Day. Read about it, discuss or ask questions >> HERE. The Triumph Register of America is sponsoring a fund raiser to help TRF get back on their feet. If you can help, vist >> their GoFundMe page.
  • Hey there Guest!
    If you enjoy BCF and find our forum a useful resource, if you appreciate not having ads pop up all over the place and you want to ensure we can stay online - Please consider supporting with an "optional" low-cost annual subscription.
    **Upgrade Now**
    (PS: Subscribers don't see this UGLY banner)
Tips
Tips

TR2/3/3A TR3 fender patch panel question

59Rob

Senior Member
Country flag
Offline
Does anybody have any experience with the Moss front fender patch panels?
I just got them and they are dead flat and they oil can. My door which has never been hit by the looks of it has about 3/8" curve from top to bottom.
Is this normal?
 

CJD

Yoda
Country flag
Offline
I assume you bought the patches that go along the bottom, from the front of the door to the front wheel opening? Once installed, they will have a slight curvature, giving the side of the car a bit of a boat shape. Being flat is not a problem, as the curvature is in a single direction, and not very pronounced. You will have to mark where to cut the old fender, using the new patch. Then cut off the old and weld in the new patch.

What type welder are you using?
 
OP
5

59Rob

Senior Member
Country flag
Offline
I'm using a MIG welder. It's quite a pronounced curve. A repair was done about 40 years ago with a flat piece. I grinded out about 3/8" of filler around the center. Not much point in repeating that process.
 
OP
5

59Rob

Senior Member
Country flag
Offline
Also, yes those are the patch panels I'm using. Here's a pic of the door profile at the front. Obviously the back of the fender needs to match preferably without a gallon of filler.
 

Attachments

  • PXL_20230307_233910841.jpg
    PXL_20230307_233910841.jpg
    3.6 MB · Views: 85

CJD

Yoda
Country flag
Offline
That's about right. You will have no problem getting the curve into the panel. Remove all the filler. It will only cause problems if even a small bit is left behind.

Use small gage MIG wire at a rather low heat to tack the new panel along the horizontal line. Then add the bend and tack it along the door jam and bottom that mounts under the tub. Finally work in the stiffening wire around the wheel opening, which will finish out your curve without any filler.

If you follow the following thread, starting at post #98, you can see my front fender repairs. I did not use patch panels, but the process is exactly the same:

 
OP
5

59Rob

Senior Member
Country flag
Offline
What do you mean by add the bend? Hammer and dolly the bend in after welding? Wouldn't it be better to add the bend before welding?
Great documentation on your build! I'm going to read that from start to finish, lots of great info. I've restored several cars but this is my first Brit. It's like it was built on another planet
 

CJD

Yoda
Country flag
Offline
The bend is VERY mild in metal terms. If you want to add it first, you can. What holds the bend is the rear flange to the door jam, the bottom flange, and the wire bead in the wheel opening.
 
OP
5

59Rob

Senior Member
Country flag
Offline
I think I need to remove the rear flange and hopefully use a shrinker on it. Currently it's also dead straight so it isn't going to hold any curve. I'll use an English wheel and put at least a bit of curve in the patch panel.
I think in hindsight I would have been better off making my own from scratch.
 

DavidApp

Yoda
Gold
Country flag
Offline
I had to make a replacement rear flange and found the HF Shrinker and stretcher did a great job. Got it curved very nicely. I did have oil canning issues at first but found it was probable caused by the inner sill being placed in the wrong position by the PO. I bolted the top portion of the wing to the body and then the patch panel to the inner sill to get the distance correct. It was about 1/8" or more longer than the wing that had come off the car. The 1/2" of bondo may have hidden the oil canning before.
Short hot tacks and move around the repair.
David
 
OP
5

59Rob

Senior Member
Country flag
Offline
That sounds about right, I had a ton of mud on it, definitely takes care of the oil canning.
I figure a little English wheel work will take care of the oil canning in the new patch. Hopefully my little shrinker will do the job in the flange, if not I have a friend with an industrial size one.
I think fitting and welding it is best on the car as you did. Won't be able to get to that for a bit. Still need to rip out everything in the engine bay plus dash and pedals, then get the body off. Long road ahead
 
OP
5

59Rob

Senior Member
Country flag
Offline
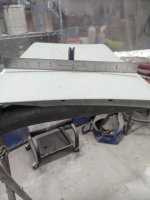
The shrinker and English wheel worked well. It will probably need some final tweaking before welding but it has some shape and no more oil canning. Still need to do the other side.
 

Attachments

  • PXL_20230310_230718800.jpg
    PXL_20230310_230718800.jpg
    2.4 MB · Views: 67
Similar threads
Thread starter Title Forum Replies Date
M TR2/3/3A TR3 Small Mouth Inner Fender Holes Triumph 3
K TR2/3/3A TR3's without the fender mirrors........... Triumph 6
1 TR3 Fender spats sold on EBay. Triumph 5
K TR2/3/3A TR3 Spats?...Fender Skirts. Triumph 3
S TR2/3/3A tr3 front fender Triumph 4
luke44 TR2/3/3A TR3 Front Fender Washers? Triumph 19
T TR2/3/3A Question on side seal on TR3 fender seal plate Triumph 1
Kleykamp TR2/3/3A TR3 rear fender bolts Triumph 2
S TR2/3/3A rear fender vinyl tr3 Triumph 6
Kleykamp TR2/3/3A TR3 rear fender needed Triumph 18
tinman58 TR2/3/3A Fender skirts TR3 Triumph 31
luke44 TR2/3/3A TR3 Rear Fender Alignment at Front Edge Triumph 8
mountainman TR2/3/3A TR3 Rear Fender Mounting? Triumph 4
mountainman TR2/3/3A TR3 Front Fender Bead Triumph 2
mountainman TR2/3/3A TR3 Front Fender Alignment Triumph 5
mountainman TR2/3/3A TR3 Fender Mirrors Triumph 25
K TR2/3/3A TR3 Fender Skirts or Spats Triumph 28
mountainman TR2/3/3A TR3 Rear Fender Bolts Triumph 2
CraigLandrum TR2/3/3A TR3 Fender dum-dum use? Triumph 16
M TR2/3/3A TR3 Rear inner fender dent repair Triumph 8
TR4nut TR2/3/3A TR3 fender removal.. Triumph 4
martx-5 TR2/3/3A TR3 Fender [Wing] Beading Triumph 9
newmexTR3 TR2/3/3A TR3 chassis to inner fender - how bad is this? Triumph 4
fad64b TR2/3/3A TR3 rear fender stone-guards Triumph 22
mcguijo TR2/3/3A TR3 rear fender Triumph 15
mctriumph For Sale front apron 57 Tr3 Triumph Classifieds 0
Rick_Thompson TR2/3/3A TR3 rack and pinion kit problem... Triumph 17
S TR2/3/3A differential hubs early tr3 and tr2 Triumph 22
S TR2/3/3A Tr2 and early tr3 differential. Triumph 10
71TR6 TR2/3/3A TR3 WIper Wheel box Triumph 2
RonC General TR TR3 Shifter on TR6 Triumph 8
jfarris TR2/3/3A Modern Temporary Donut Spare for a TR3 Triumph 1
G TR2/3/3A What color is my car? TR3 1958 Triumph 16
S TR2/3/3A Rebuilding a tr3 transmission and second gear, Triumph 57
mctriumph For Sale Odd bit for Tr3 and early 3A Triumph Classifieds 0
S TR2/3/3A turn a tr3 non-full syncro transmission into a full syncro Triumph 3
Y TR2/3/3A I cannot get my TR3 in correct timing. Triumph 7
mctriumph TR2/3/3A Safety mods every Tr3 should get Triumph 12
Editor_Reid TR2/3/3A Whitewall Tires for TR3 Triumph 11
curdy TR2/3/3A TR3 Stalling Issues Triumph 8
S TR2/3/3A Anyone cut out the spare tire compartment on a tr3? Triumph 4
S TR2/3/3A put a differential back into a tr3. Triumph 2
S TR2/3/3A tr3 breather pipe Triumph 2
2 For Sale 1957 Triumph TR3 Small Mouth Triumph Classifieds 0
Jim_Stevens TR6 Barn find of TR6 and many TR3 parts Triumph 9
J For Sale 1958 TR3 Partout Triumph Classifieds 12
R For Sale TR3 Dash Triumph Classifieds 0
D TR2/3/3A Thread and size for tr3 fuel tank vapor line fitting Triumph 0
S TR2/3/3A Aluminum door capping for tr3 Triumph 12
tinman58 TR2/3/3A TR3 at Mammoth Lakes Triumph 4

Similar threads

Top