• The Roadster Factory Recovery Fund - Friends, as you may have heard, The Roadster Factory, a respected British Car Parts business in PA, suffered a total loss in a fire on Christmas Day. Read about it, discuss or ask questions >> HERE. The Triumph Register of America is sponsoring a fund raiser to help TRF get back on their feet. If you can help, vist >> their GoFundMe page.
  • Hey there Guest!
    If you enjoy BCF and find our forum a useful resource, if you appreciate not having ads pop up all over the place and you want to ensure we can stay online - Please consider supporting with an "optional" low-cost annual subscription.
    **Upgrade Now**
    (PS: Subscribers don't see this UGLY banner)
Tips
Tips

TR2/3/3A Tr2 and early tr3 differential.

sp53

Yoda
Country flag
Offline
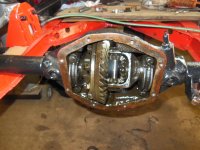
Tr2 and early tr3 differential. I finally got the oil seal out of the diff in pieces. Part of me wants to remove the diff section to clean the inside of the diff case, but I have never removed the pumpkin/diff before, so not sure what to expect, or if I should remove the diff gears at all. the pumpkin looks straight forward- kinda- to remove There are 3 bearings inside that I have not bought yet, and they are about 300.00 bucks total. Perhaps I should remove the diff to inspect them. i do not know.

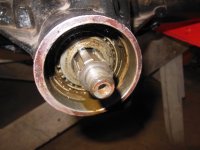
The collar of the original carrier bearing hub was cut and pitted. I had another collar but the inside of this one is damaged. it must have been loose and moving around to get the cuts inside where the splines are.

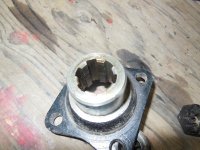
The other two outer axle wheels hubs are pitted and cut on the outside. I am wondering if I took some solder and filled in the cuts and pits and then sanded the hub smooth if that might seal the hub and work. New parts are NA, so maybe the speedy sleeves might work best if I can find them.
Anyone have any thoughts on that?
steve
 

CJD

Yoda
Country flag
Offline
I would not change the bearing caps inside the differential. They are a lot like engine bearings, where they are installed and then line-bored afterwards. If you are lucky, the new one will match, but there is always a chance it will be off a few thousandths if replaced. Unless the original cap is unserviceable, I'd recommend just using it.

The trick to the pumpkin is it has shims on the outside of the bearings. The bearings (and therefore the pumpkin) should be press fit into the case. So, even after removing the bolts, the pumpkin will stick. The easiest way to remove the pumpkin is to support the axles on jack-stands on your work table. Unbolt the bearings, and place a pad under the pumpkin. Then, slowly rotate the entire differential so the pumpkin turns downward. The weight of the differential will be enough to flex the bearing holders and the pumpkin will fall out on its own. Be sure to be ready to catch the shims, which MUST be reinstalled on the same side they came out.

Once the pumpkin is out, you can remove the pinion if you need to. If you do, you will need a new crush sleeve to reinstall...and you must keep track of those shims too!

After installing new bearings, you must check the rub pattern of the pinion gear on the ring gear, to ensure it is still good. With new bearings it often requires a slight change to the shim packs.

The hubs are up to you. I don't think solder will affect much. If there are deep scratches, you can polish them out with a grinder, then sand paper until all the stress risers are gone. The hubs are over- strong. Fatigue would be the failure mode over time, so just take a look for cracks when you grease the car each season.
 

mctriumph

Jedi Warrior
Silver
Country flag
Offline
To do it right, will take new bearings and someone that is good with differentials. Talent
is hard to find.The bearings can be sourced many times by going to a bearing supply house
and putting the thing on the counter and asking for a new one. Try for Japanese bearings or
German, never China.
I would be very careful with the axels ,you have the 4 bolt hubs and these bits may be
unobtainium. The outside of the hub is cosmetic, do as you wish. Inspect the races and the rollers
to make sure that they are up to useable standards.
Again , consult a pro that knows diff's.
Mad dog
 
OP
S

sp53

Yoda
Country flag
Offline
Thanks you guys much appreciated. I could not tell in the diff that if I undid the cap bolts inside whether the diff would slide out or not. After reading the comments, I think I will leave it alone. Everything seems to work inside the diff, so now I am thinking if it is not broke do not fix it.

The case is stinky with a lot of old grease in places. I took my finger and pulled out most of the crap that accumulated at the bottom. Now I am thinking, I can take my oil can that squirts a strong stream and squirt oil inside on the gears and let the oil run to a pan underneath. The clean oil should mix with the old grease and fall out that way. Could the detergents in the oil cause a problem somewhere?

I could not post pictures for some reason. I think my space on the server is used up and I cannot figure out how to delete some pics to add some.

steve
 
OP
S

sp53

Yoda
Country flag
Offline
I got the pictures to upload, so I thought I would post them. Do you guys see the little scars inside the hub? The scars seem to me they would not cause a problem once everything is torqued down.
 

Attachments

  • DSCN1669.JPG
    DSCN1669.JPG
    3.3 MB · Views: 31
  • DSCN1674.JPG
    DSCN1674.JPG
    3.3 MB · Views: 30
  • DSCN1673.JPG
    DSCN1673.JPG
    3.3 MB · Views: 30
  • DSCN1675.JPG
    DSCN1675.JPG
    3.3 MB · Views: 26

CJD

Yoda
Country flag
Offline
I think those may just be machining marks from the factory...even if not, I would not be concerned. The stress is at the base of the teeth, not on the top where the scratches are.

There is also no concern for detergent oil in the diff. It will help loosen the sludge, which is always a lot in these, since the oil and grease can mix. Diffs do not collect metal from old missed shifts like our trannys do, so there is no worry about the detergent releasing chunks of metal like in an old tranny.

edit: well, as I zoom in, I see the scratches continue down the sides of the teeth. It might have to do with the tight splined locking rings? I still would not be concerned with using the hub. Use sealant, but after time, TR2 hubs will always leak. I have learned to remove the rear brake drums at every oil change to wipe out the oil that leaks.
 
Last edited:

mctriumph

Jedi Warrior
Silver
Country flag
Offline
Muck it out with white kerosene in the squirt gun . Look for swarff , and get it gone. CJ is right
it will likely leak past the splines if you do NOT use a gasket sealer to at least minimise it.
My favorite fill is 70/90 synthetic gear lube with a bit of STP or Lucas stabilizer .
Mad dog
 

Rick_Thompson

Freshman Member
Silver
Country flag
Offline
Just went thru all of this after completing my second restoration. Yes, second. First one was over 40 years ago, so it was time. Did a lot of upgrades,but failed to do anything with the diff other than outer seals. Well, somehow a locking tap was left in the pmpkin and it got picked up and jammed the pinion gear, throwing me and the car sideways and onto the shoulder of the road. Thankfully I was clear of traffic and didnt hit anything...but decided then and there to go thru the diff and spiff it up.
I have a great shop local to me...not for Brit cars, but a diff is a diff and they were able to replace everything with the parts I got them. Don't mean to diss on Albert at TRS, but the kit they are sending out has the wrong outer pinion bearing in the kit. My shop says they got it close, but it needs further inspection.
So once I had it back I could see there was no preload on the pinion gear. That outer bearing was about .025 too thick, not allowing any tension or preload on the pinion. An online search showed that Moss was also selling an identical kit, and it too was being sent out with the wrong bearing. Once notified, they changed the kit. It is a Timken 15100SR, but the kit contains a 15100 without the SR.
Since the bearing was too thick, the shims were useless in trying to get the 15 inch lbs of torque required.
Once I got the 15100SR bearing and an assortment of shims, I managed to get the torque to 125 ft lbs on the big nut and when rotating the pinion gear, it was taking about 13 inch pounds....close enuf in my book.
 

CJD

Yoda
Country flag
Offline
Here in Ft Worth we have several bearing supply companies. I would not consider ordering bearings. I remove them and walk them into the bearing supply. No muss...no fuss...and I am guaranteed of the correct bearing from a decent manufacturer.
 
OP
S

sp53

Yoda
Country flag
Offline
Wow Rick that must have been a real shock to have a diff lock up like that. I never thought they could bind and put me into danger, but yeah woow.

Steve
 
Similar threads
Thread starter Title Forum Replies Date
S TR2/3/3A differential hubs early tr3 and tr2 Triumph 22
S TR2/3/3A early tr3 and tr2 kick panels Triumph 3
S TR2/3/3A TR2 and early TR3 wipers Triumph 7
K TR2/3/3A TR2 early TR3 windscreen stanchions Triumph 1
SASSAMON Wanted WTB Early Sidescreens and mounting hardware for TR2/3 Triumph Classifieds 4
J TR2/3/3A Paint type on early TR2? Triumph 4
YankeeTR TR2/3/3A TR2/Early 3 Door Wood Triumph 5
Nanhook TR2/3/3A TR2 shoes Triumph 2
CJD TR2/3/3A TR2 Annual Triumph 6
1955TR2 TR2/3/3A TR2/3 Oil Leak Where Oil Sending Pipe Connects to the Block Triumph 8
S TR2/3/3A WTB a tr2 original grill Triumph 0
P TR2/3/3A TR2 Horn Mounts Triumph 7
mctriumph For Sale Tr2/3 scuttle mechanism Triumph Classifieds 7
S Wanted tr2 original grill Triumph Classifieds 10
J TR2/3/3A TR2 Fitting/mounting rear wing Triumph 11
A TR2 Transmission overhaul Restoration & Tools 0
D TR2/3/3A TR2 Flying Mile question Triumph 11
S TR2/3/3A tr2 muffler clamp Triumph 10
Southwarks TR2/3/3A TR2 door help! Triumph 2
G For Sale NEW PHOTOS: Triumph TR3 Chassis Frame + Front Suspension, Fits TR2,TR3,TR3A,TR3B Triumph Classifieds 1
P TR2/3/3A TR2 Headlight Trim Question: Triumph 8
A Wanted Girling Axle for TR2 Triumph Classifieds 5
J For Sale Triumph TR2 or TR3 elbow trim Triumph Classifieds 0
S TR2/3/3A tr2 and tr3 back trim above the back cover Triumph 0
KVH General Tech Heater and Vent Control Cables--TR2 thru TR4, and more . . . Triumph 3
S TR2/3/3A tr2 Triumph 18
newmexTR3 For Sale TR2-4 performance valve springs, collars, exhaust seats, cotters Triumph Classifieds 0
J For Sale Triumph Tr2/3 seat foams Triumph Classifieds 1
J For Sale Triumph TR2, TR3, TR4 CAM SHAFT FOR SALE Triumph Classifieds 0
K For Sale TR2-TR4 Camshaft Sprockets...New...1/2 Price Triumph Classifieds 0
C TR2/3/3A TR2 Axle/wheel bearing removal Triumph 2
T For Sale TR2 - TR3 Gas Cap for sale Triumph Classifieds 1
71TR6 Set of 4 TR2/3/4 Connecting Rods Triumph Classifieds 0
P New member TR2 carpets Triumph 7
S TR2/3/3A Tr2 hood Triumph 8
W TR2/3/3A TR2 wiper motor mount Triumph 1
TRopic6 For Sale TR2/3 Brass Fuel Shutoff Tap [for parts] Triumph Classifieds 0
J For Sale Triumph TR2 TR3 TR3A New Moss Motors Black Karvel Style Carpet Kit Triumph Classifieds 0
S For Sale Triumph TR2/TR3/TR3A/TR3B Workshop on CCD/ROMManual – 1953 - 1962 Models Triumph Classifieds 0
Leatherman Wanted Red and black TR2 / 3 front emblem Triumph Classifieds 6
Jim_Stevens For Sale New TR2-3A inner sill assemblies Triumph Classifieds 3
C TR2/3/3A TR2 Chassis Clips Triumph 4
B For Sale TR2-3 Door Top Wood Rail Triumph Classifieds 1
T Wanted WTB TR2/TR3 Hood/Bonnet Latch Assembly with Prop Rod Triumph Classifieds 0
P TR2/3/3A TR2 color questions Triumph 23
C TR2/3/3A Triumph Tr2 Down Under Triumph 2
T TR2/3/3A About to strat a full restoration TR2 / TR3 ? Triumph 66
CJD TR2/3/3A TR2/3 Guru Final Exam Triumph 59
R TR2/3/3A TR2 Scam Triumph 13
JFS TR2/3/3A TR2 Rear Plate Lite on TR3A Triumph 10

Similar threads

Top