• The Roadster Factory Recovery Fund - Friends, as you may have heard, The Roadster Factory, a respected British Car Parts business in PA, suffered a total loss in a fire on Christmas Day. Read about it, discuss or ask questions >> HERE. The Triumph Register of America is sponsoring a fund raiser to help TRF get back on their feet. If you can help, vist >> their GoFundMe page.
  • Hey there Guest!
    If you enjoy BCF and find our forum a useful resource, if you appreciate not having ads pop up all over the place and you want to ensure we can stay online - Please consider supporting with an "optional" low-cost annual subscription.
    **Upgrade Now**
    (PS: Subscribers don't see this UGLY banner)
Tips
Tips

TR2/3/3A Rebuilding a tr3 transmission and second gear,

sp53

Yoda
Country flag
Offline
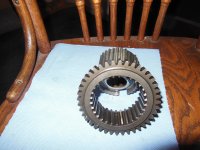
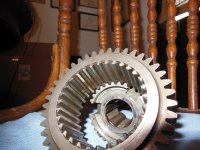
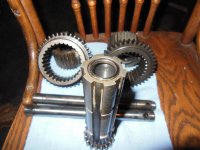
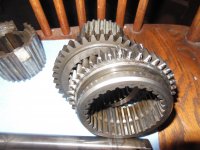
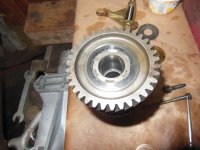
Rebuilding a tr3 transmission and second gear, my experience with tr3 transmissions and second gear is testy. They seem to want to pop out of second gear. I have heard the popping out of second gear problem when going downhill, mostly, is because the shifter ball is too loose on the second gear shifting rod. I tighten the ball real snug and the only difference I felt was the trans shifted harder and still keep falling out of gear. I have had that transmission in the same car for twenty-five years, and just live with the popping out of second going down. I have had other transmissions do the same thing and basically fall out of second gear when they want to.

One guy told me it was the dog teeth on second gear were wore out. I guess he meant the smaller teeth that come into contact with the brass synchronizer ring, but I do not know, and I am very curious how to fix the popping out of second on this rebuild. So please advise

The way I see it and from what I have read and referring to John on this one that the brass synchronizer ring needs to fit very snug on the tapered surface of the gear so that it drags some (I guess) and then when the gear becomes engaged in the shifting process the drag helps slow things down for a moment and lets the teeth mess during the shift? Maybe, I am still trying to understand.

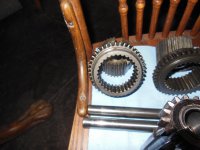
Next it seems to me that the first gear slider with the 3 little balls and springs would hold second gear from falling out, also. The snug fit on the synchronizer with second gear should help too, and it looks like the teeth on top of synchronizer might help hold second gear in place likewise. But, not sure!

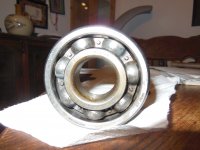
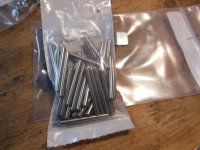
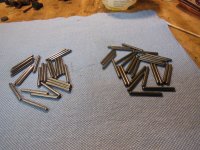
Anyways I have been picking through a collection of gears and bushings to find the best parts for this transmission rebuild, and found the same old problem with respect to aftermarket parts. In short, what aftermarket parts are worth using as opposed to original parts that look good? The stock Hoffmann main bearings M12K V3 do not seem to be available and the aftermarket main bearings cost 27.00 and I do not know if they will last. TRF sells a main bearing for 119.00 that is a higher quality than their aftermarket that costs 34.00, but that is it ---everything else is aftermarket. In addition, I have a bunch of old needle bearing that look good or should I purchase the aftermarket needle bearings for 15.00 and trust them. I honestly do not think so. I feel the best thing is to carefully pick through the needle bearing I have and use them, maybe!!!!

It is clear; I lost my mind and need a box of NOS transmission parts for Christmas.

steve
 

Attachments

  • DSCN1550.JPG
    DSCN1550.JPG
    3.3 MB · Views: 50
  • DSCN1547.JPG
    DSCN1547.JPG
    3.3 MB · Views: 53

CJD

Yoda
Country flag
Offline
Hey Steve...

Could you take a picture of the splines inside the 1-2 slider? There should be a very slight open area in spline that serves to hold the 2nd gear dog teeth (in most sliders).

The synchro blocker ring should not have anything to do with the tranny popping out of gear, but rather only if you have grinding issues going into 2nd gear. I assume the feeler gage is showing the proper blocker ring spacing? As the blocker ring wears it will move closer to 2nd gear. I don't see any obvious problems in the pictures. Let's see the inside of the slider next...then we can move on to other things to check.

If you inspect the balls individually in the main and front bearings and see no pitting, scoring, or corrosion...then I would have no problem at all re-using those bearings. I can't tell if I am seeing old grease or or corrosion on the bearing in the picture above. If it is corrosion, then I would replace it...if grease, then no problem.

By far the first bearings to go out in these trannies are the needle bearings inside the counter (cluster) gear. They seem to have a lubrication issue in the design of the tranny and tend to fail first. The needles then send metal throughout the tranny that damages the other bearings. If you have trouble finding the individual needles, then I believe the captured needle bearings from the later TR4-6 tranny will fit. (But I could be wrong about that since it's been so long since I've had one apart).

Remember the inside of the counter gear, and the outside of the counter gear shaft are the races that the needle bearings roll on, so those must have perfect surfaces with no pits or obvious wear.
 
Last edited:

CJD

Yoda
Country flag
Offline
Something I question as I study the picture of the main-shaft above. The 2nd and 3rd gears appear to be touching each other. The top-hat bushing should separate them by a bit. Is your top-hat bushing still in good shape? It could just be the angle of the photo. If the top hat is missing the flat portion and allowing the gears to touch, then it will limit the throw of the slider onto the 2nd gear dogs...one possible reason to cause the tranny to pop out of gear if it never fully engages.
 
OP
S

sp53

Yoda
Country flag
Offline
Hey thanks John, the gears on shaft I had just placed on the shaft to illustrate the second gear area I was trying to understand better. The bearing in the picture is one I pounded of an input shaft with a hammer and drift. The bearing was toast. It has a sever marbles in a jar noise and will not glide smooth when spun. A couple of the other main bearings sound kinda OK.

Anyways I took some pics of the best first gear slider set up I have. That is another deal should I purchase some perhaps uncalibrated springs or trust the stock stuff that is probably weaker.
 

Attachments

  • DSCN1553.JPG
    DSCN1553.JPG
    3.4 MB · Views: 55
  • DSCN1554.JPG
    DSCN1554.JPG
    3.4 MB · Views: 48

CJD

Yoda
Country flag
Offline
Thanks...I see nothing at all wrong with the slider or gears. They are not excessively worn. That is the true Triumph second gear, as the sliders are machined perfectly straight. Some aftermarket gears have little areas that look like worn spots that help retain the second gear dog teeth within the slider when it is under load. They would help, but we can look elsewhere...

Since your gears are great, the popping out has to be in the shifter assembly in the cover. It sounds like you already tried the simple fix of stronger detent springs. That makes me suspect something that is preventing the slider from moving fully into 2nd. That would include:

- The wrong 1-2 fork, or it is installed wrong, or placed in the wrong place on the shaft
- The 1-2 shift shaft is the incorrect length
- The link that the shift lever engages is severely worn (would have to be really worn!)

If all these check out, then I would recommend that, after you rebuild the box, mock up the cover with only the 1-2 components and shift lever installed in the cover. Then, you will be able to install the cover, shift into 2nd gear, and then carefully remove the cover to see where the 1-2 slider is. That will tell you if it is being slid fully into gear or not.

Just to reiterate...I see nothing at all wrong with the gears, so I would have no reservation about reassembling the box. Then we can concentrate on the shifter assembly in the cover.
 
OP
S

sp53

Yoda
Country flag
Offline
Thanks John I think I understand what you are saying about the dog teeth and the slider. (Just to be sure the dog teeth are the small teeth on the gear?) What I see is the dog teeth and the slider teeth at some point are tight up against each other and the slider could slip over the dog teeth and the synchro ring perhaps holding them together if they are engaged completely. I really like the idea about pulling up the cover to see where the gears are at after shifting.

However, I am still over my head with somethings like getting the measurements I see in the pictures with a feel gauge on the Top hat bushing. One bushing I have is cracked and the other looks ok or good.

My other first gear has ball indents in the center of the spines. The gear itself has a chip starting that might be able to be ground down.

On the slider inner piece there is a forth ball and spring for oil or something that looks like it does not come out friendly. Do you take them out?

Thanks for the tip about looking inside the gear cluster shaft. It looks good to me. I do not remember taking out the metal collars that hold the needle bearings in place. I think years ago I work around them. This time I might take a punch and see if I can remove them easily.

I probably should just get some new needle bearings. The one piece deals for the slightly later box might go inside, but do not know. I think I get the loose ones and compare them to mine then evaluate their quality because they are only 16.00 and heck maybe I will use them.

The main bearings are a more difficult decision because I want the quiet sound of a newer bearing, but my fear is the bearing will not last. I could pay up at TRF and get their top brand or use the old ones that I think sound ok. I cannot see the balls inside the bearing or the races; they are made closed up, I think.

I am taking the rear axles in to have the new bearing pressed on there and perhaps I will ask one of those guys what he thinks.

Should I swap to the slider with indents in the center? There is that chip on that tooth, but the end gears are not as rounded. 50/50

steve
 

Attachments

  • DSCN1555.JPG
    DSCN1555.JPG
    3.4 MB · Views: 43
  • DSCN1556.JPG
    DSCN1556.JPG
    3.4 MB · Views: 39
  • DSCN1557.JPG
    DSCN1557.JPG
    3.4 MB · Views: 39
  • DSCN1558.JPG
    DSCN1558.JPG
    3.3 MB · Views: 36

CJD

Yoda
Country flag
Offline
Yes, the dog teeth are the small peg teeth on the gears. Just a quick description of how the synchronizer works:

When we start with the tranny in neutral, you can picture that 2nd gear is spinning with the countershaft, which is always geared to the input shaft. If you are in the process of shifting from 1st gear, you picture that these gears are spinning very fast from revving the engine.

The slider clutch is splined to the output shaft, so it is always spinning at the relative speed of the rear wheels, even when the clutch is pressed.

So, the 2nd gear is spinning to fast to match the speed of the slider clutch...we have to match them in speed, or the little dog teeth will grind until they engage. That wears the teeth.

Look closely at the relation of the 2nd gear and how the synchronizer ring sits on it. First, there is a cog that keeps the synchro ring spinning with the gear...BUT!...the cog is rather loose, so the teeth on the synchro ring can be turned about 1/3 of a tooth off from the teeth on the gear. This will be important in a minute. Now, press the ring onto the gear cone. The ring has little sharp ridges that bite into the steel gear cone surface. If the ring is still in useable shape, and the gear cone does not have grooves cut into it...then pressing the synch ring onto the gear will almost lock them together, so the ring holds onto the gear and keeps the two tight. They should not slide easily between the limits of the cog we mentioned earlier. A new ring on a new gear will lock tight. A decent ring on a decent gear will hold snuggly.

Back to the shift...

At this point the clutch is in, but the 2nd gear is still spinning fast from revving in 1st gear, and the 2nd slider is spinning relatively slower. You start to shove the shift lever into 2nd. The slider tabs first hit the synchro ring, which is pushed to the limit of the cog on the gear by the difference in turning of the slider and gear. This puts the synchro teeth out of line, so the slider cannot move fully into the teeth. This mis-alignment of the teeth now takes the force you are pushing on the shifter, and uses it to push the synchro ring onto the 2nd gear cone. The ridges in the synchro ring start to grab the gear cone, and brings the gear (along with the countershaft, input shaft, and clutch disc that are attached) to the speed of the slider (still being spun by the rear wheels). You can picture that this grabbing force between the synchro ring ridges and the gear cone brings them to the same speed.

At this point, once the gear is up to speed with the slider, there is no longer a difference in speed to keep the synchro teeth out of alignment with the gear teeth. So, at this point the pressure you are putting on the shifter is enough to align the teeth, so the slider can continue to engage the gear teeth. You let out the clutch and the shift is complete.

So...what if you try to shift into 2nd at a stop light and do not press in the clutch? As above, you start to move the slider clutch until the tabs hit the synchro, the teeth are pushed out of alignment with the gear teeth because of the difference in speed (the slider has no speed since the wheels are stopped, and the gear is spinning at engine idle speed with the clutch engaged). In this case, the synchro cannot bring the entire running engine down to zero speed, so the teeth remain out of alignment, and the shifter will move no farther. You feel like the shifter hits a springy wall, as you are jamming the synchro ridges into the gear cone, but they cannot resolve the difference in speed of the two parts! The tranny will never go into 2nd gear in the situation, although the gear does not grind, since the misaligned synchro teeth are preventing the steel teeth from meeting each other.

Case 2, let's say you do a perfect shift, but the synchronizer is worn out. In this case, everything goes as in the explanation above, and you press the synchro ring into the gear cone. But this time the ridges are worn out, so they never fully grab the cone. Since they do not grab the cone, the ring is easily pushed by your shifter force to align the ring teeth with the gear teeth, and the slider teeth attempt to engage the gear teeth...with a difference in speed between them. The teeth will engage, but you get a short grind as they do!

I hope this clears the synchro operation. As you can see, the synchro ring cannot pull the slider away from the gear. It cannot cause the popping out of gear, only prevent the slider from ever reaching the gear teeth. The synchro ring is often called a "blocker ring", as it "blocks" the slider from moving onto the gear teeth until the speeds are matched.
 
Last edited:

CJD

Yoda
Country flag
Offline
Whew...now to check the synchro for wear.

First of all, if the gear ground before you disassembled the tranny, then it will grind after the rebuild...toss that synchro! They are relatively cheap, and worth discarding if there is any doubt.

Now, if it was working when disassembled, then we need to see how much life is left. If you picture the way it works, the ridges inside the ring are always bearing against the steel gear cone. Steel beats brass, so the ridges slowly wear down. As the ridges wear down, the synchro ring can move closer to the gear. The space you have the feeler gage in your first pic will get tighter as the ring moves closer with wear. To measure, just push the ring against the gear, like in the pic, and check the gap. If it is less than the spec in the manual, then toss the ring as it is toast.

Finally, if you put a new ring in, you should use 600 grit wet or dry paper to smooth the old grooves in the gear cone. The old synchro will have left slight grooves, so they must be removed or the new ring ridges cannot grab the cone properly. There are bad synchro's out of the box, too. If, after smoothing the cone the new ring will not tightly grab the gear, try another synchro ring. If none of them grab tightly, then the cone is worn and the gear has to replaced.

That's everything you will ever need to know about synchros!
 

CJD

Yoda
Country flag
Offline
The top hat bushing.

This is a design flaw in this tranny. If the washer is cracked or completely broken where it meets the bushing, then it is toast. Toss it.

The top hat has a double job. It is a replaceable bushing for the gear, so you wear the bushing instead of the more expensive steel gears. Then, it ads a bit of separation between 2nd and 3rd gear. If you shift very hard and/or fast into 3rd gear, then it stresses the washer on the top hat. Once the top hat washer cracks off, it may or may not have any affect at all on shifting. It allows the 3rd gear to move back slightly, so the 3rd slider may not fully engage the 3rd gear dog teeth. I suppose it could also do the same for 2nd gear, in certain cases of wear and breakage.

In theory the steel top hat sold should prevent any more trouble from this bushing...

Note...In my TR2 I used the brass top hat, but I ground off the end, so the bushing is the same length as 2nd gear. This does affect the spacing of the 3rd gear slightly, but will take all the stress off the top hat in shifting. In theory, again, this should prevent my top hat from ever failing from cracking at the washer. I have had no trouble at all with the tranny, but I won't know for sure how well this mod works until I tear the tranny back apart...if I ever do.
 

CJD

Yoda
Country flag
Offline
I seem to remember the 4th "ball" in the slider hub, but I cannot remember what it was. Those balls and springs help to keep the slider clutch centered on the hub. They are redundant with the detent balls in the top cover.

If you look at my old tranny thread, I show how I carefully groomed the 1st gear teeth with a dremel tool using a cutoff wheel. The teeth were originally sharply pointed, to allow the slider to slide easily over the gear teeth. If they get rounded or chipped, then you get that annoying issue where you try to engage 1st and the shifter gets stuck. You have to spin the tranny by releasing the clutch for a second and try again until you get sharper teeth to match up.

Your 1st gear teeth look really good to me. If one or two are gouged or chipped, then carefully groom those back into sharp edges. Of course, look VERY closely around the chips for the start of cracks. Gears are face hardened (only a few thousandths of an inch deep), so once chipped they are prone to cracking. The chips cause stress risers that can cause cracking. Of course a crack is grounds to toss the gear...a crack will eventually end up with a lost tooth, which wrecks havoc inside the box.

I am amazed you got the spacer and inner washer out of the cluster gear without removing the end washers. For the price I would likely replace the needles...just because they are the weakest part of this box. In a new box, with everything perfect, they will be the first bearings to fail. The inside of your cluster looks a bit rough, but that is likely just the flash picking up tiny scratches. If you run your finger over the bearing surfaces and feel nothing, then it should be good. By the way...running the hardened needles on plain steel is not a prefered design. I am sure that is why they later switched to contained needle bearings with their own hardened races. Now that I think about it, I think these newer bearings only fit the later, TR4 synchro boxes, as the cluster had to be enlarged to take the extra diameter of the contained bearings. We are stuck with the original design...oh well!?!
 
Last edited:
OP
S

sp53

Yoda
Country flag
Offline
Wow John what an excellent explanation of how the inner workings come together. I saw it very clearly in mind. The largest part I was missing was how the synchro and the gear cone come together on the gear cone with the dog teeth. I never knew the (synchro) brass ring need to grip the gear cone to mess the speeds, so the shifting could take place smoothly, good job. I always thought the condition of the brass ring had to do with the rounding of teeth.

This job started because it is too cold outside, so brought the transmissions into a warm area. One transmission was of unknown condition that I bought ten years from a guy, and the other trans was a parts transmission put together from a different rebuild, so I do not have any history shifting either of the transmissions.

My daily driver is the one that falls out of second (which I rebuilt). I also have the car I just finish with an overdrive trans that I did not rebuild, and I just installed the transmission on a visual inspection. I must have been younger then because I just open the cover on the OD trans and put that trans in the new project to test the transmission before I rebuild it. So I drive that car also, and it wants to fall out of second when warm. I thought every bodies’ does.

I had to remove the brass end washers on the cluster gear assembly. On the trans that had never been disassemble, at least by me. The washers where a very tight fit in the lower case, probably too tight. The shaft actually looked burned from friction and the gears where stuck. I pounded them off with a 4 inch wide- by 2 feet long piece of ¾ plywood with the edge of the plywood like a tomahawk, worked. I do not think the shaft was oiling up because the holes in spacer had a stain where they were located and looked all vanished and a little burned.

Anyways hopefully this transmission after rebuilding will go into the tr2. The cluster gear is going to have to be made of donor pieces. The first gear shaft I pictured is the best I have; on the other one the teeth are ground way back. The other teeth on the cluster should be fine. I have 4 of the brass washers to choose from to place on the ends of the counter shaft. I should probably buy new; these are scared up a little. From what I can tell, the shafts needs some wiggle room. I would have to look at the number, and I need a better plan to get the measurement made in the box because I really do not have plan yet. Perhaps even the washers need to filled or something. But getting an actuate reading is important.

Steve
 

CJD

Yoda
Country flag
Offline
You have your hands full! That's funny you wound up with 2 boxes that pop out of 2nd. I'm really leaning towards the cover assembly causing the 2nd problems.
 

TR Tom

Freshman Member
Country flag
Offline
What a great write up!
I too have been living with a trans popping out of 2nd for a long time (in my case 40 years). Although mine is a TR4, I think I also have issues with my top cover. You mention several potential trouble spots in post #5 but unfortunately the factory manual doesn’t give enough information to verify which might be the problem. Would be wonderful if you could go into more detail on how to troubleshoot and dial in a TR top cover. You mentioned engaging 2nd, then pulling the cover, but I’m not sure how to verify 2nd is fully engaged. My gut reaction is that may be my problem.
Any and all information will be greatly appreciated.
Thanks,
Tom

P.S.
Internals of box have been gone through by several different professionals over the years (with absolutely no improvement) but I don’t think a lot of attention has been paid to the cover, other than maybe tightening up the screws on the detent ball assemblies.
 
Last edited:
OP
S

sp53

Yoda
Country flag
Offline
Hi Tom yeh I am waiting on parts; they should be here today then I will rebuild the trany and learn more about second gear myself too.
 

CJD

Yoda
Country flag
Offline
I intentionally didn't go into cover problems, as I find the cover is more complicated than the gears! The cover assembly itself is not the complex part, but rather that there were so many possibilities:

TR2, 3 synchro box.
TR2 with overdrive, which required a different 3/4 fork to trigger the OD cutout switch.
TR3 with overdrive, adding the 1/2 cutout switch, with corresponding fork change
TR4 with 4 synchros, changing the reverse rod, fork, and lockouts, along with throw differences for the 1st gear.
Somewhere in all this the lockout mechanism changed from balls to rods and balls.

I suspect that when the forks changed, there were minor changes to the shift rods and lockout locations. Shoot, it is even possible to assemble the forks onto the shafts backwards. Now, take the fact that we are 70 years down the road with all these (and likely more) minor changes...the result is a lot of our trannies are assembled from what was laying around at the time. I suspect some of these parts may affect the throw on second gear.

The good thing is that, as far as I know, the cover casting itself is unchanged over the decades. The bad thing is that any cover will accept any rod, fork, and lockout configuration, whether it is compatible with the box you are bolting it onto or not.

So...that is why I think Steve may want to assemble the cover with just the 1/2 rod and fork, and test the amount of throw the 2nd gear is getting. I suspect it is not fully engaging the gear when the lockout is engaging?!?
 
OP
S

sp53

Yoda
Country flag
Offline
Ok I am going to start putting the trans back together. I use the Haynes Manual book for their pictures and guidance, and the Moss catalog pictures to help guide me. The Haynes Manual is unclear to me in some places, but it is probably me.

I revived my new aftermarket parts from Moss. The new needle bearings from Moss look good, but the old aftermarket parts fear creeps into my mind( I have stories). I actually looked over all the old needle bearing I had from dismantling old transmissions because I figured they were original and that I might want to use them because of the fear. But again the Moss stuff looks good and identical to the original plus the parts are new.

I figure I will replace all the bearings with the new ones I received from Moss, but fight it all the way. The main bearings are made in Korea, but look high quality and roll and sound better than my old original Hoffman bearings. I will say the original Hoffman bearings sounded real good for who knows how many miles are on them.

I will start at the beginning and assemble the counter shaft with the new Moss needle bearings and put the assembly into the case.

I do have some questions about the back end of the counter shaft where the rear thrust- washer and the constant mesh gear come together on the end. The end of the shaft looks worn and tappers/bevels back into the center of the hole where the shaft and needle bearings sit. I guess the tapering is normal and maybe makes sense for the oil to travel back into the shaft, but I do not know. I will probably use this set up anyway so there is no real point other than understanding more. Any ideas?

The book suggests .010 end float or end play on the shaft. The book also suggests fitting a different distance piece to get the proper end float or I guess grind some off the distance piece you have. I do have a small selection of original distance pieces and thrust-washers. It seems to me that 0.010 should be doable. Hopefully I will be able to set the float somewhere around 0.080 or 0.011 with the thrust- washers I have, mostly because the washer is tight and difficult to get in and out. I have not tried on this counter shaft yet. Any ideas about how to install the last thrust washer on the counter shaft final assembly would be helpful.

steve
 

Attachments

  • DSCN1573.JPG
    DSCN1573.JPG
    3.3 MB · Views: 23
  • DSCN1576.JPG
    DSCN1576.JPG
    3.4 MB · Views: 25
  • DSCN1575.JPG
    DSCN1575.JPG
    3.4 MB · Views: 27
  • DSCN1571.JPG
    DSCN1571.JPG
    3.4 MB · Views: 24

CJD

Yoda
Country flag
Offline
Koreans make very good "stuff", so no worries there. I don't quite understand the shaft taper? If it is all within the thickness of the case, then it has to be "built-in" on purpose. If it extends inside of the case, then I would be suspect. Since the shaft is also the needle bearing race, the shaft must also be perfect in the area of the bearings.

The oil to the countershaft bearings follows this route:

As the countershaft spins, there is a hole in the center that slings oil from the inside to the outside, just like a pump using centrifugal force. This creates a slight vacuum inside the counter-shaft gears. The vacuum then pulls oil into the gears at the ends...both through the end play and the spiral grooves in the thrust washers. So end play and decent washers are important. The washers must not spin, or they will throw out the oil trying to go past them.

If I remember right, it is usually easiest to install the countershaft into the case without the end washers. If you have one handy...use a "dummy shaft" the same length of the gears to hold all the needles in place while the shaft goes into the case. If you don't, just use grease to hold the needles, and don't drop or hit the gears, as that will dislodge the needles. Once inside, you can slip the front washer in place, and then gently tap the rear washer into place. This can be fiddly...use a feeler gage to shove them where needed. Finally work the countershaft through. You can use an awl or your fingers to help align the thrust washers from the outside. I usually use a little sealant on the ends of the shaft...not required on this box, but a throw-back to my Muncie days where the ends of the shaft went to the outside of the case.
 
Similar threads
Thread starter Title Forum Replies Date
S TR2/3/3A Rebuilding the early tr3 starter Triumph 5
S TR2/3/3A rebuilding a tr3 water pump Triumph 22
JFeher TR2/3/3A TR3 Type "A" front brake caliper rebuilding Triumph 17
N TR2/3/3A TR3 Gauge Rebuilding Triumph 6
K TR2/3/3A Rebuilding a TR3 Lever Shock DIY? Triumph 8
mountainman TR2/3/3A TR3 Carb Rebuilding Service Triumph 2
PeterK TR2/3/3A TR3 seat rebuilding with foam. Triumph 4
RedTR3 TR2/3/3A Rebuilding TR3 Fuel Pump question Triumph 5
S TR2/3/3A Rebuilding a cylinder head Triumph 10
S TR2/3/3A when rebuilding a differential Triumph 9
M TR2/3/3A Rebuilding suspension Triumph 29
G Rebuilding Front Seats Austin Healey 4
E TR6 Rebuilding Distributor Triumph 2
JMACENGINESHOP BJ7 Engine Rebuilding Austin Healey 23
S TR2/3/3A Engine Rebuilding. Triumph 14
L MGB Rebuilding a 1977 MGB MG 1
Joel Lester TR2/3/3A What type of valve to use when rebuilding the head? Triumph 10
KVH General Tech Rebuilding the Engine Triumph 5
K TR2/3/3A Rebuilding an Engine?..New Cam Sprocket & Gear...1/2 Price Triumph 0
drooartz Rebuilding rear axle Spridgets 19
T Rebuilding a 1275 for a BE Spridgets 8
pkmh Rebuilding Armstrong Lever Shocks on a BJ8 Austin Healey 28
steveg Steering rocker shaft - chemical rebuilding Austin Healey 3
steveg Rebuilding roadster windshield Austin Healey 24
A Rebuilding Tiger window regulator question Sunbeam (Rootes) 3
S TR2/3/3A Rebuilding Dr2 Lucas wiper motor Triumph 16
S TR2/3/3A rebuilding bomb nose starter Triumph 9
W Looking for engine rebuilding 100-6 Austin Healey 12
KVH General Tech Rebuilding the Engine--a few practice pointers [for me] Triumph 11
R TR2/3/3A Rebuilding H4 carbs Triumph 8
S TR2/3/3A rebuilding door panels Triumph 15
Rut TR4/4A Seat rebuilding Triumph 3
steveg Rebuilding the Dip Switch Austin Healey 9
Tinkerman TR2/3/3A Rebuilding SU carbs 1960 TR3A Triumph 3
Rut TR4/4A Seat rebuilding Triumph 6
CZ_Dave MGB Is it worth doing the Shock Conversion Kit or Rebuilding Exsisting shocks? MG 16
JFeher TR2/3/3A Rebuilding A type OD I Need advise / measurements Triumph 14
KVH TR4/4A Engine rebuilding Triumph 17
gbtr6 TR6 Rebuilding TR6 Engine, Tips? Triumph 7
pbraun Anyone have a 1275 core for rebuilding? Spridgets 8
Got_All_4 TR2/3/3A Continually Rebuilding of my J Type Gear Box Triumph 2
drooartz MGB-GT Rebuilding the seats MG 28
Gray_Cat MGB Rebuilding MGB Overdrive MG 4
Lin Rebuilding a master cylinder for BT7 Austin Healey 3
PatGalvin TR2/3/3A Guide for SU Rebuilding Triumph 8
H TR4/4A 4A convertible top rebuilding sequence Triumph 8
sim Rebuilding Front Suspension 58 sprite spring question Spridgets 6
Lukens TR2/3/3A More questions about rebuilding my steering box Triumph 20
charleyf TR4/4A Hs6 carb rebuilding Triumph 8
S TR2/3/3A Transmission Rebuilding Triumph 29

Similar threads

Top