• Hey there Guest!
    If you enjoy BCF and find our forum a useful resource, if you appreciate not having ads pop up all over the place and you want to ensure we can stay online - Please consider supporting with an "optional" low-cost annual subscription.
    **Upgrade Now**
    (PS: Subscribers don't see this UGLY banner)
Tips
Tips

Rocker arm assembly removal

T

Tinster

Guest
Guest
Offline
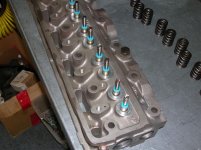
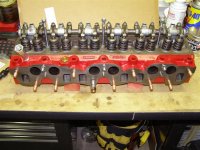
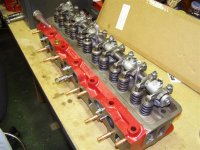
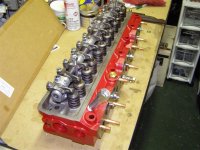
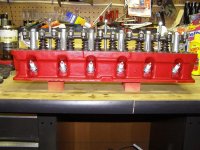
A non-mechanic's struggle. I have no oil from rocker arms No.1 and No. 12 I want to remove the entire assembly and clean it up. I am thinking there is sludge inside.

Q. If I set my engine at cylinder No.1 near TDC, with the dizzy points for plug one open- Can I just pull off the
rocker arm assembly (using my standards "parts board" so I know where everything came from), clean up the components
and put them back where they came from without going thru the process of "Static Timing" and adjusting the valves from scratch?

The car is running really well and I don't want to mess it up
trying to clean rocker arms No.1 and No. 12.

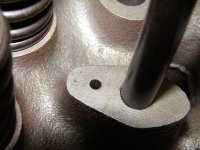
I ran the engine for about 20 minutes with valve cover off and even at 3000 rpms, rocker arms No.1 and No. 12 were dry. I stuck a piece of wire into the weep holes and still dry. A small bit of oil skim is on the rotating push rods of 1 and 12.

When I first purchased the car, no oil was weeping from any of the rocker arms. With a wire, I got all but two unclogged.

All thoughts and suggestions appreciated.

thank you,

dale (Tinster)
 

TR3driver

Great Pumpkin - R.I.P
Offline
Dale, it doesn't matter which way the engine is turned when you take the rocker shaft off; it won't affect the valve or ignition timing. And, at least in theory, it won't alter the valve clearances either.

But when you remove the shaft, loosen the nuts gradually (like 1/4 turn for each nut, then another 1/4 for each nut, etc.) until all the valve springs are released. That keeps the spring pressure from putting the shaft in a bind and potentially bending or breaking it. Do the same when you put it back on.

Be sure to clean out the inside of the shaft, and the passage through the rocker pedestal while you are at it. You could even poke a piece of wire into the hole into the cylinder head, in case there is any sludge in there.
 

tdskip

Yoda
Country flag
Offline
Just use Berryman's or similar for cleaning the shaft Randall?

0996.gif
 

Brosky

Great Pumpkin
Offline
Dale,

Once you get the rocker assembly off, this picture shows the oil galley hole that you will see on the rear of the head. That is where the oil comes up through the rocker shaft from inside the block. It must be clean and open or your cleaning work will be wasted on the stands and shaft.
 

Attachments

  • 18559.jpg
    18559.jpg
    79.7 KB · Views: 278

startech47

Jedi Knight
Offline
Make sure you replace the rocker arms and push rods in the same places they are currently at. The wear patterns are currently matched.
 

TR3driver

Great Pumpkin - R.I.P
Offline
Nothing wrong with the Berryman's; if you've got a vat big enough to get the shaft into. But I don't, so I just use whatever is handy, usually a combination of "jet spray" carb cleaner and rags, plus a rod to push a solvent soaked rag through the shaft (much like cleaning a gun).

And as startech47 notes, it's essential to put the parts back in the same places. Otherwise, at the very least, you need to readjust the valve lash.
 
OP
T

Tinster

Guest
Guest
Offline
Thanks all for the help.
I'm the guy who always uses a parts board, remember?
And takes a gazillion photos.

Thanks all,

dale(Tinster)
 

Brosky

Great Pumpkin
Offline
Dale,

Here is one more view for you.
 

Attachments

  • 18560.jpg
    18560.jpg
    87.2 KB · Views: 249
OP
T

Tinster

Guest
Guest
Offline
Thanks for the photo, Paul.

I can understand why No.1 could get starved for oil.
But No. 12, directly over the oil supply? Puzzling.

thanks all,

dale(tinster)
 

Brosky

Great Pumpkin
Offline
You really won't know until you get the stands and shaft off and see what is really blocked. Probably a few spots are clogged. Obviously, something is not right, but you'll find it.
 
OP
T

Tinster

Guest
Guest
Offline
Well, it appears the monsoons have quit today and sun is out.
I'll start a parts board and the process of taking the assembly apart for inspection and cleaning.

thanks,

dale(Tinster)
 
OP
T

Tinster

Guest
Guest
Offline
tdskip said:
Good luck with it Dale. Should we be expecting a write up on this once you are finished?

<span style="color: #990000">Yupper! I'm about 1/3 finished my "How To" for diagnostics
and replacing crankshaft thrust bearings in a TR6. I've got
a few hundred miles on the new thrust bearings, so I guess
my work was correct. End float at .007"

Once that is completed and if I don't mess up doing the
rocker arm assembly, I'll do How To for it also.

Wish me luck!

dale(Tinster)</span>
 

Brosky

Great Pumpkin
Offline
You can handle it easily. Just follow Randall's advice about removing the assembly slowly by releasing the shaft hold down nuts incrementally, rather than popping one nut off at a time off and you'll be fine.

Punch 12 holes (numbered)in a piece of cardboard and that will serve as your guide for the push rods. Just clean them one at a time so they don't get mixed up.

If you completely disassemble the shaft, do the same thing as you've done with your boards in the past and it will be fine.

Just make sure you block any areas that can allow something to fall down into the block when everything is off of the head. And don't forget the main oil feed hole at the rear. That must be clear or you'll never get oil into the rockers.

Good luck....
 

Brosky

Great Pumpkin
Offline
Dale,

One other thing. You may find wear on the shaft or arms that is normal or it could be excessive. Now would be the time to replace whatever needs done, while you have it apart. If you have any questions, post pictures and we'll get back to you with advice.

TRF and others do offer a complete reconditioned shaft assembly in the event that yours is BADLY worn. But let's assume that you don't need one for now.
 

angelfj1

Yoda
Country flag
Offline
This may have been covered by others. While your at it, remove each push rod (ONE AT A TIME) and check to see that they are dead straight by rolling across a sheet of glass or something else that is known to be flat. Let us know what you find.
 

TR3driver

Great Pumpkin - R.I.P
Offline
Brosky said:
Punch 12 holes (numbered)in a piece of cardboard and that will serve as your guide for the push rods. Just clean them one at a time so they don't get mixed up.
IMO it would be safest to just leave the pushrods alone.

However, if you do remove them, be careful not to pull the lifters up out of their bores. Sometimes the oil and sludge pooled in the lifter can create just enough suction that the lifter will come up with the pushrod and fall over. If that happens, it can be a major PITA to get the lifter back into it's bore without removing the cylinder head.

The trick is to pull the pushrod up only 1/4" or so, and spin it in your fingers until the lifter drops off. But it takes a delicate touch to judge whether it's holding the lifter up or not.

Unlike some engines, the TRs do not run oil through the pushrods, so I'd just leave them alone unless/until you are planning to remove the head.
 

tdskip

Yoda
Country flag
Offline
Hey guys - rocker assembly newbie question here. Can you "simply" pull the rocker shaft and replace just the shaft? If so, what can benefits would that potentially bring?
 

TR3driver

Great Pumpkin - R.I.P
Offline
tdskip said:
Can you "simply" pull the rocker shaft and replace just the shaft? If so, what can benefits would that potentially bring?
Sure, can be done. Foolish IMO to just replace the shaft without reconditioning the rockers at the same time; after getting a price from Rocker Arm Specialists I just sent them the whole assembly for reconditioning. Of course shipping costs might make that impractical for Dale, but I would heartily recommend them for anyone in conUS.

The difference with the rebuilt rockers & shaft was not dramatic, but there was a definite reduction in valve train noise, and the engine idled smoother. Seemed like a little more power too, but hard to say for certain. Also easier to set the valve lash, and the lash was more repeatable (before, I'd get a different number every time I would check it).

RAS did have a web site, but it appears to be gone now. However, according to the discussion at
https://www.british-cars.org/mgtd-mgtf150...18455711709.htm they are still in business, just not on the web.
 

Brosky

Great Pumpkin
Offline
When I did the first head shaving job about three years ago, I bought a reconditioned shaft assembly from TRF and this is what it looked like as a complete unit then.

And as far as the push rods go, I would tend to agree if they look clean enough, but I'm a clean freak and while it's apart, I would just clean them for GP.
 

Attachments

  • 18572.jpg
    18572.jpg
    86.9 KB · Views: 157
  • 18573.jpg
    18573.jpg
    82.9 KB · Views: 142
  • 18574.jpg
    18574.jpg
    82.5 KB · Views: 142
  • 18575.jpg
    18575.jpg
    90.9 KB · Views: 152
Similar threads
Thread starter Title Forum Replies Date
D TR6 Rocker arm assembly , pushrod clearance Triumph 8
D rocker arm assembly Austin Healey 14
Hap Waldrop Rebuilding a rocker arm assembly Spridgets 16
healeyboz Rocker arm assembly Racing 6
healeyboz rocker arm assembly Spridgets 18
S Rocker Arm assembly Austin Healey 3
WHT Rocker Arm Shaft Replacement Austin Healey 21
K TR2/3/3A Using a dial gauge to adjust valves when rocker arm surfaces are worn? Triumph 9
matmire rocker arm stress cracks? advice please. Spridgets 2
T TR2/3/3A TR Rocker Arm Spacers Triumph 7
J TR2/3/3A Installing new rocker arm shaft. Triumph 6
KVH TR4/4A I Pulled the Rocker Arm Off Triumph 7
M TR2/3/3A TR3 Steering box rocker shaft and drop arm Triumph 5
M Rocker Arm without Oil Bleed Hole Austin Healey 4
64rocksprite rocker arm fitment - how close to 'center'? Spridgets 8
R dual springs for 1500 engine rocker arm upgrade? Spridgets 3
T Defective rocker arm shaft photo Triumph 12
T Rocker arm/shaft question Triumph 13
Dadandson Roller Rocker arm Pics Spridgets 34
KVH Use of "Jam Nut" on Rocker Arm Tappets Triumph 8
T Rocker arm stud replacement Triumph 40
ronzet Rocker Arm interchangability MG 3
Moseso Rocker Arm Clearances Triumph 4
A Rocker Arm failure MG 8
Tinkerman TR2/3/3A Locking screw on rocker arm shaft, TR-3 Triumph 4
M Rocker arm shaft question Austin Healey 11
glemon Reground Cam Rocker Arm Geometry Austin Healey 11
Ralph_Y Pulling just the rocker arm? MG 5
K rocker arm needed, please help Triumph 6
PAUL161 Rocker Arm / Valve Clearance -Hot or Cold MG 0
C Rocker arm play on shaft Austin Healey 12
PAUL161 Rocker arm lubrication question MG 5
Nunyas Rocker Arm question MG 51
M Rocker Arm Shaft Triumph 4
S GT6 GT6/TR6 rocker arm identification and questions. Triumph 0
V Rocker Arm and Push Rods Triumph 8
V rocker arm geometry Triumph 2
Patton Rocker Arm Specialists Austin Healey 3
Patton Rocker Arm Clearances too Large Symptoms Austin Healey 5
Patton Rocker arm fountain!!! Austin Healey 1
C TR4/4A Rocker shaft spacer clearance with pedestals Triumph 3
Jkirchner Rocker Pedestal Banjo Bolt Thread Size Austin Healey 10
G Installing New Rocker Shaft Assembly Austin Healey 3
fordmstr 73 Midget rocker panel end caps and door handle gaskets advise Spridgets 3
Hamish Racing General TR Rocker cover identification please. Triumph 2
H Rocker Cover Data Plate Austin Healey 15
Twit TR4/4A 1.5 in outside diameter rocker cover pipe Triumph 3
kodanja TR2/3/3A Rocker studs for aftermarket Rocker covers Triumph 4
M TR2/3/3A Steering Box Rocker Shaft Bushing Reaming Triumph 4
steveg Steering rocker shaft - chemical rebuilding Austin Healey 3

Similar threads

Top