Hi Guest!

 Hey - did you know if you click on the title of a thread it will take you to the first unread post since you last visited that thread?
 but were afraid to ask:
  STOP!! Never post your email address in open forums. Bots can "harvest" your email! If you must share your email use a Private Message or use the
  smilie in place of the real @
 Pretty Please - add it to our Events forum(s) and add to the calendar! >>
Hap Waldrop
Yoda
Offline
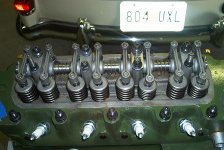
I just finished rebuilding Drew's rocker arm assembly, now this wasn't too bad of a job, he didn't need his rocker arm rebushed, the bushing were in good shape, the shaft did show some wear, and that was the reason for the rebuild. I dome this job many times, and thought I would share this with the group for those who have not done this job.
Since we didn't have to rebush the rovkr arm, we'll call this a minor rebuild. First off you need to remove the cotter pin on one side of the assembly, now the stock assemblies are spring load so keep some laod on the assembly with your hand until you get a few pieces off. I like to take every piece off nad line it up on the work bench in the same order as it came off the shaft, beside there being just the order of rocker arms, pedestals and springs, you'll also have shims and end washers on the assmebly, keeping thm in the order they came off is important. Also the order of the rocker arm is important, if you look close at A-series rocker arm (these were the stamped Vandervell 1275 units on this engine) the rocker arms on the base where the sahft pass through the rocker arm off offset, so call them lefts and rights if you will, if you jumble the order of the arms up, you take a couple hour job and turn it into a all day job trying to get everyhting back in the correct order. Now since everyhting in Drew engine is new and real pretty, it be a shame to put oil stain rocker arm and pedestals back on a new shaft, so every piece being re-used on this assembly was degreased in solvent, then blew dry, then bead blasted, then cleaned agin in solvent. If you have a bead blaster, expect to make many trip back and forth form the work bench as you need to only carry a piece or two at a time so you keep the order correct.
Now once everything is blasted and clean, you can start to assemble, remember to clean your new shaft in solvent, it will coated with a light grease to keep it from rusting on the shelf, also after cleaning lube it, I use the same assembly lube I use in the motor, CRC Moly Assembly lube, good stuff you can get it NAPA stores. For starters just assmebly all the pieces on the shaft as you took them off including using the shims in the same places. Now one of the pedestal, will have a set screww in it, and on the shaft there will be a hole for the set screw to go into this ismwhat locks the shaft down the shaft stays constant and only the roicker arms pivot. Noiw you would think it would all go back together the way it came apart, and if you're luck, maybe it will, but most times it will not. Anytime a new shaft is introduced to the a assmebly, the set screw hole could be off from one to the next by a little bit, you could blame this on third world parts I guess, but I've seen the same thing on OEM shafts. With orignal shim in their original location put the assembly on the head, chack and see where your roacker arm line up on your vavle tips, you'd like for them to be dead center, but it won't always wrook out that way,as long as the tip pad on the rocker is completely over the valve tip you will be good/ Also check for side to side play on the raokcer arm, this come into paly more on the two end one, because the rast are spring loaded. You may find that in some palce an extra shim or even removing a shim helps with aliignmant or side. While excessive side paly is something on the two end rocker you would like to avoid, you don't want them so tight that rocker does not pivot freely, so a tad bit of side paly is alot better than it being shimmed so tightly it almost locks the rocker arm down. Once you get the alignment and side pay as good as it can get, you're done, fully expect to take it on and off the head a couple of times to get it all right, it took 3 attmepts to get Drew's rocker arm assmebly the best I thought it could be.
Ok I didn't address bushing rocker arms, you can buy relpacment bushing for your rocker arm, now this a job that is too much for most home builder, becuase you will need to press out the old bushing and pres in the new bushing and on some rocker bushing re drill oil holes, then you will have the size the freshly rebushed rocker arm to the new shaft, this can be done a coiuple of ways, either by reaming them to the correct size or hioning them, I do my rocker arm bushings on my Sunnen hone the same amchine you use to resize your connecting rods. Bottom line for most folks ita lot easy to buy rebushed rocker arms form venodr with a new shaft, and these normally come already fitted to the shaft, but don't assume this, be sure to ask. Some vendors will want your old rocker arms as coares, some will not.
Anyway, this is a job that not too tough, well as far as what I did today, in repalcing the roacker arm shaft, and I thought it may be useful info to some of you. I f any of you take this job on, hopefully this post up will help you.
I do have a picture of drew rebuilt rocker arm assmebly but unfortunately the camera battery decided to dye, so may I can post the picture in a day or two.