• Hey there Guest!
    If you enjoy BCF and find our forum a useful resource, if you appreciate not having ads pop up all over the place and you want to ensure we can stay online - Please consider supporting with an "optional" low-cost annual subscription.
    **Upgrade Now**
    (PS: Subscribers don't see this UGLY banner)
Tips
Tips

Procedure to change points?

T

Tinster

Guest
Guest
Offline
My engine is dead again. 1969 TR6 w/ Lucas dizzy.

I've just replaced the coil and condenser,
replaced both low and high tension coil wires,
cleaned the plugs and checked the carb
diaphrams. All my ignition wires are new.

Plugs at .025" gap; timing at 10* advance.

I don't know how to change and gap new points.
Can someone help me with the points procedure?

Step by step since I know almost nothing of electronics.

thanks,

dale
 
OP
R

RonMacPherson

Guest
Guest
Offline
Okay, Cuz, a little refresher.

If all else fails, refer to page 519 in the Bentley manual.

I recommend, flat level ground, car in neutral with the parking brake on; key off, remove the distributor cap(making sure the carbon brush in the center that contacts the rotor is intact, and that there are no tracking cracks around any of the plug wire posts. Remove the rotor, give it the inspection, per the service manual(page 523) and also my earlier post.

Remove the hold down screw(s) for the condensor and point set, disconnect the primary wire that connects to these two items.

Take the new points and clean any shipping sealant residue off the contact points(just clean white paper(off of your printer) and slide between the points). Put a little distributor cam lube(most points sets come with a little plastic tube in the box). Squeeze that on the plastic cam arm, on the left side(as the shaft turns CCW it will hit the cam lube first). Don't be messy, but make sure the lube is on the cam plastic nubby from top to bottom) instal the points and condensor, making sure that no exposed terminals are contacting the distributor. Make sure the ground wire that screws onto the breaker plate is also fastened to the distributor body.

No set the points: two ways, dwell meter or feeler blade.

Turn the distributor so that a cam lobe is touching the plastic cam arm where it is fully centered with the arm.

You do this by turning the engine, if it is not already on the high spot of the cam lobe. Either a wrench on the alternator, crank the engine, or what I do, take the parking brake of, put in 2nd or 3rd gear and rock the car slightly(roll it forward or backward). THen adjust the point gap to .016 in..book says .014 to .016 of an inch. I recommend the larger setting as the points will settle in slightly with breakin wear.

Put the rotor back on, the distributor cap, making sure all the wires are intact, fire it up. Then if you have a dwell meter and want to double check, fasten one terminal to the distributor side of the coil and check dwell. Book calls for 35 plus or minus 3. I recommend setting it at 33 or so, as the break in wear will close the points slightly, which increases the dwell number.

OK?
 
OP
R

RonMacPherson

Guest
Guest
Offline
Oh, by the way. When you change the point gap(dwell setting) you will change the timing. But not enough to concern yourself with.

What was the measurement that you decided to change the coil for?

primary to primary impedance? primary to secondary impedance improper, or short in the coil?

Don't throw the coil away yet, as I would like to get your measurements from you, and further output tests to see if you can keep it as a back up coil. You said you have 12 volts to the coil from the ignition switch right?
 
OP
T

Tinster

Guest
Guest
Offline
Thanks Ron,

yes, right now I am just throwing parts into the car
and hoping one will make it go. I've kept the Lucas
Sport coil on the parts shelf but tossed the rest.

thanks,

dale
 

swift6

Yoda
Offline
Dale, before you pull your old points, you can check and make sure they are opening. Rock the car like Ron said for getting the cam lobe and arm on the point, where the points should open, and make sure they are. Your points simply could have closed and killed the spark.

If you use a metal feeler guage to set/reset the points gap, disconnect the coil from the distributor while you do it. You don't want to be on the wrong end of a grounding there. It stings a little. :wink:
 

trrdster2000

Luke Skywalker
Country flag
Offline
Dale, a odd thing happened years ago on a coil a friend installed, it was a sports coil of some kind and would run for a while then stop. It took several settings of the points to see what was happening, the sports coil had too much voltage and was slowly melting the plastic block from too much heat, so the points would keep closing. You might want to check the points you took out and compare them to the new ones, where it rides on the cam.


wayne
 

tom628

Senior Member
Offline
Dale, before you start all this, are you currently getting spark at all the plugs when you crank the engine?

Tom
 

startech47

Jedi Knight
Offline
Dale,

After you install the new parts in your distributor disconnect the wire attached to the outside of the coil and insulate it with electrical tape temporarily. Take an ohmmeter and connect both leads to clean metal spots on the engine and verify that it reads approximately 0 ohms. It will likely be just a little above 0. Than without moving one of the leads from the engine connect the other lead to the tab on the outside of the distributor that you removed the wire from. Have someone bump the engine several times. When the point rubbing block is on the top of the bump on the cam, points open, you should have very high resistance. When the point rubbing block is on the base line circle of the cam, points closed, you should read approximately 0 ohms. The meter may take a short time to stabilize due to the condenser charging and discharging. If this test turns out correct everything in the distributor is correct.

Phil

It is likely only 1 part is bad. Why are you throwing out every thing?
 

NickMorgan

Jedi Knight
Offline
Has anybody mentioned to be careful that you put the two little wires under the plastic washer when you put the new points in? I didn't once and it took me ages to figure out what was wrong.
 

tdskip

Yoda
Country flag
Offline
NickMorgan said:
Has anybody mentioned to be careful that you put the two little wires under the plastic washer when you put the new points in? I didn't once and it took me ages to figure out what was wrong.

I did that this summer!

Worth checking / remembering.
 

MDCanaday

Jedi Knight
Offline
For the road emergency I like to keep a fresh advance plate with points and condenser installed /ready to go,in a plastic baggy in the boot.Gets you on the road quickly,lots of bad accidents happen on the shoulder!!!
MD(mad dog)
 

KVH

Darth Vader
Country flag
Offline
Dale, it's something simple. It's like when you're suspecting everything else but the real cause.

Nick is right--look to be sure those wires are under the insulator. And check everything else that is basic like that.

I have one of those cheap $12 test lamps where I can clip one end onto the bolt in the valve cover (or any good ground)and poke the sharp probe into the ignition lead or other wires while the ignition is switched on.

That way I can be sure I've got current in the wire, to the connectors, and beyond. I'll wiggle the wires while using the probe. Anything to just rule out bad wires one at a time.

That's how I discovered a bad wire from my ignition leading to the coil.

A car that starts today and won't tomorrow, but starts again the next day, has something simple going on. Current or fuel. It sure doesn't sound like your coil or condenser, distributor cap, rotor, or plug wires anymore--you replaced those.

The "points" adjustment should be easy once you get your cam lobe on a high point. Sorry I don't have your manual, but you set those "static", correct? Engine off?

Good luck. Imagine the great drive you'll have when it's fixed!
 

Brosky

Great Pumpkin
Offline
I think that this thread is old and Dale has the front carb issue resolved and the car running once again.
 
OP
T

Tinster

Guest
Guest
Offline
Brosky said:
I think that this thread is old and Dale has the
front carb issue resolved and the car running once again.

Yes Paul, the engine is moderately functional now.

My carbs are very rich. With the mixture hex tool
in the dashpot which rotation will lean out the misxture

Clockwise lean out ?

or

Counter-clockwise lean out.

There seems to be difference of opinions.

thanks,

d
 

Brosky

Great Pumpkin
Offline
Dale,

Follow the Buckeye chart. Bottom out the needles and the back them off per their instructions. Remember that 3.5 turns out and the needle will be out to far, but that is dead rich anyhow.

I guess that I have a question. Have you or anyone else adjusted these carb needles since they came back from Jeff? I'm trying to figure out how you went rich from being fine earlier this year?

If you haven't touched them, then maybe the problem is elsewhere because these particular parts do not go out of adjustment on a routine basis.

I hate to see you chasing something that may not be the problem, if it wasn't back then.

I'd be looking long and hard at the choke mechanisms before I'd touch needles set by Jeff and then checked by Dave and Ben.
 
OP
T

Tinster

Guest
Guest
Offline
No Paul,

I have not touched the needles after Ben set them.
Until yesterday when I leaned them out.

I also am wondering how so many things went out of
adjustment and how so many fuel delivery parts
and ignition parts broke while the car was parked
for 12 hours after a fantastic run the day before.

Everything is now new and the car drives very strong.

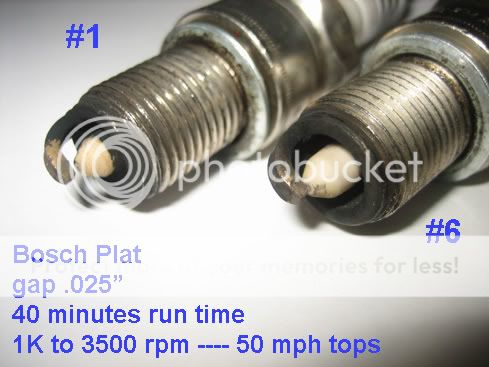
Here are two of my new plugs after a 40 minute drive
yesterday.

regards,
d

BoschPlugs.jpg
 
Similar threads
Thread starter Title Forum Replies Date
nevets oil filter change procedure Austin Healey 22
scottkilpatrick TR4/4A Knock off wire wheels procedure..basic questions Triumph 9
AUSMHLY R & R BJ8 Transmission Bearings Procedure Austin Healey 1
S Fuel gauge calibration procedure Austin Healey 18
S Testing and Adjusting procedure for RB340 Austin Healey 4
J TR2/3/3A Inner sill replacement procedure ? Triumph 5
S TR4/4A procedure for installing gauges etc Triumph 0
steveg Break In procedure Austin Healey 5
T TR4/4A Your procedure for checking out a new-used engine Triumph 6
S Procedure for setting and tuning HD8s? Austin Healey 10
S Procedure for cylinder head removal and re-installation - BJ8 Austin Healey 11
af3683 TR2/3/3A Correct Procedure to Raise TR3 Soft Top Triumph 7
R degreeing cam spec question and procedure Spridgets 23
Gliderman8 Is there a start-up procedure? ..... Triumph 10
M TR4/4A tr4A timing chain procedure? Triumph 9
R compression test procedure on 1500 midget Spridgets 5
Y BJ8 Clutch Master Cylinder Bleeding Procedure? Austin Healey 7
R Procedure to store engine Triumph 6
T Coil Test procedure ? Triumph 10
F GT6 GT6/TR6 Engine Painting Procedure... Triumph 3
J Engine Break In Procedure? Spridgets 12
T Engine bay painting procedure? Triumph 6
T Engine bay painting procedure? Triumph 0
D Torquing Procedure Racing 16
R_Lyle Replacing clutch / flywheel procedure Triumph 12
G Is there a procedure to remove the smog equipment? Spridgets 1
S Rebuilt Engine Breakin Procedure Austin Healey 4
nevets procedure for replacing brake fluid Austin Healey 14
Webb Sledge Engine Break In Procedure Triumph 9
Alfasudcrazy Starting procedure for 1975 Daimler 4.2 Jaguar 4
W What is the proper procedure for priming S.U.175's Triumph 4
S Proper Starting Procedure After Winter Storage Triumph 12
D Overdrive Stops Working After Oil Change Austin Healey 26
AUSMHLY BJ8 Differential Oil Change Austin Healey 6
NutmegCT Change amount of posts shown in a thread. FORUM Navigation Questions 0
Gliderman8 TR6 Would you change oil? Triumph 5
af3683 TR2/3/3A TR3B Anti-Freeze Change Triumph 23
D TR2/3/3A Why it is important to change brake fluid Triumph 4
C MGA Change a pull starter to a push button system MG 6
F TR6 Idle change when brake is pressed Triumph 4
TRMark TR4/4A Adapting to Change Triumph 8
BN6_2197 How regular should I change the gearbox oil? Austin Healey 5
T BJ8 Fan Belt Change Austin Healey 7
C Side-Change Gearbox Stuck in Top Gear Austin Healey 43
Michael Oritt How to change signature Austin Healey 2
R BJ8 Windscreen Change Austin Healey 2
PAUL161 why the change? FORUM Navigation Questions 5
M TR2/3/3A Engine change tooling Triumph 2
T TR4/4A Core Plug - Cam Rear change Triumph 7
B How often should you change the rear rear axle oil Austin Healey 9

Similar threads

Top