• The Roadster Factory Recovery Fund - Friends, as you may have heard, The Roadster Factory, a respected British Car Parts business in PA, suffered a total loss in a fire on Christmas Day. Read about it, discuss or ask questions >> HERE. The Triumph Register of America is sponsoring a fund raiser to help TRF get back on their feet. If you can help, vist >> their GoFundMe page.
  • Hey there Guest!
    If you enjoy BCF and find our forum a useful resource, if you appreciate not having ads pop up all over the place and you want to ensure we can stay online - Please consider supporting with an "optional" low-cost annual subscription.
    **Upgrade Now**
    (PS: Subscribers don't see this UGLY banner)
Tips
Tips

TR2/3/3A TR3 Control Head Install

oxendine

Jedi Hopeful
Offline
The above was posted a few weeks ago but a search did not find it. I have the wires through the stator tube and it down the column. I have the olive and nut for the bottom. What is the procedure to properly position the head before tightening the nut? Anything else to do on top?
 

6TTR3A

Jedi Warrior
Country flag
Offline
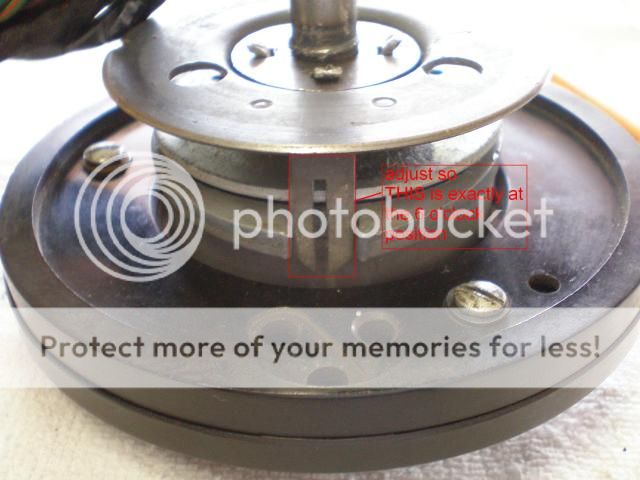
Trafficatorinstall7_12_5.jpg

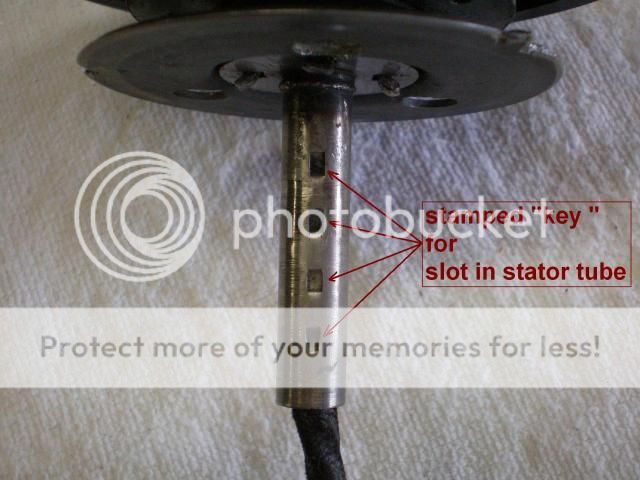
Trafficatorinstall7_12_3.jpg

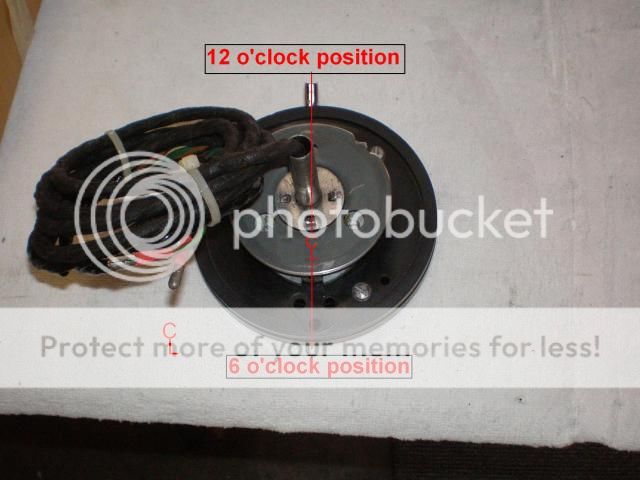
Trafficatorinstall7_12_4.jpg

<span style="font-size: 11pt"><span style="color: #003300">These instructions are for a non-adjusting steering wheel. Position the stator tube so that the slot at the steering wheel end is at 12 o'clock.(straight up) position. Olive loose. Set screws in the steering wheel hub backed off. It's a good idea to have the steering wheel in the straight up position also. If the control head is an aftermarket one, make sure that it will fit in the steering wheel base. Sometimes the attachment plate is too large a diameter & wont seat all the way past the set screws. Leave the stator tube loose enough so that when you set the control head in place the stator tube bottoms out on the head assembly and the stamped "key" fits over stator tube and into the stator tube slot. Now tighten the olive. Next remove the control heat to make sure that the stator slot was tightened in the 12 o'clock position. Before resetting the control head be sure that the return guide at the bottom of the control head is in the 6 o'clock position. VERY IMPORTANT (see photo. Tighten the set screws in the steering wheel hub and you're good to go ! What I do is jack up the front wheels and static test the return mechanism. FRank </span></span>
 

6TTR3A

Jedi Warrior
Country flag
Offline
<span style="font-size: 11pt"><span style="color: #003300">I guess I should proof read this stuff before I send it. It SHOULD read "Next, VERY IMPORTANT (see photo)Before resetting the control head be sure that the return guide at the bottom of the control head is in the 6 o'clock position. Once that's done,tighten the set screws in the steering wheel hub and you're good to go ! ,etc,etc
FRank </span></span>
 

TR3driver

Great Pumpkin - R.I.P
Offline
I do it somewhat differently: Push the tube up high enough that you can make sure the head is engaged with the slot before it touches the steering wheel (after having made sure the finger for the cancellation ring is at the bottom). Make sure the steering wheel is centered, and hold the control head with the turn lever pointing straight up (in the center position), then push the head down into the wheel (which will also push the tube out through the steering box). The head should go down until it almost touches the wheel (no more than 1/8", mine is about 1/16"). If not, pull it back up, resolve the problem, and start over. Once the head is in place, immediately tighten the 3 grub screws. Now you don't have to worry about the wheel getting turned while you go about tightening the gland nut, connecting the wires, etc.

If doing this with an adjustable wheel, start by adjusting the wheel as close to the dash as possible, so the stator tube winds up in the right place. After locking the stator tube, you can adjust the wheel back out to check on the wires.
 

bobhustead

Senior Member
Gold
Country flag
Online
The set screws are the "grub" screws that go laterally thru the steering wheel hub and lock the plate on the head in place against the bosses inside the wheel hub.
Bob
 

olarson

Freshman Member
Country flag
Offline
Any good ideas about installing the wiring don the stator tube? Mine wants to bind on the cloth covering.
 

charleyf

Luke Skywalker
Country flag
Offline
My method is to incorporate a pull wire into the other wires. Stagger the ends of the wires so that they present the smallest diameter possible. Then wrap the last 4" or so of the harness in electrical tape. Using as little as possible in a spiral fashion.
Run the free end of the pull wire down the tube then pull --gently.
In extreme cases I have had to remove the bullet connectors from the harness and do the above.
Charley
 

mastaphixa

Jedi Trainee
Bronze
Country flag
Offline
How would the procedure be different for the adjustable wheel?
 
Similar threads
Thread starter Title Forum Replies Date
Kleykamp TR2/3/3A 1961 TR3 control head. Triumph 5
Scotsman TR2/3/3A Signal switch on TR3 Horn Control Head not canceling Triumph 20
O TR2/3/3A TR3 Steering Wheel Hub / Control Head Triumph 1
O TR2/3/3A TR3 Control Head Stator Tube Install Triumph 5
K TR2/3/3A Internal view of a tr3 control head Triumph 7
mountainman TR2/3/3A TR3 Control Head Wiring Triumph 11
F TR2/3/3A TR3 Turn Signal/Horn control head Triumph 4
J TR2/3/3A TR3 control head internal pictures? Triumph 11
MGTF1250Dave TR2/3/3A TR3 Control Head Triumph 4
D TR2/3/3A Control Head [TR3] Rebuild Triumph 2
bluemiata90 TR2/3/3A TR3 Horn,control head and stator tube removel Triumph 9
MGTF1250Dave TR2/3/3A TR3 Control Head Help Triumph 9
P TR2/3/3A TR3 turn signal and horn control wiring check Triumph 4
S TR2/3/3A control for a tr3 Triumph 3
M TR2/3/3A What is the Lucas part # for a TR3 control box Triumph 2
S TR2/3/3A tr3 upper fulcrum control arm Triumph 1
mctriumph For Sale front apron 57 Tr3 Triumph Classifieds 0
Rick_Thompson TR2/3/3A TR3 rack and pinion kit problem... Triumph 17
S TR2/3/3A differential hubs early tr3 and tr2 Triumph 22
S TR2/3/3A Tr2 and early tr3 differential. Triumph 10
71TR6 TR2/3/3A TR3 WIper Wheel box Triumph 2
RonC General TR TR3 Shifter on TR6 Triumph 8
jfarris TR2/3/3A Modern Temporary Donut Spare for a TR3 Triumph 1
G TR2/3/3A What color is my car? TR3 1958 Triumph 16
S TR2/3/3A Rebuilding a tr3 transmission and second gear, Triumph 57
mctriumph For Sale Odd bit for Tr3 and early 3A Triumph Classifieds 0
S TR2/3/3A turn a tr3 non-full syncro transmission into a full syncro Triumph 3
Y TR2/3/3A I cannot get my TR3 in correct timing. Triumph 7
mctriumph TR2/3/3A Safety mods every Tr3 should get Triumph 12
Editor_Reid TR2/3/3A Whitewall Tires for TR3 Triumph 11
curdy TR2/3/3A TR3 Stalling Issues Triumph 8
S TR2/3/3A Anyone cut out the spare tire compartment on a tr3? Triumph 4
S TR2/3/3A put a differential back into a tr3. Triumph 2
S TR2/3/3A tr3 breather pipe Triumph 2
2 For Sale 1957 Triumph TR3 Small Mouth Triumph Classifieds 0
Jim_Stevens TR6 Barn find of TR6 and many TR3 parts Triumph 9
J For Sale 1958 TR3 Partout Triumph Classifieds 12
R For Sale TR3 Dash Triumph Classifieds 0
D TR2/3/3A Thread and size for tr3 fuel tank vapor line fitting Triumph 0
S TR2/3/3A Aluminum door capping for tr3 Triumph 12
tinman58 TR2/3/3A TR3 at Mammoth Lakes Triumph 4
G TR2/3/3A TR3 starter disassembly rebuild early M428G bomb Triumph 6
luke44 TR2/3/3A Calling all Wiring experts TR3 Overdrive Wiring ver A or ver B or are they the same? Triumph 8
A TR2/3/3A VERY wobbly TR3 - help needed!!!! Triumph 53
vpanza TR2/3/3A EARLY TR3 hubs for wire wheel????? Triumph 5
vpanza Wanted TR3 FRONT backplates needed Triumph Classifieds 2
mctriumph For Sale Cluster gears Tr3 Triumph Classifieds 0
T TR2/3/3A TR3 pistons and liners Triumph 14
jfarris Wanted TR3 Luggage Rack Turnbuckles Triumph Classifieds 0
K TR2/3/3A Further question re TR3 red ignition light. Triumph 1

Similar threads

Top