• The Roadster Factory Recovery Fund - Friends, as you may have heard, The Roadster Factory, a respected British Car Parts business in PA, suffered a total loss in a fire on Christmas Day. Read about it, discuss or ask questions >> HERE. The Triumph Register of America is sponsoring a fund raiser to help TRF get back on their feet. If you can help, vist >> their GoFundMe page.
  • Hey there Guest!
    If you enjoy BCF and find our forum a useful resource, if you appreciate not having ads pop up all over the place and you want to ensure we can stay online - Please consider supporting with an "optional" low-cost annual subscription.
    **Upgrade Now**
    (PS: Subscribers don't see this UGLY banner)
Tips
Tips

Replacing engine ID tag

Nelson

Jedi Warrior
Country flag
Offline
My original engine ID was removed and lost a long time ago. I have no idea how or when it happened. I just received a new tag from Clarke Spares. The original rivets are now flush with the surface of the area where the plate mounts. I thought it would be a simple matter to just drill them out and pop in the new rivets. Not so. They told me that the rivets are hardened and suggested that I use a punch to drive them down and then use Locktite on the new shortened rivets. One of the old rivets went down almost 1/8 inch and the other likes where it is. Other than using JB Weld to fasten the plate is there a way to deepen the existing rivet locations?
 
Country flag
Offline
Did you try to drive them down after the engine was good and hot?
 
OP
Nelson

Nelson

Jedi Warrior
Country flag
Offline
No, I haven't tried that. Actually I will have to wait a bit to try that. I'm in the process of reinstalling the engine after having had it out for a while. I just installed Gerard's oil seal setup and I'm still connecting the bits and pieces back onto the engine with it back in the car. Don't ask me how much fun it was putting the radiator back in.
 

Jim_Gruber

Yoda
Country flag
Offline
BTDT - MOWOGS needed with toughened little hands.
 

Gerard

Luke Skywalker
Country flag
Offline
Nelson,

I happen to have a block with the rivets removed, and the rivets intact, The depth of the hole is pretty much the same length of the rivet. It's not going anywhere if you trying to drive them in. They are a bear to drill out. You will need an appropriate bit to drill them out.

Unfortunately, people tend to grind or chisel off the heads, not knowing the correct way to remove them. All that needs to be done is to cut a screw slot in the head, then use a regular screwdriver to twist them out. They have a twist on the shank, so they will come out like a screw.

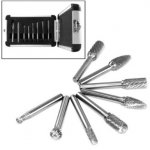
At this point, other than drilling, the only other option is to get a Dremel, carbide burr. I have a small one that I have used more than once to handle broken off hardened bolts. The 3rd from the left is what I have in mind. Here's an Amazon link, but you can find them individually at a Lowes.

Gerard

https://www.amazon.com/Neiko-8-Piec...F8&qid=1372787026&sr=8-2&keywords=dremel+burr

41lSeIh9nlL._SX385_.jpg
 
OP
Nelson

Nelson

Jedi Warrior
Country flag
Offline
Thanks Gerard. That Dremel tool has been one super handy tool. I have the proper rivets from Clarke so once I get the old ones pulverized I'll be able to do a proper install. At least I don't have to have the tag installed to run the engine. Now I need to get under the car and put the clutch slave back on.
 

Jim_Gruber

Yoda
Country flag
Offline
Nelson

IS there a way to cut some sort of slot...No how about a LH Drill Bit / Easy Out. Once you start LH Drilling it may just spins it's way out of there.
 

Gerard

Luke Skywalker
Country flag
Offline
Nelson

IS there a way to cut some sort of slot...No how about a LH Drill Bit / Easy Out. Once you start LH Drilling it may just spins it's way out of there.

An EZ-out is conceptually an option, and considered mentioning it, but the hole and the size of the EZ-out would have to be so small, that I think the force needed to extract the stub would likely break the tool. Same with the drill bit... you might get lucky, but if it catches, it'll break the tip. Either scenario leaves you with a bigger problem.
 

Jim_Gruber

Yoda
Country flag
Offline
I broke an EZ Out trying to extract a bolt from a Water Heater Element. Ever try to drill an EZ Out. NFW! Ended up replacing the water heater.
 

Jim_Gruber

Yoda
Country flag
Offline
JB Weld?
 

Jim_Gruber

Yoda
Country flag
Offline
You may even be able to fake the appearance of rivets
 

nomad

Yoda
Offline
Nelson,

I happen to have a block with the rivets removed, and the rivets intact, The depth of the hole is pretty much the same length of the rivet. It's not going anywhere if you trying to drive them in. They are a bear to drill out. You will need an appropriate bit to drill them out.

Unfortunately, people tend to grind or chisel off the heads, not knowing the correct way to remove them. All that needs to be done is to cut a screw slot in the head, then use a regular screwdriver to twist them out. They have a twist on the shank, so they will come out like a screw.

At this point, other than drilling, the only other option is to get a Dremel, carbide burr. I have a small one that I have used more than once to handle broken off hardened bolts. The 3rd from the left is what I have in mind. Here's an Amazon link, but you can find them individually at a Lowes.

Gerard

https://www.amazon.com/Neiko-8-Piec...F8&qid=1372787026&sr=8-2&keywords=dremel+burr

View attachment 27967
Engine rebuilders commonly chisel them off so if you want to save the engine identity you should remove the plate before it goes to the shop.
I've had good luck using a small vise grip with good jaw's.

Kurt.
 

racingenglishcars

Darth Vader
Country flag
Offline
EZ-out's are designed to rotate a broken bolt. These rivets have very steep "threads" (spiral spline is more like it). The only way they come out is nearly straight up.

I haven't tried with one of these rivets, but I have had good luck with a small MIG spot on broken fasteners. As opposed to most other things, it will stick to hardened metal.

It helps to shield the block from the MIG weld with a piece of sheet metal with a hole, through which you weld to the rivet.
 
Similar threads
Thread starter Title Forum Replies Date
K TR2/3/3A Replacing engine and gearbox mounts? Triumph 8
2billydavies TR2/3/3A question about where to bolt into when lifting/replacing engine Triumph 11
F replacing engine MG 0
F replacing engine Spridgets 4
S TR2/3/3A Pinion tail bearing replacing Triumph 12
B Replacing the Handbrake Cable Austin Healey 8
drooartz Replacing Bugeye windshield rubber Spridgets 6
TR3Acustodian TR2/3/3A Replacing "H" front badge Triumph 11
K TR2/3/3A Replacing water pump pulley.....memory refresh. Triumph 7
I Replacing Windscreen Wiper Wheel Boxes Austin Healey 0
S MGB 1978, replacing the clutch. MG 3
PAUL161 T-Series Replacing Transmission MG 3
S TR2/3/3A Replacing the cam shaft Triumph 27
fpstude TR4/4A Replacing Rear Flexible Brake Hoses on TR4A w/ IRS Triumph 11
J TR4/4A Replacing springs Triumph 7
Got_All_4 TR5/TR250 Need guidance for replacing steering column bushings Triumph 11
L Replacing veneer on wood dashboard Restoration & Tools 14
D TR6 Replacing Horn insert in steering column Triumph 11
69MGC MGC Replacing an Outer Wheel Well panel MG 3
maxwedge5281 Replacing Factory Hardtop Rear Window Austin Healey 24
BN6_2197 Replacing gearbox switch of the overdrive system Austin Healey 10
TomMull replacing walnut veneeron the dash Lotus 17
R TR2/3/3A Replacing rear springs Triumph 51
Jer refresh my foggy memory - replacing clutch in my 67 Midget Spridgets 1
RAC68 Clutch Still Slipping after replacing 30W-Non-Det. for Red Line Austin Healey 52
T Replacing O/D switch with a clock Austin Healey 4
simon1966 Replacing the witches nose in-situ. BN1 Austin Healey 14
KVH TR4/4A Replacing Front Windshield Gasket Triumph 5
Michael Oritt Replacing timing chain tensioner and more Austin Healey 24
Rut Replacing rocker assembly Spridgets 1
T TR4/4A Replacing rear pinion seal - remove driveshaft? Triumph 21
J Replacing BJ7 Dash - Detailed Photos/Schematics Austin Healey 3
M Replacing front shocks, torque setting? Spridgets 2
T TR4/4A Replacing in situ oils sealing gearbox and rear axle Triumph 18
55modified TR2/3/3A warning indicator bulbs need replacing where and what to buy? Triumph 4
Jim_Gruber Replacing Wheel Studs Spridgets 10
P Replacing the crankshaft damper [harmonic balancer] Austin Healey 15
K TR4/4A Replacing a broken 4A turn signal switch indicator? Triumph 2
55modified Replacing rear spring eye bushings on a BN1. How difficult? Austin Healey 8
Michael Oritt Replacing Cold Air Box with Velocity Stacks Austin Healey 10
Rhodyspit75 Replacing boot floor need bracing? Spridgets 2
RickB MGB 1980 MGB No rear brakes after replacing MC & booster MG 5
Popeye TR4/4A Steering bushing: replacing rubber with poly, do I snug to 1/8" gap or...? Triumph 3
Jim_Gruber Replacing Spridget Coolant Spridgets 21
TimK Old brake hoses need replacing, if you need proof look here... Austin Healey 1
KVH TR4/4A Replacing the Real Axle Tube Seal Triumph 17
KVH General TR Short Wheel Studs for Wire Wheels--Replacing Triumph 17
GTP1960 TR2/3/3A Question on replacing brake lines & converting to Dot 5 Triumph 9
tomshobby replacing water pump Spridgets 1
D TR2/3/3A Patching, versus replacing floors? Triumph 15

Similar threads

Top