• The Roadster Factory Recovery Fund - Friends, as you may have heard, The Roadster Factory, a respected British Car Parts business in PA, suffered a total loss in a fire on Christmas Day. Read about it, discuss or ask questions >> HERE. The Triumph Register of America is sponsoring a fund raiser to help TRF get back on their feet. If you can help, vist >> their GoFundMe page.
  • Hey there Guest!
    If you enjoy BCF and find our forum a useful resource, if you appreciate not having ads pop up all over the place and you want to ensure we can stay online - Please consider supporting with an "optional" low-cost annual subscription.
    **Upgrade Now**
    (PS: Subscribers don't see this UGLY banner)
Tips
Tips

How far do you go with Chasis Repairs?

LanceLyon

Jedi Hopeful
Offline
I've got my chasis up on the "Rotisserie" that many of you helped me with, and now I am removing as much of the rust-diseased members as I can before starting to repair and replace the various parts. I'll try to attach some photos to this post.

The question is, how far do you go when cutting out and replacing parts? A couple of points at hand are rusted holes in the chasis frame members and rusted inner-body parts.

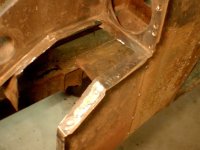
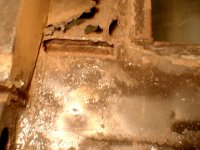
I've got a couple of areas where there are holes rusted through the frame, such as in the driver side foot-well shown. The hole in the frame is about where your right heel would rest. If I cut back to good stock, is it OK to weld a full plate over the top to repair, or should I try to fabricate the plate so that it sits flush and inside the prepared hole? Or, for that matter do I need to replace the entire member?

Also in the driver foot-well, the sheet metal at the toes and floor, where the heat-shield is bolted on, has rusted through. Currently, I have cut away the sheet metal short of where it is spot-welded to the remainder of the foot well box. Is it OK to weld the new section over the remaining flanges, or is it advisable to ream out all of those rivets and try to attach the new section as it was originally? This is certainly more difficult, since there are also standard welds betweenthese pieces, and once you release the spot welds with the spot-weld reamer, your flanges look like Swiss Cheese!

Not being a body-work specialist by trade (although I get the feeling that I may qualify as one by the time I am done!) I just don't know what is Kosher, what is considered to be sloppy, and what is considered to be a good short cut.

Your help and advice will be appreciated!
 

Attachments

  • 101200-PedalBox.JPG
    101200-PedalBox.JPG
    91.4 KB · Views: 181

Keoke

Great Pumpkin
Country flag
Offline
Lance, I am not fond of rust repair.However, repair panels are going to be easier to fit if the old rotted parts are completely removed.I feel if you are going to go this route short cuts are not in your favor.Plus it would seem advisable to have the chassis dipped or media blasted so you can see the good parts from the bad. Additionally do not forget that a complete new chassis can be had for $6500--FWIW---Keoke /ubbthreads/images/graemlins/patriot.gif
 
OP
L

LanceLyon

Jedi Hopeful
Offline
$6,500 is a little (lot) steep for my budget. I guess the real question is whether it is acceptable both structurally and cosmeticly to "patch" things rather than to replace them en mass. I think we would all like to have perfect cars, but economics sometimes take presedence!
 

Attachments

  • 101210-Driverside.JPG
    101210-Driverside.JPG
    84.5 KB · Views: 130

Keoke

Great Pumpkin
Country flag
Offline
Lance, I can understand the budget bit I have been there too.

However, the Healey chassis is not the strongest thing in the world and IMOP it does not cater very well to patching if severly rusted out. Further, attempting to weld to rusted metal is a losing proposition.--FWIW---Keoke
 

bob hughes

Luke Skywalker
Country flag
Offline
Lance, for my money, and provided that the main rails of the chasis are sound, blast the chasis and give it a coat of holding primer, foot wells, floor pans, inner and outer cills and rear deck floors are all notable rust spots for the Healey, and with the exception of the cills perhaps, all are non structural. I would replace the panels totally rather than patch them, working around the car a bit at a time, this will help keep its shape. Don't forget to spray the joints with weld through primer before mating the parts together. I have a Healey that is a rolling restoration, and has had the floors plated over by a PO in the past and not very well done, it looks bad from the underside. One fine day I will replace them, but whilst they are still sound I will keep driving it. The floor of the boot (trunk) is gently perforated and very shortly I intend to cut it out and replace it completely.
Go For It
Bets of luck
Bob /ubbthreads/images/graemlins/england.gif /ubbthreads/images/graemlins/cheers.gif
 

Johnny

Darth Vader
Country flag
Offline
Lance, I too was a little discouraged in the beginnning on my BN7. Try to enjoy your work in stages rather than looking ahead all the time for a completed project, it helps. Don't cut corners, it just isn't worth it in the end. Cut out all the floors and toe boards and replace with new sections. Wait until you get the sections before cutting out and do them one at a time. On the frame you have some choices. Remove the rusted areas back to good metal. I have heard of people opening up the frame at the top and sliding in 3 inch box channel as far as possible. Then Plug weld all along the sides. This will add considerable strength to the frame. It's an old race car trick and it does work. I replaced the X brace in total as it was pretty far gone, wasn't to difficult just hold the frame very securely with braces etc. If memory serves the frame is 14 gauge, don't settle for less. When done use some sort of rust preventer on everything, then paint.
good luck, keep us informed on your progress.
/ubbthreads/images/graemlins/hammer.gif
 
OP
L

LanceLyon

Jedi Hopeful
Offline
Of course, everyone is right. I'll try to remind myself that patience is it's own virtue!

I'm interested in this weld-through primer that Bob Hughes mentioned. Does it go by a brand name or is it a generic item?

I have thoroughly read the club magazine artical on frame strengthening and plan to incorporate some of the additional gussets etc. as I go.

Right now I am just removing all of the obvious rust-outs prior to sandblasting the remainder, then looking for more to remove. I'd like to not have to replace everything, though!

Thanks for your help!
 

Attachments

  • 101311-Trunk.JPG
    101311-Trunk.JPG
    106.4 KB · Views: 107

bob hughes

Luke Skywalker
Country flag
Offline
Lance, just get on the web and plug in 'weld through primer' it is a generic name and is a zinc rich product, comes in spray cans and is ideal if you are spot welding, or plug welding. You should be able to get it at your local automotive shop, it gives the joints that extra protection. Screw the panls together with self tappers first to get the general position right (easier than welding then busting the weld if it is wrong) then weld away, repair the screw holes with weld . Don't forget to seam seal the joints straight after, before you prime and paint.

/ubbthreads/images/graemlins/cheers.gif /ubbthreads/images/graemlins/england.gif Bob
 

Cutlass

Jedi Warrior
Offline
A couple of cautions on weld-through primer. One is cost. At the auto paint store you can pay over $20 for a can of the 3-M product. At a welding supply store, the same product, different name, is around $6.

And if you are tig welding, having any weld through primer, or any contaminant, within an inch or so of the weld, even on the inside of a seam, will royally screw up the process. Tig is best on absolutely clean metal.

A final tip from one who has replaced all the items mentioned in this thread and more over the last eight months, insist on and use Kilmartin products. The other brands are just not up to the quality of Kilmartin.
 

Keoke

Great Pumpkin
Country flag
Offline
Glad you brought that up Cutlas, Rather than using the pimers specified Phosphate is a better choice IMOP.---Keoke /ubbthreads/images/graemlins/driving.gif
 

Cutlass

Jedi Warrior
Offline
Thanks, Keoke. It's been a bit of a dilema for me when replacing metal that will result in seam of bare metal to bare metal. Seam sealing well after primer will help, of course, as will keeping the finished car in a garage. In the final analysis, though, I'm going to assume that some seam rust is inevitable with the assembly and finishing methods available to us. But this car, as are hopefully all such restorations, will be far better cared for than it was for the first forty years, and will give many years of pleasurable service despite some hopefully unseen minor rust.
 
Similar threads
Thread starter Title Forum Replies Date
K TR2/3/3A RE: Pulling the choke knob all the way out....the carb jets should be down how far? Triumph 5
R TR2/3/3A Best day ever [so far] Triumph 1
kennypinkerton MGB Are my wheels too far gone? MG 8
Cuckoo for the TF! T-Series Is spring/summer by far the best time to be able to sell aTF? MG 2
DanLewis How far is your mechanical fan from the rear of your radiator? Spridgets 39
oxford the story so far Austin Healey 5
Banjo Oops.. I bored the cylinders too far... Triumph 11
PAUL161 Just how far racing has come! Racing 2
T oops... too far? Triumph 17
6 good luck so far Triumph 6
Tr4dude some pics of my resto so far. Triumph 8
B How far is to far on a restoration? Triumph 22
mikecyc72usa So far so good, but now an odd question Triumph 2
T ZS carb rebuilding - lessons learned so far Triumph 12
elvacar Elva - She Goes Far Other British Cars 9
jaegzie Dizzy turned to far - hitting generator/tach gear Spridgets 12
aeronca65t Progress-Thus Far Racing 7
motofiaccone Not as far along as I'd like, but... Spridgets 16
PATR8 Miles Driven so far this summer Triumph 26
Bret Moss EFI kit and O/D tranny Latest thus far... MG 8
DNK Wheel Makers have gone TOO Far Triumph 11
B Too eager by far Austin Healey 4
J doing math sucks or my progress so far Triumph 12
jlaird So far so good Spridgets 7
kodanja How Far? Triumph 35
L What I have done so far. MG 4
T How far gone before replacing fenders? Triumph 7
A mgb she no go far Spridgets 7
jlaird Today so far Spridgets 1
jlaird The worst job so far Spridgets 5
6 Borg n' Beck post #2...what has gone wrong so far. MG 13
txtr3 TR2/3/3A How far to go on a TR3A restoration Triumph 12
TNMGB Restoration pics so far...Woo HOO!!!! MG 17
KLUTZ 6,500 km and Counting. How far, everyone else? Triumph 9
KVH How Far Would Any of You Drive Your Triumph? Triumph 33
J so far, so good Austin Healey 0
J clutch engaging far up the pedal Austin Healey 6
S TR6 Chasis number, engine number register Triumph 2
C 1961-1962 Sprite, What chasis and Frame? Spridgets 4
C Austin Healey Chasis/Frame for 1962 Austin Healey 4
P Refinishing the Chasis ... Austin Healey 2
J Weight of chasis. Austin Healey 7
B Del Mar Body, Triumph chasis Triumph 5
W 1965 Midget rolling chasis on ebay Spridgets 5
Popeye TR4/4A TR4A rear tub repairs (likely accident damage in front of rear wheels) Triumph 6
F TR2/3/3A Mid section repairs Triumph 17
red57 Metal prep of chassis after repairs and shot blasting Austin Healey 5
F TR2/3/3A continuing repairs to front clip Triumph 16
Tr3aguy TR2/3/3A Tr3 frame repairs recommendations Triumph 29
T Jensen-Healey back for more repairs Spotted 1

Similar threads

Top