• Hi Guest!
    You can help ensure that British Car Forum (BCF) continues to provide a great place to engage in the British car hobby! If you find BCF a beneficial community, please consider supporting our efforts with a subscription.

    There are some perks with a member upgrade!
    **Upgrade Now**
    (PS: Subscribers don't see this gawd-aweful banner
Tips
Tips

Fascia Restoration

Dr. Smoke

Member
Country flag
Offline
My BJ8 fascia needs attention. I would like to avoid removing all the fascia panel, as the veneer seems fine....but, the factory "plastic" coating is cracked. From my research, most paint removers and strippers will not remove this. Any tips ? Heat gun? Sanding? I would like to do this leaving everything in place....then maybe staining and varnishing, but I need to remove the cracked coating over the veneer. Any advice?
Thanks, in advance,
Dr. Smoke
 
When I did mine I took one of those exacto knife blades ( the ones you keep snapping a piece off) work the edge of the blade between the veneer and the thick lacquer and the lacquer will chip off . It makes a real mess bits flying all over , wear glasses it flies off in all directions . It takes a good while to get it off . Then you can lightly sand and use your preferred refinishing product . I would use eco-poxy if I was going to do another one . I didn’t know about eco-poxy when I did mine and used several coats of regular wood varnish , then wet sanded and finished with a few coats of spray varnish . Took for ever …
Eco-poxy would be way quicker .
 
Luke, now I see why you use the nickname "Healey NUT". Affectionately said...I am a woodworker (woodturner) and worked on and finished thousands of pieces. Never, ever would I have done what you did. Warning to Dr. Smoke...Lukes solution will take you many, many hours and I assure you, you will scratch the wood in many spots. These scratches will not come out in sanding, no matter how gentle you are. To eliminate a scratch the size of which your finger nail will catch while going across, will require, at a minimum, 180 grit sandpaper to start with. On a veneer , you have no hope. So, to Dr. S...buy a new dash kit. Let me know what you decide.
 
Who’s Luke ?
 
Who’s Luke ?
Healey Nut--

YOU are "Luke"! See the rank below the circular picture of your car that has been assigned to you based upon your number of posts.
 
Healey Nut--

YOU are "Luke"! See the rank below the circular picture of your car that has been assigned to you based upon your number of posts.
Nope not a star wars fan so Healey Nut will do Tks .
Also as for Law 75 , I have completed two complete dash refacing projects on 2 BJ8s done exactly the way I explained and it worked and looked just like the originals . It’s takes time patience and care .
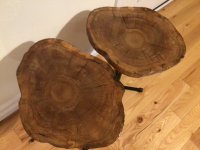
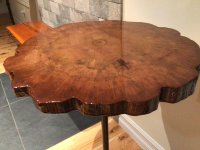
The only thing I would do differently if I did it again would be to use the epoxy finish I mentioned instead of numerous coats of paint on varnish . I have built numerous live edge tables using it and it’s an awesome product .
Anyone can buy new parts and assemble a set of parts …..thats not restoration . IMHO .
 

Attachments

  • ED36185D-29EB-40DA-967A-833419CB4D3F.jpeg
    ED36185D-29EB-40DA-967A-833419CB4D3F.jpeg
    1.6 MB · Views: 113
  • 14E558DD-F091-484C-8E14-D4491188FCC3.jpeg
    14E558DD-F091-484C-8E14-D4491188FCC3.jpeg
    1.6 MB · Views: 117
That's great! Really respect your talent and patience. Live edge (really known as "natural edge"...as it aint live any longer) tables are thick...not laminates, that our dashes are made of. So, with a laminate, you have less (?) then 1/8" to scrape with your utility knife and sand with numerous grits...probably start at 180, then 240 and perhaps even to 320. Accomplishing this on a laminate, with a good a result is better then just great!!!
 
Like I said , it takes patience ….I had nothing to lose other the time I put in . I prefer to try and restore first and if it doesn’t work then so be it replace it .
 
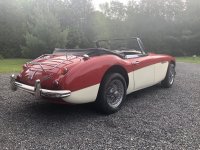
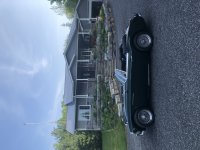
I used to have albums with both the 64 and 67 pics in but I guess they didn’t transfer when the forum upgrade was done .
Anyways they are both with new owners now .
check my media for stuff Im working on and other Posts for other pics I’ve posted of my 62 rally car project
the pics of the BRG 67 and Red over OEW 64 are the last pics I took of them before they left to new homes .
 

Attachments

  • B332BFD5-85D1-4AF2-8D49-49D4D0035349.jpeg
    B332BFD5-85D1-4AF2-8D49-49D4D0035349.jpeg
    3.4 MB · Views: 103
  • 76DAF385-0EC8-4864-86D0-D6E02AA60E02.jpeg
    76DAF385-0EC8-4864-86D0-D6E02AA60E02.jpeg
    3 MB · Views: 111

check this thread , lots of pics on the 64 restoration including the dash refinishing .
 
Dr. Smoke,

I have done a total of two veneer refurbishments on two separate Healeys I've owned (unfortunately, my first Healey was claimed by "Sandy" back in 2012). However, on both Healeys, I've utilized a two part epoxy resin, although the first Healey was done as a "pour in place" approach with no cutting down the epoxy (ie., sanding, compounding and buffing).

My second Healey, which I still own and enjoy, also utilized the two part epoxy resin approach, but this time, after pouring and letting it set (cure), I cut down the thickness by using various grades of sandpaper and compounds, then buffing, proving to be a much better and 'professional' looking finish. Healey Nuts mentioning of the epoxy resin approach as mentioned above is, I believe, the same or similar what I had used.

In addition to my preparing my second fascia refurbishment, I also had to resolve issues I had with 'checking' or peeling away of the existing wood veneer from the wood substrate). On that plus the application process, I posted my approach here on the Forum some years ago. If interested, one can research by typing, Epoxy Resin Dash Refurbishment.

Nonetheless, whatever finish you desire using, it is, in my humble opinion, to do it right and to have control over your finished product, I really see no way around doing this other than completely removing the veneer fascia and laying it flat as possible on a horizontal surface so as to avoid pooling, cascading, etc., of whatever liquid medium used, not to mention how to negotiate around the existing chrome trimming, bezels and so on, if one decides to leave in place.

I suppose it is easier to apply varnish or whatever liquid medium to the veneer used, leaving everything in place. Or, go through the chore of removing everything from the wood veneer (and yes, that does mean removing the oil/temp gauge gingerly along with everything else with all other bits, pieces plus using muscles in your body you never used before)!

But let me say that every time I look at my Healey, the one thing I draw my eyes to is that dash! That says just about everything to me!

Good luck!

Paul
 
Last edited by a moderator:
Resin is so...mid-20th century.
 
Similar threads
Thread starter Title Forum Replies Date
L TR2/3/3A Fascia Capping Triumph 8
L TR2/3/3A Fascia capping ends. Triumph 5
Jim_Stevens TR2/3/3A Bakelite ashtray fascia 3D print Triumph 6
S TR4/4A Fascia support and shift rod boot Triumph 0
JimTR4 TR4/4A Does a 4 wood dash fascia fit a 4A? Triumph 2
Brooklands TR2/3/3A TR2 - 3 Fascia on eBay Triumph 12
T Post-War Other Herald dash recovered!! Now Fascia won't fit!! Triumph 1
T Wanted Wanted TR3 rust free nut & bolt restoration Triumph Classifieds 13
A 100/6 BN4 Restoration Austin Healey 17
S Wanted Used Austin-Healy 100/100-6/3000 Restoration Guide By Gary Anderson And Roger Moment Austin Healey Classifieds 14
Cutrog1 For Sale Healey 3000 BJ8.... a restoration saga Austin Healey Classifieds 0
Greg Chait Wanted Stalled or Abandoned MG Restoration Projects MG Classifieds 3
H General MG MGYB--Semi-- restoration MG 2
D My new restoration tool Restoration & Tools 13
D For Sale 1955 DAIMLER CONQUEST RUNS NEEDS RESTORATION. Other British Classifieds 1
JoeO 72 TVR Vixen hybrid restoration TVR 1
Rob Glasgow Restoration: What Would You Have Done Differently? Austin Healey 37
GeorgeC Rich Chrysler's "Introduction to Austin-Healey Restoration" Austin Healey 3
J Restoration Progress - Boot Installed Austin Healey 1
C For Sale Parts, Factory Manual, Restoration Guide for 1959 100-6 Austin Healey Classifieds 4
BigGreen For Sale Anderson / Moment Restoration Guide for sale Austin Healey Classifieds 0
SteveTheBrewer Spitfire Triumph Spitfire Restoration Blog Triumph 22
R Tr4 restoration books Restoration & Tools 2
F YouTube Healey Restoration Videos Austin Healey 5
R TR2/3/3A Re-start after total restoration Triumph 22
F GT6 Looking to sell - in progress restoration Triumph 19
R TR2/3/3A Restoration of 1954 TR-2 Long Door Triumph 6
Don Riicardo Reliant Scimitar GTE se5a restoration Other British Cars 23
R TR2/3/3A Starting TR-2 for first time after restoration Triumph 58
Josandra 1949 singer nine roadster restoration by ladies Other British Cars 20
C SoCal Restoration Shops Austin Healey 15
HealeyRick Coronet Cream Restoration Austin Healey 1
H Restoration Magazines and Books Spridgets 4
W For Sale 1961 TR3a - Full Off Frame Restoration Triumph Classifieds 0
T BT7 Hardtop Restoration Austin Healey 6
nichola TR6 1973 TR6 Restoration - it’s a roller again! Triumph 4
Got_All_4 TR6 Starting my frame restoration Triumph 32
F General MG Field find restoration question ... MG 5
R TR2/3/3A Restoration of 54 TR-2 Triumph 6
Lin Fairly new YouTube series on AH100 restoration Austin Healey 0
S TR2/3/3A Frame off vs. body on restoration Triumph 21
D For Sale Custom 1972 Triumph Spitfire [Restoration Project] Triumph Classifieds 0
V TR2/3/3A TR3A Chassis restoration Triumph 8
Z For Sale 1954 Austin Healey 100-4 BN1 Beautiful Restoration Austin Healey Classifieds 0
Z For Sale 1954 Austin Healey 100-4 Beautiful Restoration Austin Healey Classifieds 0
J TR2/3/3A Body Restoration - Inner Sill Replacement Triumph 38
Jim_Gruber Pages from Porter Spridget Restoration Manual on Seat Recovering, You Tube Videos Spridgets 4
A TR2/3/3A Restoration work near San Diego CA Triumph 2
JPSmit Restoration on a Budget Restoration & Tools 4
F Restoration Guide Austin Healey 2

Similar threads

Back
Top