• The Roadster Factory Recovery Fund - Friends, as you may have heard, The Roadster Factory, a respected British Car Parts business in PA, suffered a total loss in a fire on Christmas Day. Read about it, discuss or ask questions >> HERE. The Triumph Register of America is sponsoring a fund raiser to help TRF get back on their feet. If you can help, vist >> their GoFundMe page.
  • Hey there Guest!
    If you enjoy BCF and find our forum a useful resource, if you appreciate not having ads pop up all over the place and you want to ensure we can stay online - Please consider supporting with an "optional" low-cost annual subscription.
    **Upgrade Now**
    (PS: Subscribers don't see this UGLY banner)
Tips
Tips

Dampner Replacement In or Out?

kkaa

Jedi Hopeful
Offline
Guys, I might have messed up. Rebuild, installed, tested and tuned ready for paint but a bit worried about using the original dampner instead of a new Harmonic Balancer :nopity:. Can the dampner be replaced while the engine remains in or is this another lesson in life and it comes out??? I remember the dog nut was a *#^$* :joyous:
 

Patrick67BJ8

Obi Wan
Silver
Country flag
Offline
Guys, I might have messed up. Rebuild, installed, tested and tuned ready for paint but a bit worried about using the original dampner instead of a new Harmonic Balancer :nopity:. Can the dampner be replaced while the engine remains in or is this another lesson in life and it comes out??? I remember the dog nut was a *#^$* :joyous:
I used the Dampner Doctor to do mine. Service was fast and about $275.00. Why take a chance on a 40 plus year old one? I changed mine without removing the engine about 2007 but I can't remember the exact sequence because I also did the started dog and chain and chain tensioner too.
 
5

57_BN4

Guest
Guest
Offline
You gotta jack up the engine about an inch to get the damper out from between the nut and the chassis brace which is just a matter of taking out the eight bolts that go into the chassis boxes so no biggie. And the radiator out obviously.

There are guys that re-bond the original dampers using modern methods but really, the stock damper mass is tuned to a specific frequency that exists only in the original engine so if you have a lightened flywheel or different weight pistons then the old type damper is quite likely no use anyway. The modern replacement ones work on all frequencies and are a better option if you don't mind non-original. Then you'll have to get the pulley off which means undoing 'that' nut. I recently had to split one in half to get it off...

Andy.
 
OP
K

kkaa

Jedi Hopeful
Offline
Holy crap thats good news, I thought for sure I would need to pull the engine..

Im not too excited about the nut, had to use a crescent wrench and some blows with a hammer to get to seat all the way on. Should I use a little heat to get it to break free? Sounds like Moss is the safest balancer ? Much appreciated guys..
 
Last edited:
5

57_BN4

Guest
Guest
Offline
Take the starter out and arrange a short bolt to lock into the ring gear teeth so you can undo the nut. Remove the damper first, then lower the engine and put some bolts back in the mounts so it doesn't slide sideways, then pull as hard as you can on a three foot length of pipe slipped onto the handle of your wrench. If it comes off easily then you need more tightness next time. Then you'll have to jack it up again to get a puller on to remove the pulley. Not as bad as it sounds really.

Had a quick look at the Moss damper- it is principally the same as the stock one so I'm not sure how it is tuned to the correct frequency for any particular engine. Probably only important if you are going racing.

Andy.
 

Keoke

Great Pumpkin
Country flag
Offline
Should I use a little heat to get it to break free? NO I suggest buying borrowing or renting an Impact wrench to free the nut which has been treated with PB Blaster before hand. IF the damper does not show that the rubber has spun or any other visible degradation it can be reused .
 
OP
K

kkaa

Jedi Hopeful
Offline
Thanks Andy, pretty clear and could be worse. No racing on this one, but want to with the next thats sitting waiting for my time....

Learning tough lessons as I go and the value of of slowing down a bit. I left the first motion seal out of the gearbox on first run and watched the driveway fill with fluid, this just another lesson....

This ones gonna be fun, I can only jack up a couple fee and was just a nightmare to get the dognut to seat completely/ Sounds like I should lock the emergency brake and put in gear also...

As far as the damper, thats a good point on the Moss unit. When I rebuilt the motor I punched it out and that changes weight. Is there a more specific one or an i getting picky?

Kurt

Take the starter out and arrange a short bolt to lock into the ring gear teeth so you can undo the nut. Remove the damper first, then lower the engine and put some bolts back in the mounts so it doesn't slide sideways, then pull as hard as you can on a three foot length of pipe slipped onto the handle of your wrench. If it comes off easily then you need more tightness next time. Then you'll have to jack it up again to get a puller on to remove the pulley. Not as bad as it sounds really.

Had a quick look at the Moss damper- it is principally the same as the stock one so I'm not sure how it is tuned to the correct frequency for any particular engine. Probably only important if you are going racing.

Andy.
 
OP
K

kkaa

Jedi Hopeful
Offline
Keoke, Ok on the heat. I have an impact wrench but wouldnt have the power for that nut. Ill go and try to measure the nut today and order a socket that will fit instead of the crescent wrench, put on a small extension and bar. Ill make sure to soak it first with PB... I want to take a pic of the damper and find a way to leave it, but sounds like thats more of the odds and no sure way of knowing by visual inspection?"

Should I use a little heat to get it to break free? NO I suggest buying borrowing or renting an Impact wrench to free the nut which has been treated with PB Blaster before hand. IF the damper does not show that the rubber has spun or any other visible degradation it can be reused .
 
Country flag
Offline
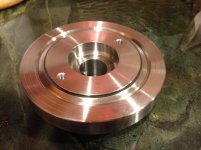
Seems like I got this Pro Race damper from Moss...

dampener.JPG


Here's your socket size; it fit fine to remove the original damper, but I had to mill down the end of it to go inside the new damper:

dampener_socket.JPG
 
OP
K

kkaa

Jedi Hopeful
Offline
Should have asked earlier, changing the damper and tightening, im sure ill rotate the crank a bit. Silly question, but any chance this can effect timing? Its all mechanical?
 
Country flag
Offline
Looks like the damper I used; mine was extremely tight on the snout, and I know I used an oven to heat it up. I've slept since then, so I don't remember how hot I got it, so I would definitely recommend that you check with the supplier as to what a safe upper limit is. It's a heavy mass, so if you put it in the oven cold and let it come up to temperature with the oven, it will take a lot longer to thoroughly heat the entire damper than it will to heat the air in the oven (satisfying the "preheat" function).

Definitely make sure the snout is smooth and completely free of burrs, dings and high spots of any kind.

Once you get started (you'll see what I mean...) work quickly, wearing welder's gloves if you have to, and don't stop until it's fully seated. Once the damper cools off, it'll be very hard to get it to budge any further.

As a final note, better make sure your socket fits inside the damper before you get started (mine didn't, but I milled the socket ahead of time).
 
5

57_BN4

Guest
Guest
Offline
Check your original pulley hub near where the seal runs, if there is any sort of groove cut into it then your timing cover is not on central. The groove is not worn from the seal lip but from the timing cover metal touching it because there is nothing to centralise the cover unless the bolts are tightened up after the pulley is fitted. Often one or two bolts won't go in the holes with the cover on centrally. It isn't the best bit of design.

While you are in there it'd be a good opportunity to replace the seal and re-centralise the cover.

Timing won't change with turning the engine, the chain sprocket is fixed by a second key further back, the same type as the one that locates the pulley.

Andy.
 
OP
K

kkaa

Jedi Hopeful
Offline
Randy - This is super helpful and your spot on. I opened it and the instructions say bake by oven at 250 for 15 min or boil in water for the same amount of time....Its definitely instructing quick work, not to delay. The other recommendation was changing timing cover seal, so hopefully I have an extra or will order today, and post the instructions once I can scan and share the info in case anyone else wants it....

Haven't received the socket yet, but am a little worried about how you milled yours, I dont have a mill. Hopefully it fits, if not ill figure something out with a air grinder to get it close....


Looks like the damper I used; mine was extremely tight on the snout, and I know I used an oven to heat it up. I've slept since then, so I don't remember how hot I got it, so I would definitely recommend that you check with the supplier as to what a safe upper limit is. It's a heavy mass, so if you put it in the oven cold and let it come up to temperature with the oven, it will take a lot longer to thoroughly heat the entire damper than it will to heat the air in the oven (satisfying the "preheat" function).

Definitely make sure the snout is smooth and completely free of burrs, dings and high spots of any kind.

Once you get started (you'll see what I mean...) work quickly, wearing welder's gloves if you have to, and don't stop until it's fully seated. Once the damper cools off, it'll be very hard to get it to budge any further.

As a final note, better make sure your socket fits inside the damper before you get started (mine didn't, but I milled the socket ahead of time).
 
Country flag
Offline
Haven't received the socket yet, but am a little worried about how you milled yours, I dont have a mill. Hopefully it fits, if not ill figure something out with a air grinder to get it close....
It'll slow down your project, but if you send your socket to me, assuming it doesn't fit, I'll neck it down for you like I did mine.

All I was able to find, at the time, anyway, was a 3/4" drive impact socket. If yours is either 1/2" drive (if they even make them that big...?) or a non-impact 3/4" drive, maybe you'll be okay. I wanted a 6-point, so maybe my choices were more limited; I sure as heck don't remember why I got such a big one now!

But the offer stands.
 

Griz

Jedi Hopeful
Offline
I was able to find a 1 11/16" socket (non-impact) for 1/2" drive at Sears. It fits into the Pro Race dampener recess. Griz
 

Jerry

Darth Vader
Gold
Country flag
Offline
Randy, did you consider enlarging the balancer hole to make it easier to go on? I also had trouble getting mine on and wonder if it will ever come off.
Jerry
 
Country flag
Offline
Randy, did you consider enlarging the balancer hole to make it easier to go on? I also had trouble getting mine on and wonder if it will ever come off.
Jerry
I didn't modify the damper, mounted it as per instructions. Someday, I guess we'll both find out how hard they are to remove...
 
Similar threads
Thread starter Title Forum Replies Date
T Dampner for a 1275 [damper? dampener?]: recommendations Spridgets 6
JFS TR2/3/3A BF&G Dampner Seal Triumph 8
jlaird Question-Front dampner puller Spridgets 2
L Getting the Vibration Dampner Off Austin Healey 12
L Crankshaft Vibration Dampner Austin Healey 4
M Replacement of Lucas HA12 with Lucas SA12 Coil Austin Healey 6
1 TR2/3/3A Rimmer Brothers Replacement Front Wing Quality? Triumph 8
T TR2/3/3A Replacement Turn Signal Switch Triumph 4
scottkilpatrick TR4/4A Difficulty Level Opinion - Differential Gasket Replacement 62 TR4 Triumph 10
WHT Rocker Arm Shaft Replacement Austin Healey 21
Celtic 77 MGB Seat webbing replacement. MG 1
olarson TR2/3/3A Horn Replacement Wiring Triumph 7
Celtic 77 MGB Seat Diaphragm replacement MG 0
Celtic 77 MGB 1977 seat webbing replacement. MG 1
tr6nitjulius General TR Fan Belt Replacement '72 TR6 Triumph 1
K TR2/3/3A Wing mirror replacement again... Triumph 0
W TR2/3/3A 1960 TR3A Radiator replacement recommendations Triumph 11
AUSMHLY BJ8 Clutch Fork Bush Replacement Austin Healey 5
B T-Series Battery replacement mgtd MG 2
F TR4/4A Speedometer cable replacement access Triumph 0
B For Sale Replacement Panels BE/Midget Spridgets Classified 0
Celtic 77 MGB Looking for best info regarding throttle cable replacement. MG 16
T TR2/3/3A Replacement radiators Triumph 8
M TR2/3/3A HVDA Replacement Clutch Disc Available from Moss Triumph 10
F TR4/4A Replacement air filter for SU HS6 Triumph 6
BobHaskell Mini Cooper rear subframe replacement British Motor Corp 3
A MGB MGB 1974 windscreen centre rod replacement MG 5
B Poor quality BE replacement spring boxes Spridgets 0
AUSMHLY BJ8 Laygear Replacement Options Austin Healey 0
B TR6 Fuel tank replacement Triumph 0
S MGB clutch replacement MG 7
S Wiring Harness Replacement Spridgets 1
JPSmit Not something you see everyday - a warranty replacement Spridgets 1
M 1972 Midget Seat Belt Replacement Spridgets 4
old sub sailor Ignition switch / steering lock replacement in a '78 midget Spridgets 5
T TR2/3/3A tr3 front carpet replacement Triumph 5
somewhatspritely The black paint on replacement panels. Restoration & Tools 7
D Engine replacement. Rover / Land Rover 0
EWD TR6 Dash Pad Replacement Triumph 3
R TR6 fan shroud replacement Triumph 5
C Replacement wheels Rover / Land Rover 1
B TR4/4A Floor pan replacement Triumph 4
DrEntropy MGB Replacement starter MG 7
Kurtis Bugeye Sprite front frame rail horn replacement Spridgets 5
P TR6 1970 TR6 Passenger Sun Visor Replacement Triumph 1
M General MG Midget MK1 windshield replacement MG 2
M TR6 Replacement Steering Rack ? Triumph 7
Kurtis TR4/4A Rear wheel brake cylinder replacement Triumph 1
A TR2/3/3A TR3-A replacement top Triumph 7
C TR2/3/3A Horn Control replacement Triumph 3

Similar threads

Top