• Hi Guest!
    You can help ensure that British Car Forum (BCF) continues to provide a great place to engage in the British car hobby! If you find BCF a beneficial community, please consider supporting our efforts with a subscription.

    There are some perks with a member upgrade!
    **Upgrade Now**
    (PS: Subscribers don't see this gawd-aweful banner
Tips
Tips

Adjusting Valve Clearance

AUSMHLY

Yoda
Country flag
Offline
Hello. This is my first attempt at adjusting the valves.

The shop manual states use of a .012 gauge, screwdriver and wrench, but does not mention how to get the valves in the positions needed.

1) What's the best/easiest way. I've used the starter solenoid, but it's a or miss knowing if the valve is in it's lowest position.

Per Youtube, some car manuals state there is an order of which valves to adjust.

2) Is there a valve adjustment order for the Healey?

3) Can two valves be adjusted at the same time? Example, when adjusting valve #1, valve #12 should be in it's lowest position. I noticed valve #10 seemed to be in it's lowest position at the same time too. Was it? If so then I could adjust valve #3 at the same time?

Anything else I should be aware of?
 
Last edited:
Thoughts:
--if you remove the plugs and have the stock generator, you can turn the engine over by hand using a wrench on the generator nut while pressing down on the fan belt.
--you can divide a circle in sixths and make a timing disc (photo). You can google an image for a circle divided into sixths.
--position the #1 cylinder at TDC with both valves closed (observe a little play in both rockers), position timing disc mark lined up with a designated reference point (such as the left side of the square hole here) adjust valves, then follow order of timing disc for the rest. It takes two full turns of the crank, but you get both valves at each numbered position.

screenshot.1924.jpg
 
Last edited:
The valve sequence is listed in the Healey Haynes manual .
 
If you are using the Bently manual, I love it for most things but has no value when it comes to valve adjusting info.

With all plugs out, in my case I can turn the motor with the fan blades and pinching the belt a bit to get it to bite, Steve's method is similar using the generator nut and pinching the belt a bit, others prefer to put it in 4th and roll the car. All of these methods are better than trying to use the starter in my opinion.

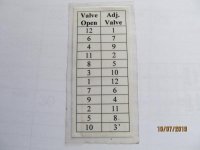
Knowing which ones to adjust is easy if you follow this simple chart (and, no you can't do more than one in any given position). I forgot which manual I found the info in, but years ago I made up this small chart and laminated it and carry it in my wallet. This is the easiest way, with minimal engine turning, that I have found. The sequence is made for turning the engine in it's normal direction of rotation.
Example: when valve #12 is at maximum open, adjust valve #1, #6 open, adjust#7, etc. thru the sequence (takes very little turning). Note, you don't have to start at valve #12, you can start with any one you find wide open and proceed from there.
IMG_2504.jpg

Dave
 
Last edited:
The valve sequence is listed in the Healey Haynes manual .

Would you or someone else provide that sequence from the Haynes manual or any other manual that provides that information?
I have the Austin Healey Workshop Manual. It's doesn't list the sequence. Wonder why?
Why do we need to adjust the valves in a particular sequence?

Thanks Dave. You posted 4 minutes before me, while was typing this.
 
If you are using the Bently manual, I love it for most things but has no value when it comes to valve adjusting info.

With all plugs out, in my case I can turn the motor with the fan blades and pinching the belt a bit to get it to bite, Steve's method is similar using the generator nut and pinching the belt a bit, others prefer to put it in 4th and roll the car. All of these methods are better than trying to use the starter in my opinion.

Knowing which ones to adjust is easy if you follow this simple chart (and, no you can't do more than one in any given position). I forgot which manual I found the info in, but years ago I made up this small chart and laminated it and carry it in my wallet. This is the easiest way, with minimal engine turning, that I have found. The sequence is made for turning the engine in it's normal direction of rotation.
Example: when valve #12 is at maximum open, adjust valve #1, #6 open, adjust#7, etc. thru the sequence (takes very little turning). Note, you don't have to start at valve #12, you can start with any one you find wide open and proceed from there.
View attachment 60787

Dave

Example from your list, should it be valve #1, 7, 9, 2, 5, 10, 12, 6, 4, 11, 8, 3.
Why does the order matter?

PS. you carry that chart in your wallet? Truly, a car guy!
 
No, it doesn't really matter which order if you want to turn the engine a lot - the whole point of this chart is to have minimal engine turning - eg, if you adjust #1, there is only a few degress of turning to do #7 and then only a few degrees of turning to do #9, etc. The cam turns at 1/2 speed of crank so overall you will only turn the crankshaft about 2 revolutions (one full revolution of the cam) to do all valves if you follow the chart.

I got in the habit of carrying this kind of thing when I was racing :smile:.

Dave
 
There is no requirement to adjust the valves in that sequence, it's just that they go fully closed in that sequence.
 
Ah, that makes sense.

Another thing my manual doesn't mention, removing the spark plugs allows the engine to turn easier.
Do many people do that?
 
Do AH owners ever just remove the plugs, shift into 2nd, and roll the car backward or forwards to get the valves opened/closed? Sometimes turning the generator only results in the belt slipping and no engine movement.

Tom M.
 
The chart that red57 has shown is the rule of 13. It is good for any 6 cyl engine with 2 valves per cylinder. So you pick a number from 1 to 12 and open that valve fully then adjust the corresponding number that equals 13. I believe for a 4 cylinder engine i is the rule of 9. To be exact as possible to make sure the open valve was right at its lobe peak I started to meassure the height of the compressed spring, when I got it to its lowest height I knew it was fully open. And yes pull all the plugs and turn the engine by pinching the fan belt down and pulling on the fan or turning the gen nut.
 
1) Remove valve cover
2) Remove all plugs
3) Put gearbox in neutral, use starter solenoid to employ 'Rule of 13;' e.g. to adjust #1 valve get #12 valve as close to rock (fully open) as possible
4) Put car in fourth and push car forward/back as necessary to get #12 at rock (rock is probably 20deg or so; close is good enough)
5) Repeat steps# 3-4 for the remaining valves
 
If you want to be super precise (some call it a$@l ) :wink-new: Set up a dial indicator on the opening valve , top of the spring collar will do , so you can find the exact full open point of that valve then adjust the appropriate corresponding valve .
 
The valve sequence is listed in the Healey Haynes manual .

Yaeh:

That was all I ever used back in the day seemed simple enough to me
 
Try this, EOIC method.
https://www.onallcylinders.com/2012/02/28/lashing-out-how-to-adjust-valve-lash/


Attachments

  • 38BA71C0-4E29-4999-8F03-33767171B66D.jpg
    38BA71C0-4E29-4999-8F03-33767171B66D.jpg
    65.8 KB · Views: 261
I know the use of a dial indicator was described as a word we can't use here, but do people really do that??

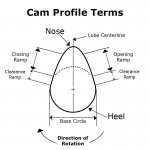
Cam_Profile_Terms.jpg
I have attached a generic picture of a cam profile, half the rotation of the cam is in what is called the base circle in the diagram, if the lifter is resting on the cam anywhere in the base circle valve clearance will be the same and can be set precisely. In other words if you are just learning this procedure, the seat of the pants method of watching the opposite valve identified by the rule of 13 and stopping when the opposite valve (as opposed to the one you are setting the clearance for) appears to be somewhere around fully open or pushed down as far as it will go by rocker arm, that is all the data you need to get a precise valve clearance setting.
 
Exactly what glemon said. This is not precision work. There is plenty of leeway on the cam to do the valve adjustment.
And not to complicate matters, if one set of valves is at overlap, about equally open and closed, you can do both intake and exhaust on the corresponding cylinder that has fully closed valves (firing).
Overlap is easy to spot as one valve is opening and the other is closing.
 
... the seat of the pants method of watching the opposite valve identified by the rule of 13 and stopping when the opposite valve (as opposed to the one you are setting the clearance for) appears to be somewhere around fully open or pushed down as far as it will go by rocker arm, that is all the data you need to get a precise valve clearance setting.

Yup. Did it that way for years; I suggested the 'move the car in gear to get closer to full rock on the opposite valve' because, well, you know ...
 
Back
Top