• The Roadster Factory Recovery Fund - Friends, as you may have heard, The Roadster Factory, a respected British Car Parts business in PA, suffered a total loss in a fire on Christmas Day. Read about it, discuss or ask questions >> HERE. The Triumph Register of America is sponsoring a fund raiser to help TRF get back on their feet. If you can help, vist >> their GoFundMe page.
  • Hey there Guest!
    If you enjoy BCF and find our forum a useful resource, if you appreciate not having ads pop up all over the place and you want to ensure we can stay online - Please consider supporting with an "optional" low-cost annual subscription.
    **Upgrade Now**
    (PS: Subscribers don't see this UGLY banner)
Tips
Tips

TR2/3/3A continuing repairs to front clip

Frank Canale

Jedi Warrior
Silver
Country flag
Online
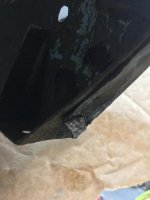
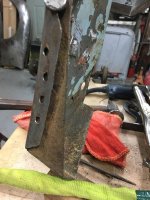
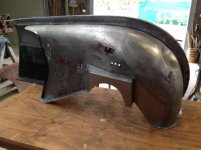
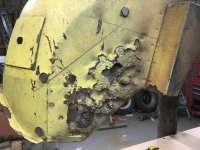
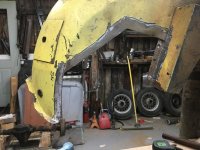
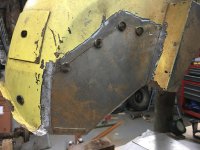
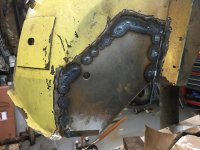
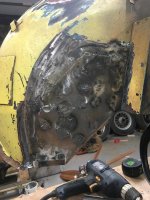
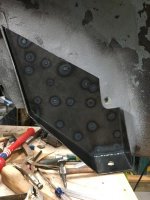
I had put off repairing the front body mounts and inner wing. I have a table built to set the front end on to do the repair and have started with the passenger side. All is going well. I started to make the template for the driver inner wing repair and noticed the back flange has been folded up approximately 1/2". The passenger side flange is flat and has not been folded up. Any ideas if this fold is necessary or just another oddity from years gone past. The photos are from behind the front body mount. The flange in question is part of the inner wing and the body mount bracket is spot welded to this area.
 

Attachments

  • IMG_0379.jpg
    IMG_0379.jpg
    33.5 KB · Views: 100
  • IMG_0380.jpg
    IMG_0380.jpg
    74.9 KB · Views: 97

LionelJrudd

Jedi Trainee
Country flag
Offline
Frank the lower part of my inner guards where it is spot welded on to the bracket were both folded up flush so that is how I made them.

Below you can see the flange as I fitted the repair section on the RH side
IMG_1249.jpg
Here once the bracket was spot welded to the guard and then the flange turned up.
IMG_1530.jpg
 

Attachments

  • IMG_1335.jpg
    IMG_1335.jpg
    67.1 KB · Views: 84
  • IMG_1361.jpg
    IMG_1361.jpg
    55 KB · Views: 88
OP
F

Frank Canale

Jedi Warrior
Silver
Country flag
Online
Thank you Lionel, Both sides of mine have the tab doubled over at the bottom like you did but the diagonal flange that wraps behind the body mount is what I have the question about. The passenger side is flat and the driver side has part of the flange doubled over.
 
OP
F

Frank Canale

Jedi Warrior
Silver
Country flag
Online
Great ,that is what I thought. I could not figure any reason for it to be doubled over and it really did not look neat and even. Thank you Graham and Lionel for the pictures. My passenger side that was rusted out had an extra hole that I did not think should be there so I left it out of the repair panel( just has the one 1/2” hole) so that is off my mind. Hope to get the passenger body mount spot welded to the inner wing that has already been welded and then on to the driver side.
 
OP
F

Frank Canale

Jedi Warrior
Silver
Country flag
Online
Passenger side is welded in but I am a little disappointed with the spot welds. Lionel sets the bar pretty high and looking back at his, has me thinking I might have to redo mine. I will decide after the driver side. I am going to have to make a better way to clamp the panels for spot welding and give lionels method a try. His sure do look good.
 

sp53

Yoda
Country flag
Offline
Yes Frank Graham car is beautiful and very photogenic. The area you are working on is often a problem because the sheet metal is folded on the bottom and doubled for the body mount and water gets between the 2 pieces of tin at the inside seem and rust. The spot welds should be there and I am so much a purest I look for them. In the past I have taken a whole saw and drilled off the just the first lawyer of the doubled metal to see how bad it has rusted between the 2 sections and then if not too bad taken the whole saw and drilled another piece for the plug then welded that back in for a filler after I chipped off what is left of the old spot welds. That is one reason I look for the spot-welds because that area gets fixed very creatively sometimes. You are a much better welder and fabricator than I, so you will probably build something like Lionel. Incidentally, the little hole in Graham pictures is for a clip that holds the overflow for radiator.
steve
 
OP
F

Frank Canale

Jedi Warrior
Silver
Country flag
Online
I am also using a tig welder but I tried plug welds like I did on the frame and they worked great but that was two pieces of 16 gauge. That method did not work with the 20 gauge to the 16 gauge body mount bracket. My repair does not look bad but no where as good as Lionel's. The repair was great till I did the plug welds, The picture looks worse than it really is. The body mount bracket turned out very good. That bracket is a difficult bracket to form due to the shape. Only one flange can be formed in the brake and the rest has to be hammer formed. I made the mounting flange out of heavier 1/8" material and welded that flange in. The original flange was distorted and looked a little light to me so I added the heavier metal, Just like I did to the outrigger mounts. I am hoping this will make for a stiffer car.
 

Attachments

  • IMG_0366.jpg
    IMG_0366.jpg
    80.6 KB · Views: 69
  • IMG_0367.jpg
    IMG_0367.jpg
    70.6 KB · Views: 70
  • IMG_0368.jpg
    IMG_0368.jpg
    70.7 KB · Views: 68
  • IMG_0369.jpg
    IMG_0369.jpg
    69.4 KB · Views: 70
  • IMG_0381.jpg
    IMG_0381.jpg
    77.3 KB · Views: 69
  • IMG_0383.jpg
    IMG_0383.jpg
    69.8 KB · Views: 69
OP
F

Frank Canale

Jedi Warrior
Silver
Country flag
Online
Thank You Graham for the pictures. The after picture of the painted car looks great and will be taken into consideration as to weather I redo the first repair or not. If I redo the repair it might save a little time when it comes time to do the paint work. I will take a little time to think about re doing the repair after the driver side is done.
 

LionelJrudd

Jedi Trainee
Country flag
Offline
Frank, with my spot welds I use 125 amps dc and hold it for 2 to 2.5 seconds when spotting two pieces of body sheet. If the backing sheet is thicker, I increase the time a bit.

The two sheets need to be very clean and clamped very firmly together. Any gap between the sheets and the top sheet will blow out. I regularly use a three eigth inch copper plate as a heat sink behind the weld. This is not always convenient in tight corners but if used, can allow you to extend the period of the weld.

I think your plug welds look pretty good. The reason I started researching spot welds with the tig was because my plug welds looked so awful. Haven't gone back to plug welds except in extreme situations. I never seem to be able to get the filler rod, electrode and hole all together in the right place at the right time without getting a big blob of weld.
 
OP
F

Frank Canale

Jedi Warrior
Silver
Country flag
Online
Hi Lionel, I hope to have the spot welding clamp done today. Looking forward to giving it a try. I used 2 welding clamps to clamp the pieces and that works ok but this new clamp might be better. The one question I have , are you spraying the mating pieces with weld thru primer that you spot welded. Anything that is folded or welded together is being sprayed with the weld thru primer so far and this might make the spot weld a little easier for me. Thanks for the information, I had gone back and looked up your work on the tub and found how you were spot welding your parts. Thank you for following , It is great to have others watching and giving advice. I am on my own here except for the followers on the forum, Great to have the extra help.
 

LionelJrudd

Jedi Trainee
Country flag
Offline
Frank I am not using weld through primer on the welds. Had too mich trouble early on with the weld blowing out so now will depend on getting as much primer as I can into the joins after the weld. Copper rich weld through primer is probably OK but the tig seems a lot more sensitive to primer than the mig.
 
Similar threads
Thread starter Title Forum Replies Date
P TR6 Clunking noise in rear continuing Triumph 39
H Continuing clutch problems Austin Healey 10
H Continuing clutch problems Austin Healey 7
DornTRoriginal TR2/3/3A Accererator Assembly Continuing Triumph 16
drooartz Continuing saga of the noise Spridgets 21
Sarastro Continuing with the capacitor/condenser issue Spridgets 15
Popeye Panel adhesive - continuing "welding for dummies" Restoration & Tools 7
davester MGB-GT MGBGT brake restoration - the continuing saga MG 9
jerrybny TR6 Continuing Saga of TR6 Temp Triumph 19
G TR2/3/3A The continuing saga of my "Free TR3 Engine" Triumph 1
Popeye TR4/4A TR4A rear tub repairs (likely accident damage in front of rear wheels) Triumph 6
F TR2/3/3A Mid section repairs Triumph 17
red57 Metal prep of chassis after repairs and shot blasting Austin Healey 5
Tr3aguy TR2/3/3A Tr3 frame repairs recommendations Triumph 29
T Jensen-Healey back for more repairs Spotted 1
A TR2/3/3A I'll pay for competent repairs! Triumph 4
S Chassis repairs Austin Healey 7
af3683 Triumph Repairs in Connecticut Triumph 2
O TR6 TR6 Body Repairs Triumph 1
Michael Oritt Who repairs SU fuel pumps? Austin Healey 7
M Post the crazy previous repairs you have found Spridgets 16
JPSmit Now Suzuki Sidekick - field repairs Other Cars 6
JPSmit Ford Ranger - Field repairs Other Cars 17
Patrick67BJ8 Harmonic balancer repairs Austin Healey 8
T Inner fender repairs Triumph 9
T Wedge Nearly done welding the TR8 floor repairs Triumph 15
G Fuel Pump repairs Austin Healey 2
N What type and gage of sheet metal for rust repairs Triumph 1
T TR4/4A TR4 Fender Repairs Triumph 4
tr6web TR6 Body and frame repairs TR6 Triumph 0
L How far do you go with Chasis Repairs? Austin Healey 10
L Aluminum Shroud Repairs Austin Healey 11
Webb Sledge Triumph repairs Triumph 10
M Repairs/Planning....your ideas, please! MG 12
56HealeyDan 100-4 Front Crankshaft Seal Austin Healey 2
AngliaGT 1997 Miata - Anyone Have a Picture on How to Mount the Front License Plate Bracket? Other Cars 12
mctriumph For Sale front apron 57 Tr3 Triumph Classifieds 0
71TR6 TR2/3/3A TR3A Front Bumper Mount Triumph 11
1 TR2/3/3A Rimmer Brothers Replacement Front Wing Quality? Triumph 8
Carlbanan56 MGB Front hub MG 4
F For Sale E Type Series II front and rear bumpers good condition Jaguar Classifieds 0
J MGB Front Wheel Bearings. Re-grease or replace? MG 19
scottkilpatrick TR4/4A Front Brakes - Basics for Pads Triumph 11
C MGB-GT MGB-GT Front Ride Height MG 0
C MGB-GT Front Ride Height MG 0
J For Sale Bilstein Front Shocks for Jaguar E-Type 727-498-6493 Jaguar Classifieds 0
J TR2/3/3A Mystery knocking sounds at front wheel Triumph 11
E Wanted 1963 Healey 300 mark 2 front grille wanted Austin Healey Classifieds 0
K TR2/3/3A Front brake hub removal to access Vertical Link bolts(screws) Attached pictures. Triumph 1
K TR2/3/3A How to remove the front brake hub from the brake disc? Triumph 11

Similar threads

Top