• The Roadster Factory Recovery Fund - Friends, as you may have heard, The Roadster Factory, a respected British Car Parts business in PA, suffered a total loss in a fire on Christmas Day. Read about it, discuss or ask questions >> HERE. The Triumph Register of America is sponsoring a fund raiser to help TRF get back on their feet. If you can help, vist >> their GoFundMe page.
  • Hey there Guest!
    If you enjoy BCF and find our forum a useful resource, if you appreciate not having ads pop up all over the place and you want to ensure we can stay online - Please consider supporting with an "optional" low-cost annual subscription.
    **Upgrade Now**
    (PS: Subscribers don't see this UGLY banner)
Tips
Tips

Restoring proper order to spark plug wires

M

Member 10617

Guest
Guest
Offline
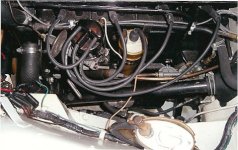
At my request, the shop where I have work done on my TR3 repositioned my distributor two teeth so it is more in line with the block and gives me some room for setting the advance.

I also asked them to return my spark plug wires to the proper sequence (an earlier engine rebuild resulted in the wires being moved forward one connection on the distributor cap. Don't know why?) When I got the car back, the wires had not been repositioned... and the explanation was that it wasn't necessary.... etc., etc.

OK. So if I want to do this myself, what is involved?
 

Attachments

  • 27625.jpg
    27625.jpg
    44.6 KB · Views: 424

DNK

Great Pumpkin
Country flag
Offline
You can't do it if it doesn't need it. At TDC the rotor HAS to be pointing in the general direction of #1. With only 4 pistons if you move the sequence it will change by a minimum 90degrees.
Don't think that would make you happy . And besides, you would start another thread that would carry on for months
grin.gif
 

Darrell_Walker

Jedi Knight
Silver
Country flag
Offline
Hi Ed,

It means repositioning the distributor drive gear again.

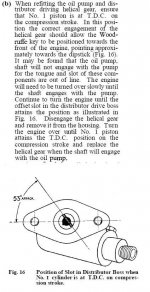
The manual should have the procedure, basically get #1 TDC on the compression stroke, and then insert the gear (the one you just had moved) so that the slot is pointing to #1 (note, the drive dog is offset, so while there are positions that line the slot up, only one will allow the distributor to also point at #1). Then move the wires around.

-Darrell
 

TR3driver

Great Pumpkin - R.I.P
Offline
From where you are, you would have to move the gear (again) to correct the plug wire order. As Don says, the rotor has to be pointing at the #1 plug wire when #1 is ready to fire. And with your current setup, that is almost straight back instead of roughly towards the #1 spark plug as it should be.

I would refuse to pay the shop, since they failed to do what you asked them to do. "It isn't necessary" is not a reasonable explanation if they agreed to do the work. And having failed to do the work, you shouldn't owe them anything.

You really need to be looking for a different shop.
 

Attachments

  • 27626.jpg
    27626.jpg
    93.2 KB · Views: 412
OP
M

Member 10617

Guest
Guest
Offline
Darrell,

Thanks. Sounds pretty straight forward operation.

For the time being, things seem to be working fine but when I get the chance, I'll undertake the modification. Seems odd to me (and did at the time) that the original engine rebuilder would have made these changes, but I have heard and read that it doesn't really matter as long as the firing order is correct. But I'd like to get it back to standard.

Randall,

Problem is... there aren't any other shops around here, and the one I use has an excellent national reputation. They just resist doing something that they don't think necessary, or that they believe will not improve things. For example, they refuse to substitute electronic ignition for points, etc., etc.

Don,

Ha, ha... Yes... let's not get into any more dramatic, month-long threads. For some reason, mine seem to devolve into such epics. I really do appreciate your good advice.
 

MikeP

Jedi Knight
Offline
What's happened is that in rotating the distributor, AND THE SHAFT, by two teeth it's still pointing to the same cap terminal for firing #1. And since rotation direction doesn't change then each plug will fire in the same order at the same time in relation to the crank/valves as before. That's why they said it wasn't necessary. To get back to the proper terminals would have meant moving the body, and changing the shaft a different amount and maybe different direction to point to another cap terminal for #1.
 
OP
M

Member 10617

Guest
Guest
Offline
Mike.....

The more I read of these good answers, the more I'm convinced that I need to leave well-enough alone, for now, especially since the car is running extremely well (thanks to the shop's work and Jeff Schlemmer's distributor rebuild).

Thanks.
 

TomMull

Darth Vader
Silver
Country flag
Offline
Agree with all above and you can do this yourself. The manual gives precise directions with illustrations.
Tom
 
OP
M

Member 10617

Guest
Guest
Offline
There's been several mentions of "the manual" with illustrations. Which manual would that be? I have the SERVICE INSTRUCTION MANUAL, and it has very brief instructions and no illustrations.
 

Darrell_Walker

Jedi Knight
Silver
Country flag
Offline
I'd have to look to be sure, but I believe both the Haynes and the TR4 factory manuals illustrate the procedure.
 

Geo Hahn

Yoda
Country flag
Offline
LexTR3 said:
...They just resist doing something that they don't think necessary, or that they believe will not improve things...

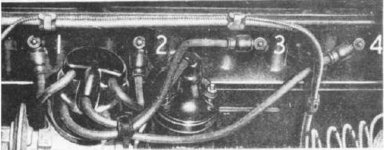
I find that having the distributor aligned per the manuals makes not only a neater appearance but a less problem prone arrangement. For one thing the wires can be shortened to lengths that assure they can only be fitted to the plugs one way (the correct way).

Apart from that, the long wires & strange routing would just bug me.

Capillary%20Tube(1).JPG


You need some local BritCar buddies to guide you on this as the best approach (IMO) is to pull the dizzy and gear out, position the engine (#1 TDC compression) and start from scratch to set-up the distributor.

But -- if it doesn't bother you then driving it 'as is' is better than disabling it.
 
OP
M

Member 10617

Guest
Guest
Offline
George:

No TR buddies within miles of here. As a matter of fact, I have the only TR3 within about 50 miles.

My distributor is now about parallel with the head (as shown in your great photo, but the wires are, as I said, not in "proper" sequence. As they are, the wires are not excessively long. I'll either try this sometime in the future -- (TR Manual speaks of using a Woodruffe key and caution) -- or have someone do it for me. Good thought: Driving it "as is" is better than disabling it."

With the arrival of winter days, I think often of good old Tucson at this time of year. Bet the driving is great.
 

Geo Hahn

Yoda
Country flag
Offline
LexTR3 said:
...No TR buddies within miles of here. As a matter of fact, I have the only TR3 within about 50 miles...

Okay Ed, I'll be your buddy. Here's an idea -- we could try a real-time Forum tech session to reposition your distributor and wires.

As it happens the distributor on my TR4 is not in the ideal position and the task of moving it a little or a lot is pretty much the same so an approach would be... on a day that works for both of us we both reposition our distributors. I would go first step by step with photos posted when needed to clarify. You would follow -- step by step -- doing what I am doing.

Here's your dizzy, looks to me to be off about 120° clockwise though by repositioning the wires the cap only looks about 30° off:

Dizzy-Eds.jpg


My wires are right but the body/gear is off by about 25° CCW:

Dizzy-Geo.jpg


The pic Randall showed would be our objective:

Dizzy-PracticalHints.jpg


The procedure for both you and me is to get the engine to TDC #1 compression, remove the dizzy, pull out the gear and reinsert in the correct position (some trial and error may occur) and then reinstall the distributor. You would then rearrange your wires to the correct terminals and Viola! we should both be able to set the timing and drive.

You mentioned the Woodruff key and to be truthful I don't recall just how that shaft comes out vis a vis the gear and the oil pump shaft but I have done it before without hurting myself or the car.

We could do this in a PM or a thread here -- the latter would offer entertainment possiblilities but also give us a lifeline call or two if we get jammed up.

Let me know if you're game for this and we'll work out a schedule.
 

DNK

Great Pumpkin
Country flag
Offline
We need web cams for this.
Cool
There would be more chefs than diners
 

TR3driver

Great Pumpkin - R.I.P
Offline
The Woodruff key locates the oil pump driveshaft to the intermediate gear. I find it works best for me to assemble the shaft into the gear so the key is trapped in place. Then you only have to worry about the tang on the end of the shaft engaging with the oil pump.

Here are the instructions from the workshop manual (although I don't know if they will come out legible or not):
 

Attachments

  • 27628.jpg
    27628.jpg
    97.3 KB · Views: 318
OP
M

Member 10617

Guest
Guest
Offline
George,

What an offer.... very tempting.

First: the position of my distributor. The photo I posted shows the distributor as it was before I had it repositioned yesterday at the shop north of here. The guy who worked on it moved it by two teeth and reset the timing (35 degrees total advance, 14 static). So the distributor now is more parallel to the engine block than it was in the posted photo.

As for your kind and tempting offer, I think I have to pass. I have spent so much time the last twomonths on the car, with a fair amount complications and frustration, that I'm sort of burned-out on working on it myself. Should something go wrong in our long-distance tutorial, I'd be up a creek here.

On the bright side, for the first time in nearly a year, I've finally got the car running really well... so I'm reluctant to mess with it, even though ultimately I'd like to get the wires straight.

On the other hand: I know that I and others would GREATLY appreciate your posting a step-by-step account of the process as you go through it. I, for one, would follow it carefully and take copious notes.

Don is right. We need a web cam and a YouTube for this.

Very sorry to whimp out... but my confidence level is just low at the moment, or perhaps I've simply spent too much time lately trying to solve problems with the car.
 

3798j

Darth Vader
Bronze
Country flag
Offline
Neat position that shop is in. They don't feel the need to listen to the wishes of the customer, choosing instead to do as they please. Is it possible they charge at a premium while enjoying that great national reputation? Not since the Soup Nazi has entrepreneurship succeeded in such a manner. Only in America.
 
OP
M

Member 10617

Guest
Guest
Offline
Actually, the situtation is not as bad as you make it out to be. What we have is a shop with a number of very experienced mechanics and a very inexperienced owner. I know that if I insisted, they would probably accede, but the outcome probably would not be good.

They're experienced mechanics and restorers, and I'm an enthusiastic owner and driver. It's a situation in which I think many people find themselves. (Perhaps the old addage, "the customer is always right," doesn't apply here, but I appreciate your point.

BTW -- I don't know why my threads always seem to become soap operas or morality plays. Ha, ha...
 

TR3driver

Great Pumpkin - R.I.P
Offline
I agree with you, Jay, but that attitude seems to be common in auto repair shops (not just the LBC variety). I have the same exact problem with a local "in business since 1949", recommended by AAA, etc. shop.

For example, I had my "LBC support vehicle" towed in after diagnosing an intermittant fuel pump. They called and said there was nothing wrong with the fuel pump and I should come pick up the car. When I got there, it wouldn't start. Oops, guess it was a bad fuel pump! That's just an example, they've screwed things up enough times now that I will NOT be going back. The final straw was when they forgot to tighten the front wheel lug nuts (that they loosened after I asked them to change a rear wheel bearing). And that rear wheel bearing is still rumbling ...
 
Similar threads
Thread starter Title Forum Replies Date
drooartz Restoring Penny the Bugeye Spridgets 22
Twit TR4/4A restoring TR4 sun visors Triumph 0
R TR2/3/3A Restoring a 54 TR-2 Long Door Triumph 10
angelfj1 TR2/3/3A Restoring Smiths heaters as fitted to a 1959 Triumph TR-3A Triumph 4
K Restoring Horn Push Button Austin Healey 12
B MGB 79 MGB - restoring emissions controls MG 5
S Restoring a bj7 floor issues Austin Healey 3
pbraun Restoring that Moke British Motor Corp 10
K TR2/3/3A Restoring a tonneau cover? Triumph 3
tahoe healey restoring the windshield Restoration & Tools 7
Jim_Gruber Dye for Spridget Knobs - Restoring dash Spridgets 12
J Restoring a '62 TR3B Restoration & Tools 2
PatGalvin TR2/3/3A Restoring Chrome, on a budget... Triumph 19
C TR5/TR250 TR250 Worth restoring Triumph 18
Gliderman8 Help with restoring broken aluminum logo badge Restoration & Tools 6
A Restoring '53 Austin Somerset Other British Cars 9
Jim_Gruber Meeting a pair of 20 y.o.'s restoring a Spridget Spridgets 14
N BJ8 restoring carburetors Austin Healey 13
HealeyRick Restoring a Healey is Easy Austin Healey 7
S Spitfire Question on restoring a 73 spitfire Triumph 11
Y Restoring a 58 100 six front shroud Austin Healey 1
K TR2/3/3A Restoring a TR3A Grille? Triumph 12
M TR6 Restoring my TR6 [pics] Triumph 8
K Stuck float in Su fuel bowl.restoring carbs. Triumph 3
W restoring a BN2 - need advice on sheet metal Austin Healey 10
EinsteinsDad Restoring MG Frame Restoration & Tools 12
A Restoring headlights Restoration & Tools 3
B A area of interest when restoring. Restoration & Tools 2
B Restoring Triumph Triumph 3
V Restoring rostyles. Spridgets 6
T GT6 GT6 - no offense anyone, are they worth restoring Triumph 28
I Restoring brake, gas lines Spridgets 28
L Need help restoring a 1950 Morris Minor FORUM Navigation Questions 0
L Need help restoring a 1950 Morris Minor Other British Cars 2
M Restoring Plated Items Triumph 2
M Restoring Switches Triumph 6
M Restoring Plastic Triumph 11
T TR4/4A Ideas on restoring the TR4/6 center dash supports Triumph 6
Basil Restoring plastic lens covers? Restoration & Tools 6
Tullamore MGC MGC GT: Worth restoring? MG 26
M MGA Restoring a plastic dynamics MGA hardtop MG 4
Z Restoring Bakelite - Hard rubber MG 15
Bruce_B Nice job of restoring an AH Sprite [with pictures] Spridgets 13
TRMark Restoring my old race car Other Cars 11
N Spitfire 75 Spitfire needs restoring Triumph 5
KVH Still Restoring the Underside Triumph 4
B Restoring a MK I Steering Wheel MG 8
P Restoring dashboard on BJ8 Austin Healey 5
tony barnhill MGB Restoring an MGB Works Hardtop MG 45
D MGB Hi, Restoring a 1964 MGB MG 18

Similar threads

Top