• Hey there Guest!
    If you enjoy BCF and find our forum a useful resource, if you appreciate not having ads pop up all over the place and you want to ensure we can stay online - Please consider supporting with an "optional" low-cost annual subscription.
    **Upgrade Now**
    (PS: Subscribers don't see this UGLY banner)
Tips
Tips

Help Needed with Upholstry Problem!

Bruce Edge

Freshman Member
Offline
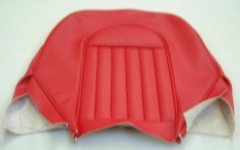
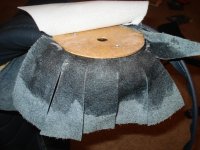
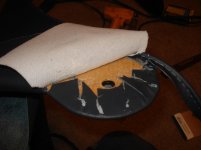
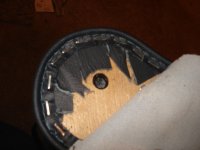
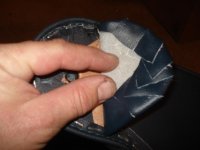
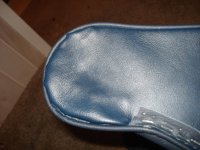
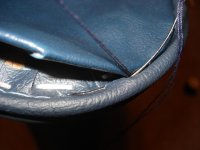
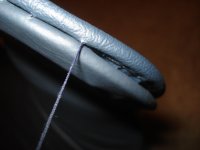
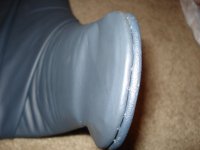
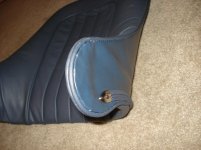
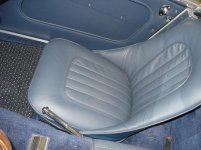
I have a new leather seat kit from Moss. I have used their upholstery kits in the past and have been able to install them without having to take to a professional upholstery shop. Not so with these 100-4 seats. I do not have any old patterns to go by. I cannot figure how the material is attached around the flange section of back part of the seat. This is the section that the hinge bolts go through to attach to the bottom seat pan. So I took it to a 40+year experienced upholster and he is not sure how to do it either. He has done later model Healeys where that section of the cover is in two pieces (not all one piece like this one). I know this is a lot to ask, but if someone could please take some detail digital pictures of that area of the seat particularly showing how the piping runs under the bottom and ends up at the back of the seat. I know this rambling is very confusing, I just hope someone has gone through this and understands what I'm asking.
Any help much appreciated,
Bruce
 

AH100M

Jedi Trainee
Offline
"Not so with these 100-4 seats. I do not have any old patterns to go by. I cannot figure how the material is attached around the flange section of back part of the seat." "...how the piping runs under the bottom and ends up at the back of the seat."

Do you mean the backrest, not the seat (cushion)?

The backrest upholstery is 3 pieces, right? Two "ears" plus the big piece? Or are the ears now paert of the big piece, as original?
 

John Turney

Yoda
Silver
Country flag
Offline
The 100 and early (Longbridge) 100-6 seatback cover is not the three piece kind. After you slip the cover over the backrest, you have to hand stitch the cover over the flanges (ears) with the piping following the edge of the ear and around to the back along the bottom. The bottom of the back is attached to the metal backrest by tacking to a plywood piece along the bottom. The tacking is covered by a trim strip. The ends of the trim strip have metal points that cover the ends.

I would take a photo of mine, but I have black leather and black piping in a dark garage. The 100-6 site, https://www.healeysix.net/Teal Blue.htm has some photos of an original seat that shows how the piping goes.
 

andrea

Jedi Knight
Country flag
Offline
I am not a native english so I don't understand exactly what you need, so my reply can be vague, I have colect a lot of photo's of this work, here you can find some help I hope
https://picasaweb.google.com/lh/photo/jOG3_EwU7PX76YKgFmRIbNMTjNZETYmyPJy0liipFm0?feat=directlink --- and this is my album ---https://picasaweb.google.com/112770...EY10061958BeginningMayJune2011endMayJune2013#
Also Randy Forbes have one good album with this work (I haven't the address)
and from Magnus of BORA's I learned a lot https://healeyspecialists.com/high-quality-resto/
I have some difficulty today to upload photo's- but if you need more help please explain me exactly (with photo's is better)
 

Attachments

  • BJ8FrontSeatBackrestBrightRed.jpg
    BJ8FrontSeatBackrestBrightRed.jpg
    7.9 KB · Views: 93
OP
B

Bruce Edge

Freshman Member
Offline
Hey Guys, Thanks again. Andrea I looked at your build process pictures and that is a totally remarkable job. John, your post really zeroed me in, appreciate it. Like I said earlier I know It is confusing trying to tell others what is in your mind so I drew this sketch to better explain my thoughts to others. It looks like I will need to machine stitch down to point A in the diagram, then hand stitch down from point A to point B. From point B on to the backrest I will need to tack to the wooden insert. See attached picture.
Bruce
2014-1-12 Healey Drawing 001 (800x600).jpg
 

John Turney

Yoda
Silver
Country flag
Offline
You got it. You/your upholstery guy will need to cut some wedges out of the upholstery material that is tucked underneath where it goes around the ear so the material doesn't bunch up.
 

andrea

Jedi Knight
Country flag
Offline
Hi Bruce here the sequence of the operation better explained (sorry I haven't the possibility to add photos -directly uploaded )
wood must be riveted - https://picasaweb.google.com/lh/photo/8QYIQgUZM3e50C0w0j73ZNMTjNZETYmyPJy0liipFm0?feat=directlink
then sponge glued- opening the border https://picasaweb.google.com/lh/photo/kNL9AhaBfPkEninnznND7NMTjNZETYmyPJy0liipFm0?feat=directlink
https://picasaweb.google.com/lh/photo/71BfuxjGXUso5yZuvWrh_NMTjNZETYmyPJy0liipFm0?feat=directlink
reinforce by cotton https://picasaweb.google.com/lh/photo/y5lpisP0Z3v04U5UDrsRadMTjNZETYmyPJy0liipFm0?feat=directlink
add soft material and add also https://picasaweb.google.com/lh/photo/qvVl-vZyAPvrNHd2qidVHNMTjNZETYmyPJy0liipFm0?feat=directlink
non glued soft m. to correct flaws https://picasaweb.google.com/lh/photo/twuujFpMq7UsyJi2u2To19MTjNZETYmyPJy0liipFm0?feat=directlink
put the edges in place https://picasaweb.google.com/lh/photo/jlRqR4Cd6nbDNCis2ShaOtMTjNZETYmyPJy0liipFm0?feat=directlink
glue and press the center https://picasaweb.google.com/lh/photo/jOG3_EwU7PX76YKgFmRIbNMTjNZETYmyPJy0liipFm0?feat=directlink
https://picasaweb.google.com/lh/photo/Zkr8PTdULHvWJa_z5AdmxtMTjNZETYmyPJy0liipFm0?feat=directlink
glue also the two internal border https://picasaweb.google.com/lh/photo/G3W3kW-tDS1g-9IkUr9Vo9MTjNZETYmyPJy0liipFm0?feat=directlink
now sewing the corner https://picasaweb.google.com/lh/photo/2uEn3h9PVAFPTpTXeVUWL9MTjNZETYmyPJy0liipFm0?feat=directlink
on my upholstery kit, only the under part are open https://picasaweb.google.com/lh/photo/2uEn3h9PVAFPTpTXeVUWL9MTjNZETYmyPJy0liipFm0?feat=directlink https://picasaweb.google.com/lh/photo/0TOLn8rDjnQGVz6gBsdBVNMTjNZETYmyPJy0liipFm0?feat=directlink
here the profesional are better(my good friend Fabrizio) https://picasaweb.google.com/lh/photo/PlJAfmaeOm-Q9S3Fe8W5hNMTjNZETYmyPJy0liipFm0?feat=directlink https://picasaweb.google.com/lh/photo/W9ja20NJleA2yIimRiQtRtMTjNZETYmyPJy0liipFm0?feat=directlink
https://picasaweb.google.com/lh/photo/ziUl7gxBA1f65_jItG5nX9MTjNZETYmyPJy0liipFm0?feat=directlink
https://picasaweb.google.com/lh/photo/TT421pslONPnUAREFcuL0NMTjNZETYmyPJy0liipFm0?feat=directlink
 

bighealeysource

Luke Skywalker
Bronze
Country flag
Offline
Hey Andrea,
Great series of pictures showing how you did your seats. Mine are done but know many will appreciate your detailed pictures.
Regards,
Mike
 

healeyblue

Jedi Warrior
Gold
Country flag
Offline
I have quite a few good pictures detailing how I did this too on the longbridege, but my computer is in the shop for the moment so I will try and get some loaded later this week when I get it back.
Jim
 
OP
B

Bruce Edge

Freshman Member
Offline
Hey Andrea, You went to a lot of trouble for me, and I am so appreciatative. Like they say, a picture is worth a thousand words. I printed them off this morning and took them to the upholstrer. After looking at the pictures he said it all made sense to him and he should not have any problem with it. Also, I was looking at some of your album pictures and saw a MGTD which looks identical to mine. The little tan dog in your pictures looks identical to my dog too. Is that your TD and dog?
Thank,
Bruce
 

andrea

Jedi Knight
Country flag
Offline
Hi Bruce
Only the MG TD 52car is mine- the dog are from my neighbor !
Very happy that I can help you, this is a profesionist job, and we must learn a lot !
Good work! Cheers
 

healeyblue

Jedi Warrior
Gold
Country flag
Offline
here are some of my pics to add to the mix.
 

Attachments

  • 2013-03-26 017.jpg
    2013-03-26 017.jpg
    195.7 KB · Views: 93
  • 2013-03-26 019.jpg
    2013-03-26 019.jpg
    166.9 KB · Views: 93
  • 2013-03-26 022.jpg
    2013-03-26 022.jpg
    169.1 KB · Views: 86

healeyblue

Jedi Warrior
Gold
Country flag
Offline
some more
 

Attachments

  • 2013-03-26 028.jpg
    2013-03-26 028.jpg
    163.7 KB · Views: 80
  • 2013-03-26 027.jpg
    2013-03-26 027.jpg
    186.9 KB · Views: 75
  • 2013-03-27 002.jpg
    2013-03-27 002.jpg
    178.3 KB · Views: 76

healeyblue

Jedi Warrior
Gold
Country flag
Offline
One tip is I hand sewed both sides to the piping even though the leather side was stapled because I found it gave an even spacing and made the piping lay perfectly along the seam and not pull to either side.
 

Attachments

  • 2013-03-27 005.jpg
    2013-03-27 005.jpg
    177.3 KB · Views: 83
  • 2013-03-27 006.jpg
    2013-03-27 006.jpg
    177 KB · Views: 82
  • 2013-03-27 007.jpg
    2013-03-27 007.jpg
    183.6 KB · Views: 82
  • 2013-03-27 008.jpg
    2013-03-27 008.jpg
    195.1 KB · Views: 80
OP
B

Bruce Edge

Freshman Member
Offline
One tip is I hand sewed both sides to the piping even though the leather side was stapled because I found it gave an even spacing and made the piping lay perfectly along the seam and not pull to either side.

Hi Jim, Thank you very much for the pictures. They really show the details. I am amazed at how you all have come to my aid.

Bruce
 

John Turney

Yoda
Silver
Country flag
Offline
I did mine long before you all did, so I didn't have the excellent pictures/instructions. Now I have to decide if I need to redo mine. :cry:
 
Similar threads
Thread starter Title Forum Replies Date
C MGB More Weber help needed MG 27
V 96 Chimera help needed TVR 1
A TR2/3/3A VERY wobbly TR3 - help needed!!!! Triumph 53
H Wanted MK2 - Please, help needed Jaguar Classifieds 60
E GT6 Help electrical guru needed Triumph 4
R Rust in Block? Help needed! Austin Healey 6
Michael Oritt 100 throttle linkage--help needed Austin Healey 3
Jim_Gruber Help and Advice needed for post pressure washing debacle Spridgets 10
J BJ8 Turn signal help needed. Austin Healey 6
P TR2/3/3A Help needed. TR3A transmission popping out of 1st gear Triumph 13
T TR2/3/3A help needed! fuel problem Triumph 25
M 1974 Jensen INterceptor electrical help needed Other British Cars 8
F General MG Help needed with su dual carburetor identification MG 4
S Wedge TR8 Starter wiring help needed Triumph 18
TomMull Air compressor help needed Restoration & Tools 2
T TR2/3/3A TR3 choke cable connection help needed Triumph 21
Lukens TR2/3/3A help needed Triumph 6
A Fuel Gauge - Help Needed Austin Healey 18
Jim_Gruber Help Needed, getting those 1/4 Eliptics out of the spring mounting box Spridgets 24
E Singer wood frame help needed. Other British Cars 3
JPSmit General Tech Girling Brake help needed Triumph 4
JPSmit Spitfire Girling Brake Help needed [I hope] Triumph 9
A BJ7 - Help Needed Austin Healey 3
Lbp TR2/3/3A Painting Help Needed for Restored Steering Wheel Triumph 5
J Any SP250 owners with Austin Healey [big] rearends e-brake help needed Other British Cars 4
Tinkerman TR2/3/3A DOOR PANEL HELP NEEDED 1960 TR3 A post 60000 car Triumph 5
S BT7 Dash Gauge Light Bulb Replacement Help Needed Austin Healey 16
Tinkerman TR2/3/3A Air Deflector Installation Help Needed Triumph 19
B Looking for passenger side rear marker light module-and lots of fixes/help needed pls Spridgets 13
Tinkerman TR2/3/3A Front windscreen help needed. TR3A 1960 Triumph 9
A Serious help needed !!!! BJ7 Installing a new soft top Austin Healey 9
Tinkerman TR2/3/3A Parts help needed 1960 tr3 a Triumph 5
bighealeysource Stromberg carb help needed for TR buddy Triumph 8
Tinkerman TR 3 Picture HELP Needed Triumph 5
S Help needed... Sunbeam (Rootes) 7
S Lower Wishbone Fulcrum Help Needed!! Austin Healey 26
S 3000 BT7 Steering Wheel Restoration help needed Austin Healey 3
Tinkerman TR2/3/3A TR3A Seat spring set needed, Help Triumph 6
C Mallory dual point recurve help needed Austin Healey 6
Tinkerman Speciality Paint Help Needed Triumph 4
TR4A_IRS Help needed with high idle Triumph 13
Kleykamp TR2/3/3A TR3 Generator mounting issues help needed Triumph 4
Wirewheels Remote purchase help needed! Triumph 8
S Spitfire Spitfire front suspension help needed Triumph 9
R TR 3 Conv. top help needed Triumph 10
M Help Needed. Alternator Question Spridgets 14
rcufley A little ignition help needed Triumph 123
6 Rear brake help needed Austin Healey 10
Brooklands MG Parts ID help needed MG 4
abarth69 quick help needed Spridgets 3

Similar threads

Top