• The Roadster Factory Recovery Fund - Friends, as you may have heard, The Roadster Factory, a respected British Car Parts business in PA, suffered a total loss in a fire on Christmas Day. Read about it, discuss or ask questions >> HERE. The Triumph Register of America is sponsoring a fund raiser to help TRF get back on their feet. If you can help, vist >> their GoFundMe page.
  • Hey there Guest!
    If you enjoy BCF and find our forum a useful resource, if you appreciate not having ads pop up all over the place and you want to ensure we can stay online - Please consider supporting with an "optional" low-cost annual subscription.
    **Upgrade Now**
    (PS: Subscribers don't see this UGLY banner)
Tips
Tips

TR2/3/3A Beginning the TR2 Bodywork

OP
CJD

CJD

Yoda
Country flag
Offline
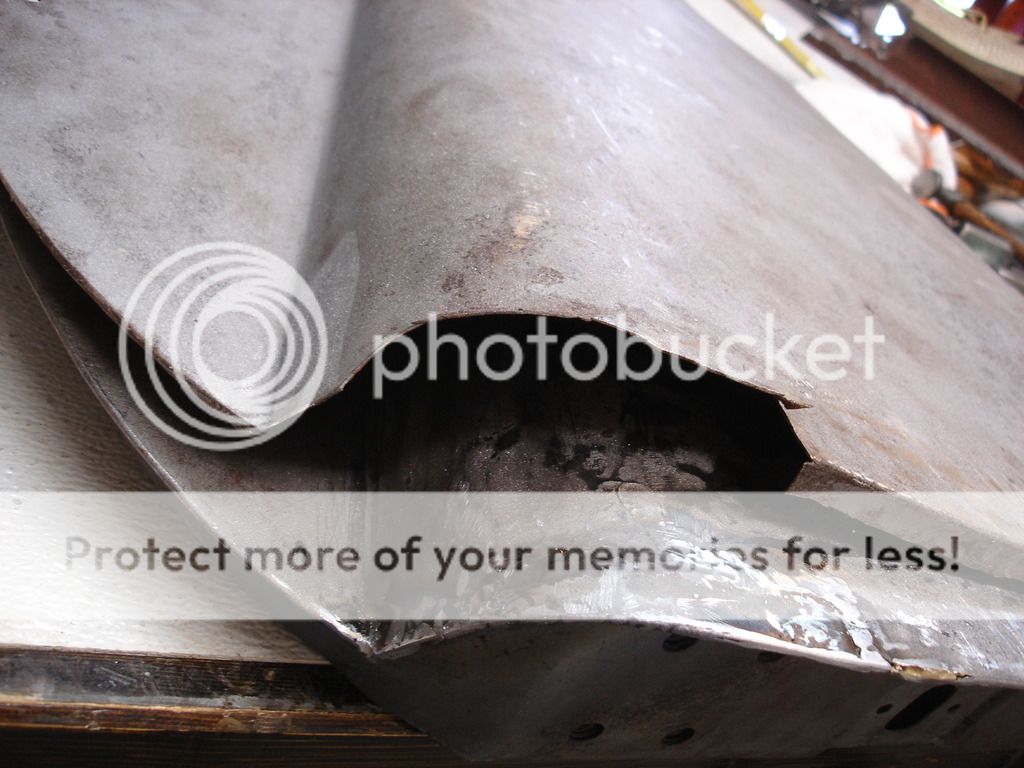
Here's this week's update. Moving along with the left door, as I "left" it last week, the upper forward edge is still mangled from the 2 accidents. I decided to cut a good section from another skin that was rusted at the bottom, but this section was good.


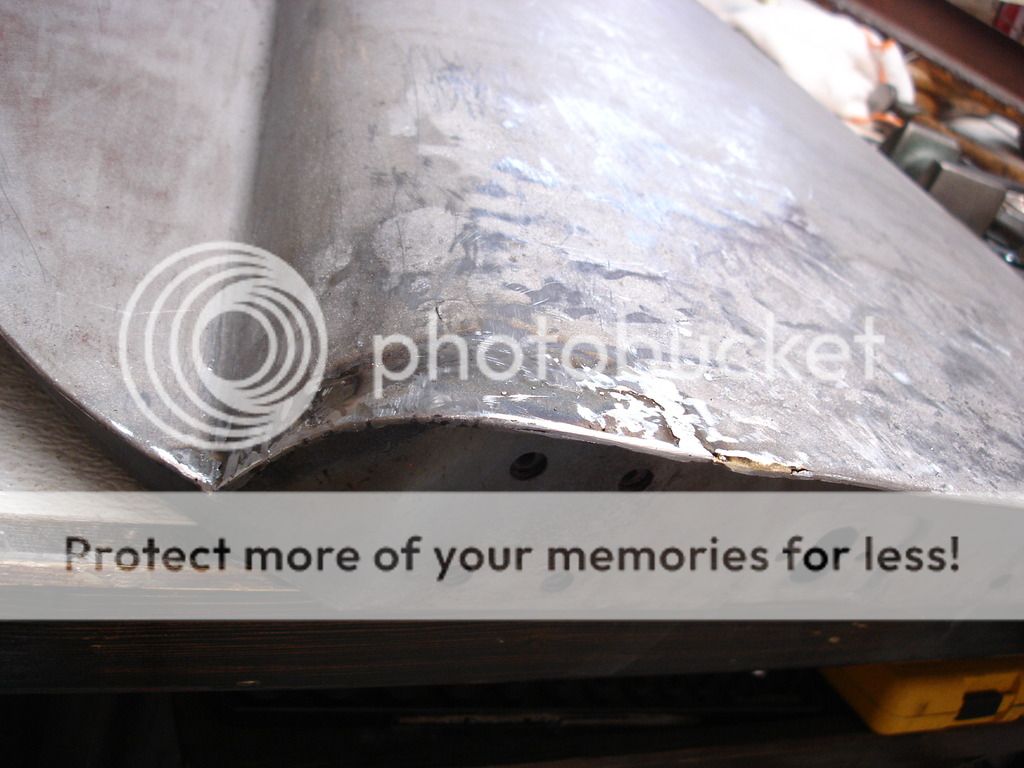
This drastically improved the shape of that corner, but when held up to the actual body, the contour was still off in this area. Steve, this is the question you asked in an earlier thread, about what to do to get the door gaps even and correct. Well...here's the process:


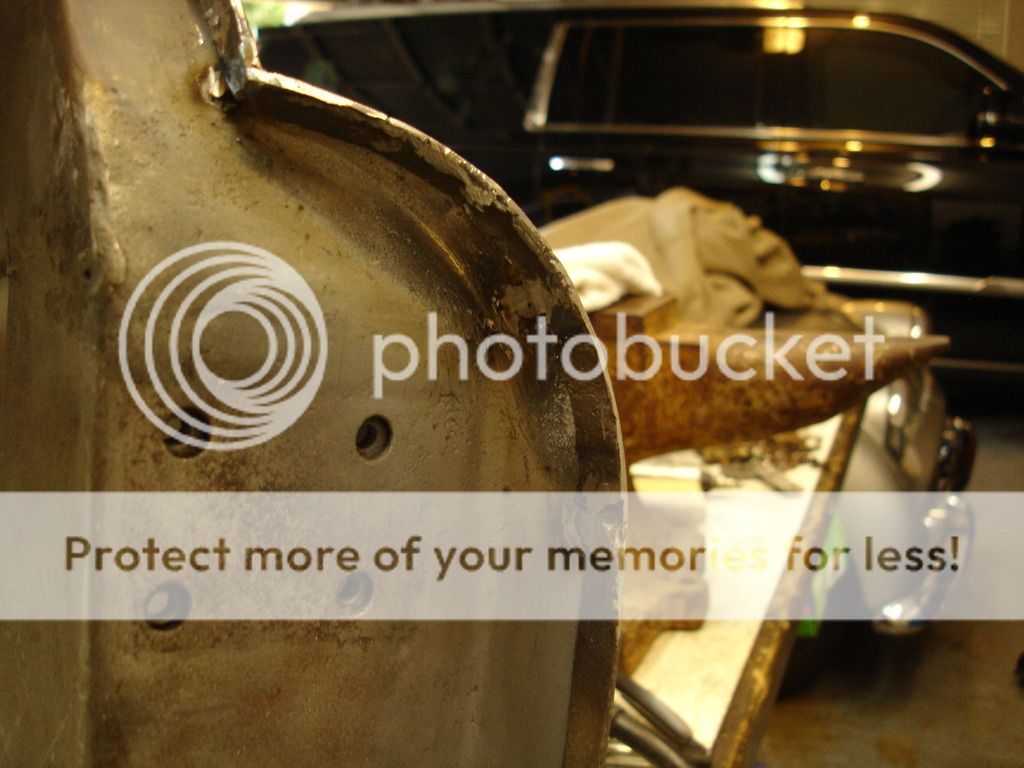
This is the door held in the opening. The bottom and rear look good.


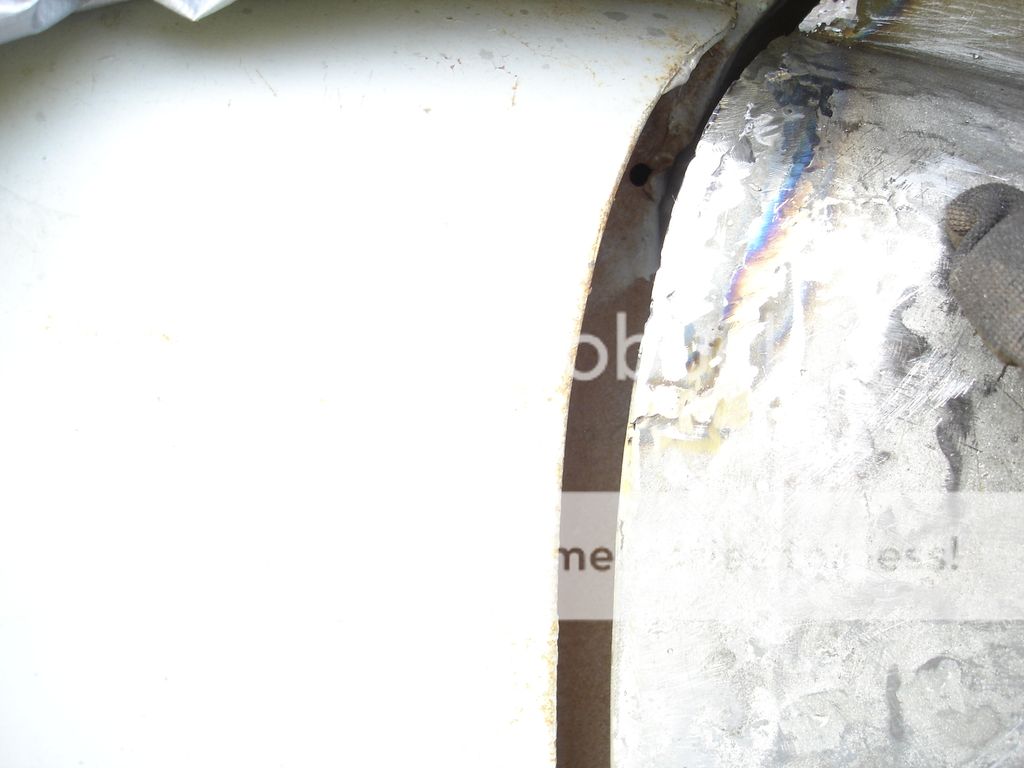
The problem is shown here. Remember the fender is not mounted back far enough, so I am not concerned with the size of the forward gap...but I am about it being even from top to bottom. As you can see...it is not.


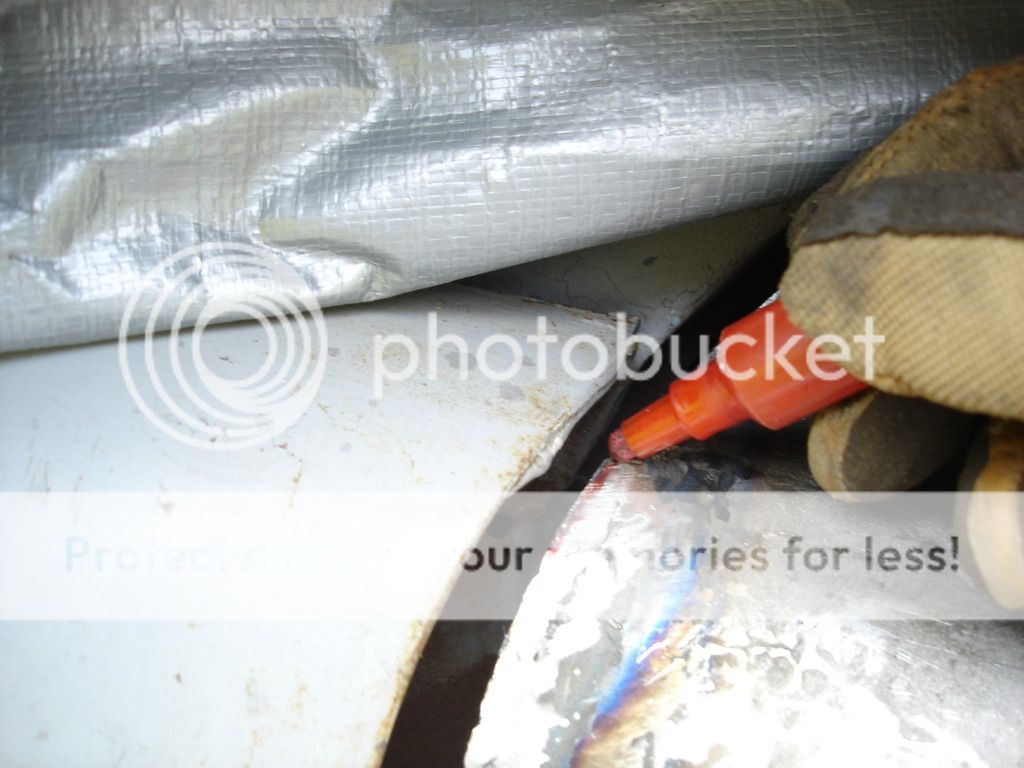
Here I am welding beads on the edge that is gapped to far. I am using .023" steel wire. On my Millermatic 185, the setting is at 1 (the lowest), and feed at 40FPM. Just add bead upon bead until you extend the edge a bit farther than you need it.

Note...don't pick too much on the ugliness of these welds...and I fully know they are terribly ugly! You will note the weld on the left side went well and looks decent. The area currently being worked is not going that well...not pretty but functional. The reason for the difference? Remember when I said if you braze body work someone will be cussing it in the future. This is another example. The brass and brazing flux will never completely come off once you put it on, and it screws up any welding you try anywhere near it. The brass boils and spatters, making striking an arc tricky and the results splotchy. Welding is so easy...I just cannot fathom why you see so much brazing in body work!?!


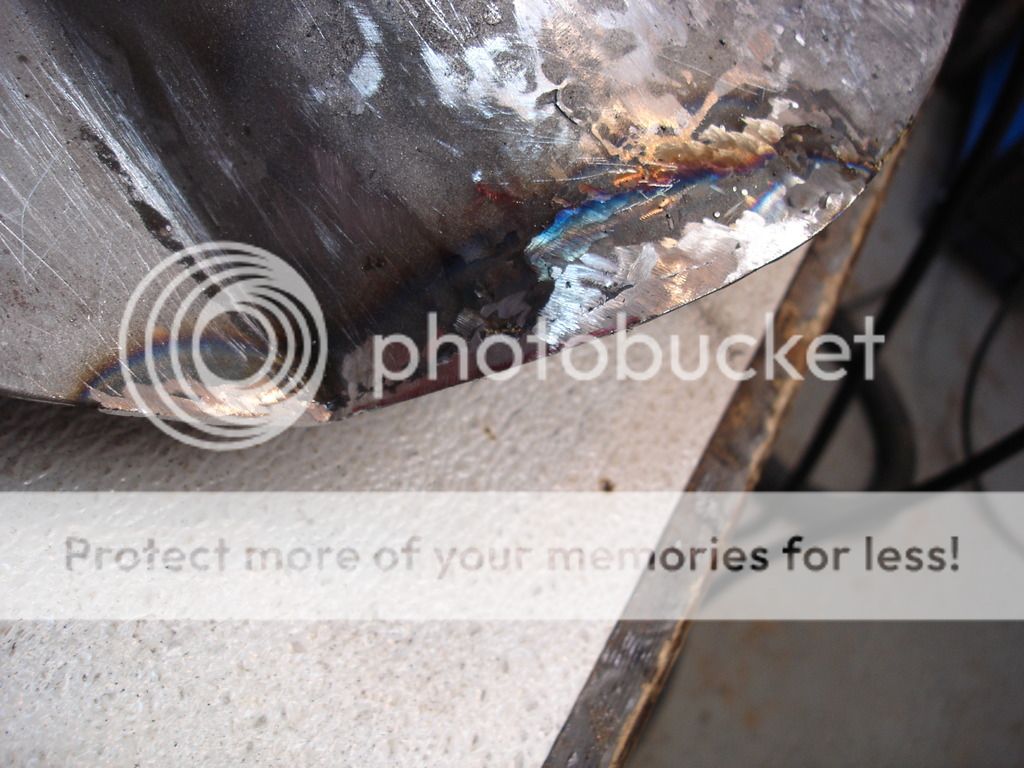
Once the bead is on, grind it to shape, so it cannot be detected at all once the primer goes on.


Door is back on. Note the bottom edge should align with the relief in the sill.


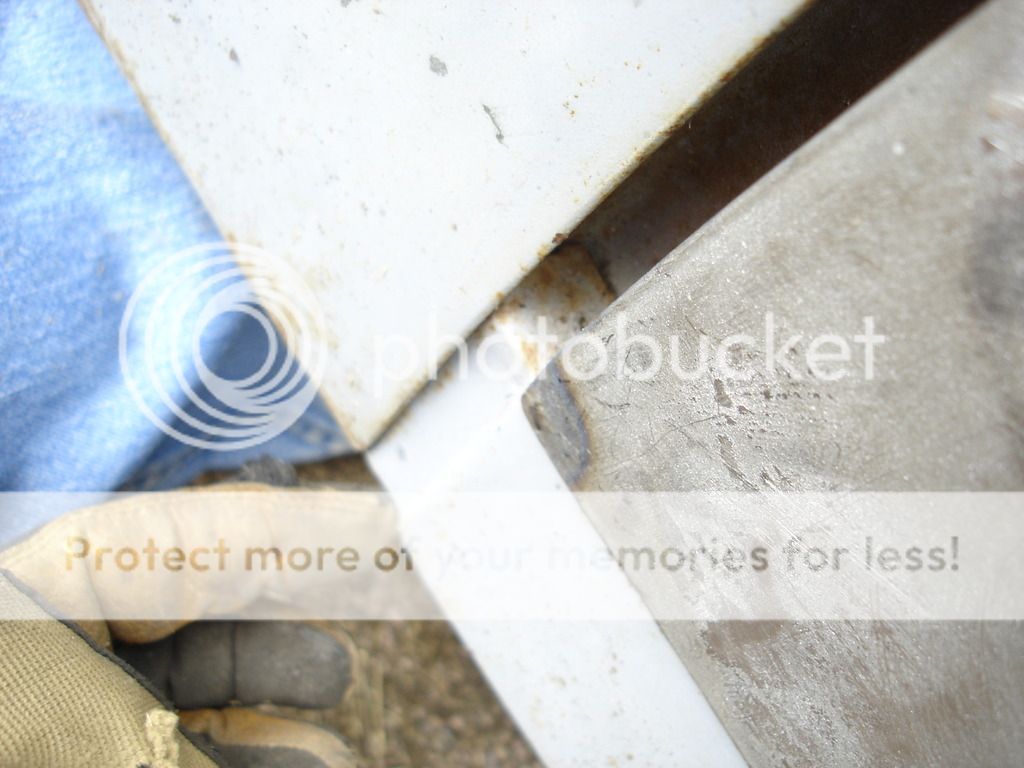
It's better, but you can just see it is still a bit to large.


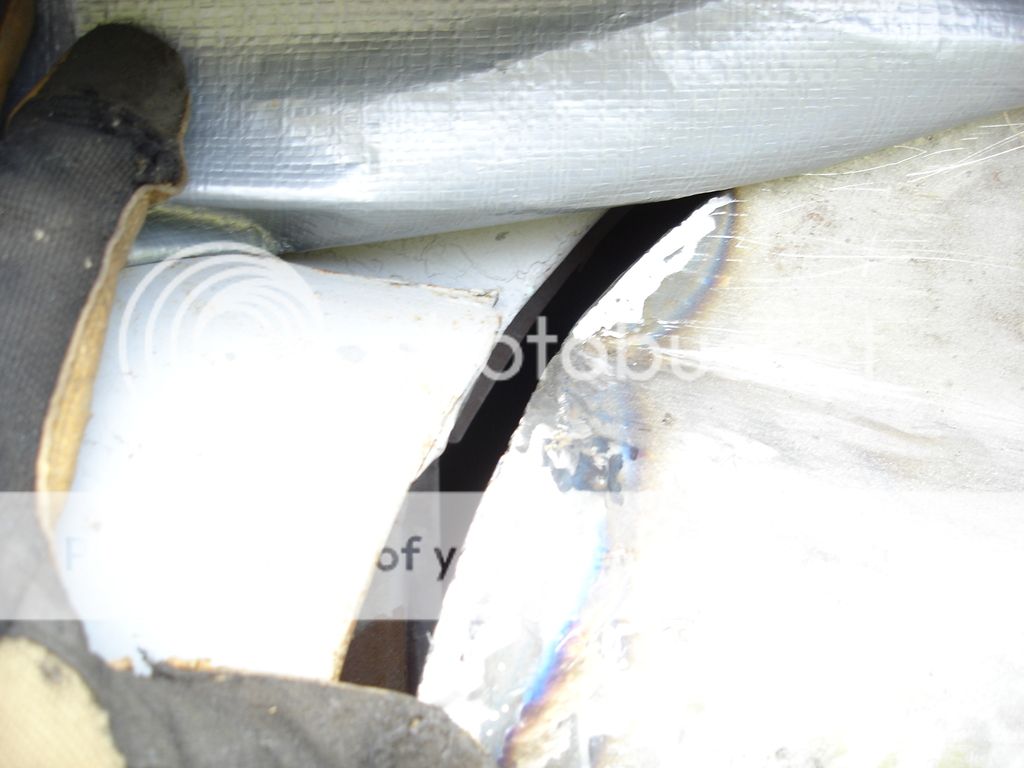
And up here is too close.


As it gets close, you are best to mark what you need. Funny how fast you can forget where and how much by the time you move the door from the car to the bench!


And the gap is good.
 
Last edited:
OP
CJD

CJD

Yoda
Country flag
Offline
Now I ran into the next issue. The door fits perfectly all around the opening...except the angle at the very top stuck out farther than the scuttle. Bummer.


So, the frame had to be sliced wher I need the upper portion to curve inward more.


I bent the top using the TLAR method and tacked it. It took 2 iterations of breaking the tack and re-bending. But finally the top contour is perfect.


The finish weld.


Now, the metal work is complete. The door is ready for the final fitting before paint, but there is one more thing to do. It is impossible to adjust fitment if you are fighting every time you loosen and tighten the mounting screws. So every one of the blind nuts will be chased with a tap and checked for ease of the screw installations. This is small step, but it vastly speeds the assembly later.


Same thing with the latch assembly. The original is beyond fixing. This is the repro latch sold by Moss. It is identical, with the exception of the patent stamping.


This is another important step. This is the latch striker being checked for fit. On my TR3, the assembly looked perfect, but when I went to fit the latch after the paint job, it didn"t fit in the room between the door and the quarter panel jam. Bummer. In this job I have mounted the latch and striker, and then am checking the jam area for room. Within reason, too much is not a problem. Too little room is best addressed now, before the paint goes on.


These are the packings that go under the striker assembly. If there is too much room, just double up the packing until it is correct.


Checking the new door opening stop. This is a TRF part...currently it was less than half the cost of the other suppliers.
 
OP
CJD

CJD

Yoda
Country flag
Offline
At this point the door is done...well...except for the white elephant in the room. The Wood! I was planning to reuse the original wood pieces, but with 3 doorsets to choose from, they were all rotted away. Double bummer.


Anyway, the following steps are what I went through to make new wood inserts. These are sold by the big suppliers...for an unGodly price. But, after making them myself, I would likely choose to purchase next time. They are actually that complicated! On initial glance, they look like simple 1" by's, cut to shape. Closer examination reveals that these were steamed to shape at the factory, incorporating both curve AND twist to the inserts. I don't have access to the original forms to steam the wood. This will have to be done the hard way...by hand.


The pads for the sidescreen mounts are held with wood screws shown here.


Close up of the front pad. The wood is unknown (to me). It is too light for walnut. To dark for oak. I happen to have African Mahogany that has been seasoned for 20 years in my shed. I decided it would be the best rot-resistant and closest match to the factory wood.


Just a quick note...I emphasize that I am using seasoned wood. The inserts form the shape of the very obvious top rail of the door. If you just go to the Home Depot and pick some fresh cut wood, it will warp later, and not look good when it does. After 20 years sitting in the TX atmosphere, the mahogany I am using has already warped and cracked all that it is going to. The inserts are 7/8" thick. I am starting with boards that are 1.5" thick and 24" long. Since I cannot steam the inserts, I have to have extra thickness to carve the twist and curve out of the board.


These shots are close ups showing the fine detail of the inserts. In the top pic you notice that there is a bow...the center of the insert doesn't touch when you lay it on a flat table. The second shot is the "cup" that runs along the upper edge of the inserts. This is shaped to hold the round foam rubber padding along the top of the door.


Because of the curves, the upper rail has to be cut with a scroll saw. I used the original parts as a template, but over-sized the cut to have room to work down to the perfect contour later.


Using a belt sander...and a lot of checking as the shape gets close.


Once very close, I switched from using the old rails to using the actual door that will take the insert. Here you can see the front needs to come down a bit.


The first rail serves as the pattern for the second rail.


Here is the mark for the curvature, taken from the original insert.


I learned it is much harder to work in the concave curvature. The convex curve that goes on the other side is much easier to add when using a flat sanding belt.Here are the inserts with the concave curvature worked in. I then marked 7/8" from the inside and sanded the outside curves.


Upper rail in place. Of note...While you can measure the curvature...the twist has to be done slowly as you go, by working a little and checking a lot! The door is my pattern to monitor the twist.


The mounting pads are relatively easy. They only have one curve, along the edge that contacts the upper rail. the other edges are straight and can be taken easily from the original pads.


Here is the original rail, showing the upper cup, curve, and twist. There is a lot going on for such a simple piece!


Moving on, I now have to add the cup along the top. I had planed to use this bit in a router table. Great idea! But it won't work! The issue is the concave curvature of the rail. The rail will not sit flush on the router table. Scratch this idea...bummer.


Back to basics. Sand paper and a big dowel. This is going to take a while!


2 Hours later.


Now to match the pads to the rail. At least I'm back to the power tool for this...


The screws are slip fit through the rail, and screw securely into the pads.


The finished insert...after a day's work!

The only thing left to do is screw the inserts in at the ends, and tack along the upper edge. Tacks are not a problem. But, try to find slot head, counter sunk, wood screws in this day and age. I still have not located a source.


I did a bit of math. I have now finished the first door. I calculate that this amounts to about 3% of the total body work, and it took me 19 days to finish it. Assuming I hit no big issues (not likely), and I don't run into any "family time" losses (very not likely), and work doesn't get in the way of my hobby (yeah, right!) this works out to 633 more days to finish the body work.

Did I mention...

Bummer!

Anyway, I'm on to the right door, which on inspection will be an exact, mirror repeat of the left...so I won't bore you guys with that. I'll be back when I'm finished with the right door and move on to...well...I haven't decided what's next...
 

M_Pied_Lourd

Darth Vader
Country flag
Offline
Looks great John. Good idea to check on the clearance with the striker and catch plate on the door. I ran into issues here on mine. What would be the fix if the clearance is too tight John? Do you modify to b post?

Cheers
Tush
 

mallard

Luke Skywalker
Country flag
Offline
I don't envy you with all that panel fitting, great wood working. 19 days to do one door, sounds about right. Took me 7 years to get mine on the road , and I'm still working on it.
 
OP
CJD

CJD

Yoda
Country flag
Offline
Looks great John. Good idea to check on the clearance with the striker and catch plate on the door. I ran into issues here on mine. What would be the fix if the clearance is too tight John? Do you modify to b post?

Cheers
Tush

On the TR3 I just pounded on the "B" pillar in the location of the striker plate until it went in as far as I dared, and then did the same on the door. The door is harder, as the latch assembly covers more space, so more metal has to be moved. It's tricky, as you cannot get behind either with a dolly, and you have to go slowly to keep from denting the metal. It wasn't hard...but it hurt my ego since I had already painted and had to re-paint after the adjustment.
 

M_Pied_Lourd

Darth Vader
Country flag
Offline
Hi John,

I know what you mean about already painted....my paint is wearing off on either side of the catch on my 60. I can live with it, but on the 59, I'm going to do a better job of checking clearance before paint...

Cheers
Tush
 
OP
CJD

CJD

Yoda
Country flag
Offline
Time for the weekly update. I actually finished the second door. Guess the first is always harder as you get your bearings. That could update the bodywork projection to just 1-1/2 years!

The bodywork on the right door was pretty much a duplication of the left, so I won't bore you with details. Here is a brief description of the final wood installation, though:


The wood is held inside the door with 2 screws on each end. The screws are #8 by 5/8", countersunk (also called flat), slot head wood screws. The metal is very thin...only 18 gage, so there is not a lot to work with. Each hole is drilled oversize to 1/4", and then the wood behind is countersunk using a bit like in this photo.


Slot heads are not the easiest to install, so I first drilled a pilot hole for each screw, using caustion not to go all the way through and out the front of hte door panel.


The original screws were steel. I am using brass. I could not find a local source for any slot head screws, so I wound up ordering them online.


Now for the top edge of the door. It has a cup, and now I matched the edge of the metal to the cup in the wood. I am using an old connecting rod gudgeon pin, and just tapping the metal to shape.


Again, the factory used steel tacks along the top...I am using copper.


And the finished door "in white", so to speak.
 
OP
CJD

CJD

Yoda
Country flag
Offline
I did run into one issue that was different with thee second door, but one that is common. To remove the door latch, I had to drill one of the bolts out. The bolts for the latch go into a tapped steel plate that allows some adjustment. When I tried to re-tap the buggared hole, it came out too loose to hold the new bolt.


Here, I am tapping through the door bolt hole to spread the retainer that captures the bolt plate.


Here the old plate is out. I slipped the new back in...well, "new" as in not damaged, as it is still 60 years old! I then had to go in from the back side to close the retainer back up. This is a perfect example of why it's a good idea to check all the captured nuts before you get to the final assembly with painted parts. In bare metal this is a non-event. In the painted door I'd be crying all over my fresh paint getting chipped up!


Here are the finished doors. I trial installed all the hardware and then will set them aside for the final fitting...a year and a half from now! I do love the dry air in Tx. I can leave them completely bare and unpainted, and they will not rust. When I lived in New Orleans, I could not even leave metal overnight without getting surface rust. There I would have to prime.

The main reason I don't want to prime now is that I am certain there will be more welding adjustments to do to the edge gaps. But at this point it is too soon know how much and where.


Today I will clean and shape the aluminum door cappings.
 
OP
CJD

CJD

Yoda
Country flag
Offline
There are at least 4 of us doing bodywork right now, so I thought I would go a bit into techniques of how to do it. If you never plan to do bodywork, this will be pretty boring, but I figure that maybe it'll help those like me, that had to learn this by screwing it up enough times to figure out how to do it right. Please...anyone with good tricks or tips, chime in! There are many ways to do bodywork that work, but some save a whole lotta time compared to others.

95% of body work is done using hammers and dollies. Unfortunately, it takes 2 hands to do the work, so no pics of how to do it. I figured I'd post just a little about how it works...for those that follow.

I bought my body kit from Sears over 30 years ago. It came with a selection of hammers and dollies, and is by far the cheapest and easiest way to get them. Much cheaper than if you go wonsies and twosies.


This dolly is my favorite. You want to match the shape of the dolly to the contour of the panel, and most panels have a whole lotta flat areas. That's why this one comes in so handy. It is flat on 2 edges, and only slightly curved on two more.


And this is how you work it. The dolly goes on the "low" side...or so it is normally outside the panel if the dent is inward. The hammer taps on the "high" side, to bring the dent down. It is important to tap...no brute force...to gradually "work" the dent into place. The dolly is critical, as it prevents the dent from poking out the back, making a wavy mess. Do not hold the dolly tightly to the work. You just want it to be there, and let the mass of the dolly do the work instead of trying to farce it against the work. It should bounce as you tap.

When done correctly, you tap with the hammer, and the dolly bounces off and clicks back down. So the sound is "bang", "click"..."bang", "click" as you work the dent back to shape. I use ear plugs, as it's not gunshot loud, but you will lose hearing if you do this for years, like I have.

The initial dent comes up pretty quickly. If it doesn't, then the area may be work hardened from being dented and re-shaped. In that case you have to heat the area red hot and let it air cool...then work it some more.

You never want to plan to use more than 1/32" of glaze to smooth the final panel. SO the question then is, "when you get close, how to you tell where the panel needs to be worked?"


Here, I am using a straight edge to look for low places along the panel. Move the edge around to view from many different angles. This panel was originally crushed in the area of the drillings. I had to bring the metal up over 2 inches...but it would be hard to tell looking at this picture. The sad part of body work...when you're done, nobody will ever realize how much effort it took to get where it is.


By far the best way to detect low and high spots is to rub your hand along the panel. You will be amazed how small a spot you can detect with just "feel"! Your eyesight will be fooled by lighting conditions and color differences in the metal. Your hand doesn't get fooled, and is very accurate..Feel it, put your finger on it to mark the position, and then tap it flat.
 
OP
CJD

CJD

Yoda
Country flag
Offline


Several times on these doors I had to re-curve the panels back to shape. This dolly came in very handy. As you tap, the dolly holds the panel and, if done gently, adds the curve back to the panel. I moved the hammer and dolly from one end of the panel to the other, tapping the curve to shape as I went. This is one of the only exceptions to the rule..."always have a backing tool when you tap the metal". In this case I am taking special care to keep the hammer head absolutely flat, and to not use so much force as to dimple the panel. Gentle, flat, tapping.


When working highly curved areas, you need the dolly to match the curve. The dolly in this pic is a very poor choice...but it could be used to remove some of the curve if needed.


This dolly is the choice for this curve, as it matches it perfectly.


Here, I am actually using the flat work table as a dolly. Do not be afraid to use anything that can act as a backing tool. I have used anvils, other hammers, door jams...basically anything that catches my eye in the shop as being the correct shape for what I am working on.


This hammer has a chisel shape that comes in handy when working into tight corners. It is good in that it can reach the tiny edges...but it will leave dimples if you do not work very gently.


For large, open curves, this dolly works well. As you can see, when working the center of a panel, it is often difficult to determine if your dolly is under the spot you are tapping. You will learn to tell by the sound of the tapping. If there is no "click" after the tap....then your dolly is not in position.


Here is a trick you will eventually figure out. The hammer heads are broad and flat, to prevent dimpling the metal as you tap. As you can see here, that is a problem if you are working a deep curve like this panel. If you tap like this, the hammer will hit sharply in 2 spots, leaving dimples as it does.


Here's the trick...notice that if I angle the hammer while tapping, I can get down into the curve. With the perfect amount of lean, I can match the curve perfectly.

Well, that's it for this week. I will be heading to the shed later to pick another panel to work on. I'm thinking the spare tire cover, to keep it easy for now...
 

Tr3aguy

Jedi Knight
Country flag
Offline
attachment.php
Sectioon the right is new and getting approval by the county this week
 

Attachments

  • image.jpeg
    image.jpeg
    101.6 KB · Views: 442
OP
CJD

CJD

Yoda
Country flag
Offline
Very cool! When are you breaking ground? I assume they'll build the little garage first for the TR3.
 

Tr3aguy

Jedi Knight
Country flag
Offline
Well I hope real soon, got building approval, awaiting zoning approval and passed the dreaded HOA already. The addition is just the little one story addition.....it will cut through about 8 feet in the middle between the current garage space....Then I can pick up the other car as bring it here as well.....
 

M_Pied_Lourd

Darth Vader
Country flag
Offline
The garage is on the left hand side, right? :smile:

Cheers
Tush
 

glemon

Yoda
Country flag
Offline
That is a great write up on bodywork and hammer and dolly work, I have painted a few cars (most of which were pretty rough to start, but always can learn something, never though or angling the hammer on curves like that, great idea. I have never been able to feel the very slight waves and imperfections in the finish that are too fine to see in dull primer, but pop out (or more precisely in) when you get a shiny topcoat on, I have talked to others who have difficulty with this too, the straightedge is a good alternative for those of us who are specially abled in the tactile department.
 
Similar threads
Thread starter Title Forum Replies Date
RJS TR4/4A Beginning Cyl Head Removal - Questions Triumph 21
W Beginning to sale pieces and parts Spridgets 8
B T-Series Beginning TD Restoration MG 4
P Beginning restoration, advice please Spridgets 28
M steering wheel restoration-from the beginning Triumph 17
JPSmit The beginning of the end Spridgets 10
B TR6 Totaled TR6 saga...a new beginning Triumph 17
J project beginning Austin Healey 13
DrEntropy I'm beginning to evaluate this: Lotus 6
RickB MGC MGC GT - beginning to restore this old girl. MG 16
Branson Beginning of my restoration - '65 MKIII Spridgets 77
Nanhook TR2/3/3A TR2 shoes Triumph 2
CJD TR2/3/3A TR2 Annual Triumph 6
1955TR2 TR2/3/3A TR2/3 Oil Leak Where Oil Sending Pipe Connects to the Block Triumph 8
S TR2/3/3A WTB a tr2 original grill Triumph 0
S TR2/3/3A differential hubs early tr3 and tr2 Triumph 22
P TR2/3/3A TR2 Horn Mounts Triumph 7
S TR2/3/3A Tr2 and early tr3 differential. Triumph 10
mctriumph For Sale Tr2/3 scuttle mechanism Triumph Classifieds 7
S Wanted tr2 original grill Triumph Classifieds 10
J TR2/3/3A TR2 Fitting/mounting rear wing Triumph 11
A TR2 Transmission overhaul Restoration & Tools 0
D TR2/3/3A TR2 Flying Mile question Triumph 11
S TR2/3/3A tr2 muffler clamp Triumph 10
Southwarks TR2/3/3A TR2 door help! Triumph 2
G For Sale NEW PHOTOS: Triumph TR3 Chassis Frame + Front Suspension, Fits TR2,TR3,TR3A,TR3B Triumph Classifieds 1
P TR2/3/3A TR2 Headlight Trim Question: Triumph 8
A Wanted Girling Axle for TR2 Triumph Classifieds 5
J For Sale Triumph TR2 or TR3 elbow trim Triumph Classifieds 0
S TR2/3/3A tr2 and tr3 back trim above the back cover Triumph 0
KVH General Tech Heater and Vent Control Cables--TR2 thru TR4, and more . . . Triumph 3
S TR2/3/3A early tr3 and tr2 kick panels Triumph 3
S TR2/3/3A TR2 and early TR3 wipers Triumph 7
S TR2/3/3A tr2 Triumph 18
newmexTR3 For Sale TR2-4 performance valve springs, collars, exhaust seats, cotters Triumph Classifieds 0
J For Sale Triumph Tr2/3 seat foams Triumph Classifieds 1
J For Sale Triumph TR2, TR3, TR4 CAM SHAFT FOR SALE Triumph Classifieds 0
K For Sale TR2-TR4 Camshaft Sprockets...New...1/2 Price Triumph Classifieds 0
C TR2/3/3A TR2 Axle/wheel bearing removal Triumph 2
T For Sale TR2 - TR3 Gas Cap for sale Triumph Classifieds 1
71TR6 Set of 4 TR2/3/4 Connecting Rods Triumph Classifieds 0
P New member TR2 carpets Triumph 7
S TR2/3/3A Tr2 hood Triumph 8
W TR2/3/3A TR2 wiper motor mount Triumph 1
TRopic6 For Sale TR2/3 Brass Fuel Shutoff Tap [for parts] Triumph Classifieds 0
J For Sale Triumph TR2 TR3 TR3A New Moss Motors Black Karvel Style Carpet Kit Triumph Classifieds 0
S For Sale Triumph TR2/TR3/TR3A/TR3B Workshop on CCD/ROMManual – 1953 - 1962 Models Triumph Classifieds 0
Leatherman Wanted Red and black TR2 / 3 front emblem Triumph Classifieds 6
Jim_Stevens For Sale New TR2-3A inner sill assemblies Triumph Classifieds 3
C TR2/3/3A TR2 Chassis Clips Triumph 4

Similar threads

Top