• The Roadster Factory Recovery Fund - Friends, as you may have heard, The Roadster Factory, a respected British Car Parts business in PA, suffered a total loss in a fire on Christmas Day. Read about it, discuss or ask questions >> HERE. The Triumph Register of America is sponsoring a fund raiser to help TRF get back on their feet. If you can help, vist >> their GoFundMe page.
  • Hey there Guest!
    If you enjoy BCF and find our forum a useful resource, if you appreciate not having ads pop up all over the place and you want to ensure we can stay online - Please consider supporting with an "optional" low-cost annual subscription.
    **Upgrade Now**
    (PS: Subscribers don't see this UGLY banner)
Tips
Tips

TR2/3/3A TR3 windshield angle and body shims

Jesus

Senior Member
Country flag
Offline
Hello,

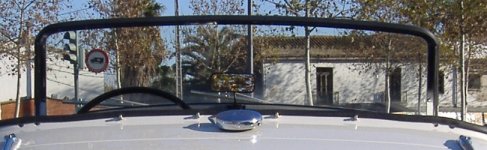
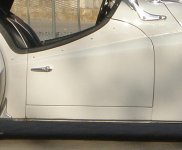
After trying to fit the sidescreens frames to the doors, windshield stanchions and hood (top) I feel that I would get a much nicer fit if the right windshield stanchion would be less raked, ie. the tip moved to the front by about ½ “. This is consistent with some measurements and visual inspection. I have checked the stanchion shape, and it seems that it is not bent.

Do you think that it is possible to change the position of the stanchion by shimming the body?

What are the body-to-chassis anchor points that I should free and where should I ad shims?

Your comments are very much appreciated.

Jesús
 

TFB

Jedi Knight
Country flag
Offline
Hey Jesus,
I am fitting body panels on my TR3 and dont think shiming or re shimming the body is going to help,unless maybe the door gaps are tight at the top.
tom
 

TomMull

Darth Vader
Silver
Country flag
Offline
In my opinion, the stanchions themselves are the most likely culprits. They do bend fairly easily and can be bent back (not so easy) if they are bent. I'd find a correct car and carefully measure the windshield angle to scuttle angle in a couple of places. Less likely would be a bad repair to the scuttle windshield mounts (which I suppose could also be repaired by tweaking the stanchions).
I agree that your problem would be about impossible to correct with body shims.
Tom
 

sp53

Yoda
Country flag
Offline
That is a tough one without seeing it. You do not say what year the car is and that will make a difference in windshield arms. The early ones slide on and the later bolted on. The windshield itself could be tweaked and you might be able to loosen everything thing up and gently tweak it around some. I had one once that was bent when the hood was thrown from the car and that has happened a lot because the way the hoods are fastened down. The thing is it took me a while to notice that is was the windshield. I am not sure how nice your car is, but I bet if you look around at tr3s with the tops up and windows in you will see a lot gaps and over laps. We usually see them in summer. An ½ sounds like a lot, but the way all that stuff has to fit and come apart, you just might be looking at too closely. You will probably have to settle for 3/8 or ¼ . Having said all that are you taking about left and right gap or in and out gap.
Steve
 
OP
J

Jesus

Senior Member
Country flag
Offline
Thanks. Tom. Tom and Steve for your comments.

More data: The car is a post 60K TR3A, with bolted stanchions. I imported the car from the USA. It was in a much unmolested condition (one of the best I have seen) with everything in its place, very little rust (even in the sills), but in need of restoration. I have completely restored the car during four years, down to the last nut. The car has been driven less than 100 miles since final assembly.

In the pictures below you can get an idea of the situation. The picture from the back gives an impression of the right windshield corner bent to the rear. This is real, not just a photographic effect. The door gaps are pretty nice, taking into account that I did not anything to adjust gaps. Perhaps a little tight on the B pillar? I guess that the stanchion scuttle mounts are OK. When comparing side to side both stanchions, they seem to be identical. The hood can be installed without any easily, as well with a nice fit.

The problem is when trying to fit the sidescreen. If I keep the frame parallel to the sill (horizontal), the front edge is not parallel with the stanchion (while it is in the left side), due to the too inclined stanchion.

Hope this clarifies better the situation.

Jesús
 

Attachments

  • 26577.jpg
    26577.jpg
    95.8 KB · Views: 244
OP
J

Jesus

Senior Member
Country flag
Offline
Well here is the second photo (with less than 100 K... sorry).
 

Attachments

  • 26578.jpg
    26578.jpg
    60.1 KB · Views: 239

sp53

Yoda
Country flag
Offline
Hi Jesus well the car is beautiful. Let me ask you are you using the old holes for the curtain brackets? A good way to attach the curtains is to put the brackets on the curtain with the panel tacked to the door and with the door closed and top on then wiggle the curtain around until you get the best overall fit then trace that on the panels then drill new holes. But before your drill you have to plug the old holes with wooden doles. Moreover if you plan on using a hard top that drops the curtains down about an inch. However, it looks like in your case you are not going to be sure of things until you get a different windshield and bolt it on to see. I see the frames on ebay for not too much. The more I think about it, you should be able to pull your windshield off and figure out where it is wrong. How does the rubber on the bottom lay on the tub?
steve
 
OP
J

Jesus

Senior Member
Country flag
Offline
Thanks steve for your response.

I am following the method that you suggest for fitting the sidescreens. No problems on the left door, but on the right I have the different angles issue.

I do not think that the problem is in the windshield, since the stanchion is much more rigid and would force it to place. Perhaps I should try to bend the left stanchion. I can try also to use some eventual play in the stanchion bolts and force the stanchion to the front.

In all, I understand that shimming the body is not thee way to go.

Jesús
 

sp53

Yoda
Country flag
Offline
Hi Jesus, when looking at the photo, it looks like the bolt closet to the passenger seat is down, but it is a photo. And I am not sure if your windshield bolts on or slides on. Somebody should know by the TS number. Anyways, if the hood flew off that thing in another life then perhaps that bolt is bent down. You might try loosening things a bit all around and see if that bolt is bent. Definitely get a good quality screw driver that fits right (perfect) and if the kick panels are off oil it from the back and oil it from the front. Yes, I think the arms are solid brass and very beffy . Again, if the frame is bent the bend occurs on the skinny piece between the arms, and the rubber on the bottom will probably not huge the cowling if that is the case.
steve
 

CJD

Yoda
Country flag
Offline
Dang...we lost another nice car!

It sounds like it's going to come down to adjusting the right stanchion. I think if I were doing it, I would study where the bend is compared to the left side. Definitely remove the glass before you attempt to re-bend anything. My biggest fear would be the chrome cracking, since it is much more brittle than the underlying brass. Hopefully the amount needed will be small.

Have you already fit the hood? Changing the stanchion position will affect that fit too.

John
 
OP
J

Jesus

Senior Member
Country flag
Offline
Thanks steve and John for your suggestions.

The bolts, although original are straight. I have tried to undo the bolts and to force the stanchion trying to take some play in the bolts, but there was no appreciable change.

The right stanchion is definitely more inclined that the left one, but I would swear that is not bent since both have the same shape when compared side to side. This is why I thought that the problem might be in the body. I noticed it even before disassembling the car, but since in the end the hood was well fitted, I accepted to live with it. However, now the problem appeared again when fitting the sidescreens.

I deliberately left the stanchions unchromed, and am using the old bolts. When everything will be straight (whatever this means) the stanchions will be re-chromed and new bolts used.

Perhaps the only solution is to bend the straight part to compensate for another bend somewhere else.

As far as the hood fitting, I guess that half an inch is not too much for the vinyl flexibility.

Jesus.
 

CJD

Yoda
Country flag
Offline
Hey, I feel much better knowing the stanchions are not chromed yet. That way you can work with them and not worry about cracking the chrome.

I think it comes down to the two options mentioned above...

First, compare the body mounting holes to make sure they are the same angle on both sides. You can screw the bolts in a few threads without the stanchions, and use a builder's level to make sure the angles of the caged nuts in the body are relatively close. Even if they are off, it may be too difficult to fix at this stage...your paint job looks great! But relocating one nut, just an eighth inch or so, is an option.

Second is to bend the right stanchion. If you are only off 1/2 inch at the top, it will not take much of a bend to straighten it up...just about 3 degrees at the base of the windscreen. Remove the windscreen from the stanchions before you do any bending. Early in the build I'd use a long pipe over the top of the stanchion...but I think that would mar your beautiful paint at this stage. You'll likely have to study, remove, bend it a tad, and then reinstall to check. Keep repeating till it lines up. If I were doing it, I would probably add a little heat, but I doubt that heat is needed. Brass is fairly soft.

Whichever way you choose, you can use the sidescreen as a pattern to get the angle correct. Even if you get a small crack in the stanchion, the chrome shop can fix it before they re-chrome.

Best of luck with it...!

John
 
Similar threads
Thread starter Title Forum Replies Date
K TR2/3/3A Removing TR3 windshield stanchions Triumph 4
K TR2/3/3A The Harley Davidson side mirror that mounts to the TR3 windshield stanchion? Triumph 11
N TR2/3/3A TR3 windshield Triumph 2
N TR3 Windshield FORUM Navigation Questions 0
Lbp TR2/3/3A Question about TR3 Rubber Windshield Seal Triumph 9
Tinkerman TR2/3/3A Windshield glazing TR3 A 1960 Triumph 7
D TR2/3/3A tr3 windshield Tenax fasteners Triumph 2
luke44 TR2/3/3A TR3 Windshield Rebuild and Assembly - Step by Step Triumph 20
luke44 TR2/3/3A TR3 Windshield Stanchion Short Screws Long Screws Triumph 2
6 TR2/3/3A TR3 windscreen/windshield glass Triumph 5
M TR2/3/3A My own TR3 windshield question? Triumph 5
O TR2/3/3A TR3 Turn Signal Retrofit / Windshield Screws? Triumph 7
O TR2/3/3A TR3 Windshield to Scuttle Mounting Triumph 1
S TR2/3/3A windshield wipers tr3 Triumph 1
T TR2/3/3A TR3 Windshield washer pump Triumph 14
B TR2/3/3A TR3 Windshield Wiper Tubing Triumph 5
Marvin Gruber TR4/4A Windshield motors TR3 & TR4 Triumph 2
AngliaGT TR2/3/3A New Windshield for TR2,TR3 $150 Triumph 2
S TR2/3/3A windshield post 60k tr3 Triumph 10
O TR2/3/3A TR3 Windshield Glass Replacement Triumph 2
mountainman TR2/3/3A TR3 Windshield Center Support Triumph 1
G TR2/3/3A TR3 windshield corner finishers Triumph 4
O TR2/3/3A TR3 Windshield Replacement Triumph 4
G TR2/3/3A TR3 Windshield size question Triumph 2
G TR2/3/3A TR3 windshield isntall Triumph 11
B TR2/3/3A TR3 Windshield-[screen]? Holder on'r thingy remove Triumph 6
G TR2/3/3A TR3 windshield assembly sequence Triumph 9
mrv8q TR2/3/3A TR3 Windshield Stanchion Q Triumph 6
D TR2/3/3A TR3 post 60000 windshield stanchion guide plates Triumph 5
M TR2/3/3A TR3 Windshield Frame Triumph 2
bmurphy7369 TR2/3/3A TR3 Windshield Stanchion Guide Plates? Triumph 22
G TR2/3/3A TR3 windshield disassembly Triumph 3
mctriumph For Sale front apron 57 Tr3 Triumph Classifieds 0
Rick_Thompson TR2/3/3A TR3 rack and pinion kit problem... Triumph 17
S TR2/3/3A differential hubs early tr3 and tr2 Triumph 22
S TR2/3/3A Tr2 and early tr3 differential. Triumph 10
71TR6 TR2/3/3A TR3 WIper Wheel box Triumph 2
RonC General TR TR3 Shifter on TR6 Triumph 8
jfarris TR2/3/3A Modern Temporary Donut Spare for a TR3 Triumph 1
G TR2/3/3A What color is my car? TR3 1958 Triumph 16
S TR2/3/3A Rebuilding a tr3 transmission and second gear, Triumph 57
mctriumph For Sale Odd bit for Tr3 and early 3A Triumph Classifieds 0
S TR2/3/3A turn a tr3 non-full syncro transmission into a full syncro Triumph 3
Y TR2/3/3A I cannot get my TR3 in correct timing. Triumph 7
mctriumph TR2/3/3A Safety mods every Tr3 should get Triumph 12
Editor_Reid TR2/3/3A Whitewall Tires for TR3 Triumph 11
curdy TR2/3/3A TR3 Stalling Issues Triumph 8
S TR2/3/3A Anyone cut out the spare tire compartment on a tr3? Triumph 4
S TR2/3/3A put a differential back into a tr3. Triumph 2
S TR2/3/3A tr3 breather pipe Triumph 2

Similar threads

Top