• Hey there Guest!
    If you enjoy BCF and find our forum a useful resource, if you appreciate not having ads pop up all over the place and you want to ensure we can stay online - Please consider supporting with an "optional" low-cost annual subscription.
    **Upgrade Now**
    (PS: Subscribers don't see this UGLY banner)
Tips
Tips

TR2/3/3A Removing the J type unit from the gear box

Got_All_4

Luke Skywalker
Country flag
Offline
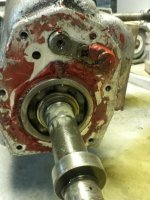
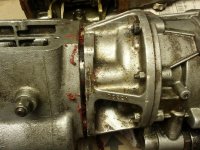
Trying to separate the overdrive unit from the rear of the gear box. Took out all 6 bolts and a ton of RTV silicone. I can only get it to move about a 1/4 inch. See pic. I can see some one has been in this several times as there are many screwdriver pry marks. I have no instructions so it may not be as straight forward as it looks. My goal is separate the two and get the main gear box cleaned up and inspected. What am I not doing?
 

Attachments

  • IMG_20150308_211244.jpg
    IMG_20150308_211244.jpg
    93.2 KB · Views: 71

TR3driver

Great Pumpkin - R.I.P
Offline
Did you relieve the bind between the direct drive clutch and the sprag clutch? (Shift into and out of OD with the clutch depressed.)

You can download instructions (as part of the TR6 workshop manual) from
https://drive.google.com/file/d/0B2H2NJt34OffZTJaeXJhWllGWnc/view?usp=sharing
The bit mentioned above is in section 40.20.07, removing the OD from the car. Disassembly is right after that.
 

TR3driver

Great Pumpkin - R.I.P
Offline
Well, normally that joint should just pull apart. The clutches binding is one reason it might not. If it is the clutches, the only ways I know to get it apart are brute force, or fill it with oil, spin it up on the bench, and hit the solenoid with 12v. In theory you could just pressurize it through the test port, but I don't have an oil gun that will generate that kind of pressure. You can read through https://www.buckeyetriumphs.org/technical/jod/JOD2/JOD2.htm for some other ideas.
 

CJD

Yoda
Country flag
Offline
Just curious...would air pressure be enough to actuate the OD through the pressure tap?
 

TR3driver

Great Pumpkin - R.I.P
Offline
I guess that all depends on how much air pressure you have :smile: I didn't check myself, but Nelson wrote that it took about 170 psi to move the pistons on his J-type. My compressor cuts out at 150 psi.

OTOH, I used to work on ships that had 3,000 psi available. I always tried not to think what might happen when I had to step over those lines!
 

CJD

Yoda
Country flag
Offline
If 170psi does it with the OD flush, then it might take a bit less if the springs are extended some as shown in his pic. Worth a try, anyway.

It's frightening just thinking about 3,000 psi of air pressure! I watched an AC mechanic kill himself over-inflating an F4 tire to 300psi. 10 times that would be devastating.
 

TR3driver

Great Pumpkin - R.I.P
Offline
It's frightening just thinking about 3,000 psi of air pressure! I watched an AC mechanic kill himself over-inflating an F4 tire to 300psi. 10 times that would be devastating.
Yeah. The ships in question used the air to simulate an explosion in the water immediately behind the ship. I was told that, back in the bad old days, they used kegs of dynamite instead! Anyway, every time they set off a "shot", the entire ship would jump and the water turned white for many yards around. And they did that every 10 seconds or so, for literally days on end! (Ideally about 3 weeks continuous, but usually something broke and they had to stop to fix it.)

All part of the search for "black gold". Not that anyone cares, but this is one of the ships:
https://books.google.com/books?id=P...nepage&q=shell america seismic vessel&f=false
 
OP
Got_All_4

Got_All_4

Luke Skywalker
Country flag
Offline
Well I think the Triumph gods did their magic while I was sleeping. The next morning I was able to walk it of fairly easy. Got to wonder how many times this thing was apart, you should see all the pry marks from probably screw drivers and the RTV silicon. Wow! The oil passages were even blocked so the OD could not have been getting a full oil supply. I took the main case to one of my customers and they let me use their enzyme parts washer to clean it up before disassembly. I'll make sure it's tip top shape before I start on the OD. If I find too much bad I have a old Volvo J type OD that I hoping to use for parts or maybe just swop out the speedo gears and use it. I know it is good but not used for 12 years.
 

Attachments

  • IMG_20150309_090853.jpg
    IMG_20150309_090853.jpg
    41.2 KB · Views: 64

CJD

Yoda
Country flag
Offline
I bet the fishing trawlers liked following you guys around. That's serious horsepower to pop a 3k psi burst every 10 seconds!

And, that's also a whole lotta RTV!
 
OP
Got_All_4

Got_All_4

Luke Skywalker
Country flag
Offline
Ok got the input shaft out and then the lay shaft but the layshaft gears won't drop out of the way(so what do I do) so I can drive the main shaft out of the rear bearing. My concern is damaging the gears as I hammer the shaft towards the front. The cage for the needle bearings in the input shaft had disintegrated and that was a bugger to get out!
 

CJD

Yoda
Country flag
Offline
If you do hammer the shaft out, plan on replacing the rear bearings. Best to press them out.
 
OP
Got_All_4

Got_All_4

Luke Skywalker
Country flag
Offline
For sure he are getting replaced. They seemed a little rough anyway. Looks like I'll be bushing the gears too and what ever else I find in there. Only planning on doing this once.
 

TR3driver

Great Pumpkin - R.I.P
Offline
That big screw and plate at the top of your photo is holding the counter shaft in place. Remove that, then you should be able to push the shaft out from the other end. ISTR it's helpful to push a dummy shaft in (which is too short to engage with the case and stays inside the gears, but I don't recall why offhand.

With the shaft out of the way, the gears should fall to the bottom.

PS, a warning for later : All of the bushings I bought turned out to be the wrong size in one way or another. That was a few years back, so maybe not a problem now, but check them carefully. Out of 4 bushings, 3 were too short and the other was too small on the inside diameter.
 

HerronScott

Darth Vader
Offline
That big screw and plate at the top of your photo is holding the counter shaft in place. Remove that, then you should be able to push the shaft out from the other end. ISTR it's helpful to push a dummy shaft in (which is too short to engage with the case and stays inside the gears, but I don't recall why offhand.

Randall,

Was that so the loose needle bearings don't fall out?

Scott
 

TR3driver

Great Pumpkin - R.I.P
Offline
Randall,

Was that so the loose needle bearings don't fall out?

Scott
I guess that's what I was thinking of. Except that only the early 3 synchro boxes had loose needle bearings, so that wouldn't apply here. I just happened to use the "dummy" shaft that I had in the tool box, as the drift for tapping the later shaft out.

Sorry for the confusion.

BTW, in addition to the series of Buckeye articles linked above; there are some good articles on the gearbox on the VTR site as well.
https://vintagetriumphregister.org/maintenance/
Unfortunately, the authors never finished the series with the J-type. As you may see mentioned, they started writing the series because the Buckeye articles had been taken down. Then later, the author of the Buckeye articles relented (on the condition that his name be removed) and so there was no reason to do the J-type write-up.
 

CJD

Yoda
Country flag
Offline
Ok got the input shaft out and then the lay shaft but the layshaft gears won't drop out of the way(so what do I do) so I can drive the main shaft out of the rear bearing. My concern is damaging the gears as I hammer the shaft towards the front. The cage for the needle bearings in the input shaft had disintegrated and that was a bugger to get out!

Oh, we're talking tranny! I was still focusing on the OD. Did you get the layshaft gears to drop yet?
 
OP
Got_All_4

Got_All_4

Luke Skywalker
Country flag
Offline
Randal I do have the lay shaft out. The info says and a video I watched you can hear the lay gears fall to he bottom of the case once you pull the shaft out. Ive tried taping the gears and dropping the case. The gears only moved about 3/16 of an inch. For what I can see through the layshaft holes the thrust washers look badly beaten. (like the rest of this tranny) so I wonder if they are holding the gears up. What if I was able to push the main shaft up as high as it will go, support it in front of the main shifter selector with shims resting on the inside of the case, then turn the case upright and press the shaft out of the rear bearing so not to damage any teeth?
 

TR3driver

Great Pumpkin - R.I.P
Offline
Hmm, my memory isn't exactly clear, but I don't think they dropped much more than that.

Not sure I follow you about the shims, but the usual way is to remove the rear bearing with the shaft still inside the housing. You tap the shaft to the rear just enough to get a bearing separator under the circlip, then either use a puller to get the bearing off the shaft, or put shims under the circlip and then tap the shaft through the bearing (repeat as necessary to work the bearing out). Page 7 at https://vintagetriumphregister.org/maintain/TransRebuild/TRTrans01.pdf shows the process using what I believe is a cheap separator from Harbor Freight with some simple mods to increase it's reach (threaded rod & long bolts from the hardware store).

If you really can't get the cluster gears to drop, then you may be able to get a pry between the back gear and the bearing, to move the shaft forward a bit and then drive it back as above to work the bearing loose from the case. Be careful though, and stop if the gear teeth get tangled. You don't want to break the gears.

Yet another approach might be to use a small grinder (eg Dremel) and grind the bearing apart. Cut the metal bands that hold the balls in position, then grind notches into one or both races so you can remove the balls one at a time. Very tedious and time consuming, but should be possible. Be careful not to cut the case or shaft (although one or two small nicks won't hurt anything). (I've done other bearings this way, never had to use it on a TR though.)
 
Similar threads
Thread starter Title Forum Replies Date
F Removing Axle Half Shaft [Tube Type] MG 4
tr6web TR6 Need advice removing downpipe nuts Triumph 2
L Removing Master Cylinder Without Paint Damage Austin Healey 27
D Removing the steering wheel hub Spridgets 12
J General MG Thoughts on removing a stubborn 2-ear spinner MG 5
K TR2/3/3A Removing scratches and scrapes fro the wind wings that screw to the windshield? Triumph 9
Gatheringtree TR2/3/3A Removing the headlamp bezel rim Triumph 2
R TR6 Removing the charcoal cannister considerations Triumph 7
S TR2/3/3A Removing a stuck oil drain plug Triumph 13
K TR2/3/3A Removing TR3 windshield stanchions Triumph 4
KVH General Tech Removing Piston Wrist Pin Triumph 2
C Removing AH Sprite Mk 1 windscreen washer pump Restoration & Tools 2
M Need help removing the pinion assembly from a late 1275 steering rack Spridgets 7
jfarris TR2/3/3A Removing choke cable from dash insert Triumph 3
doakley Spitfire Removing facia Triumph 2
7 Wedge Removing sunroof frame Triumph 5
D Removing the last rust from pitted steel Restoration & Tools 11
D Removing Old Radio Austin Healey 4
S Removing Overdrive Shaft Lever Pin Austin Healey 7
L TR2/3/3A Any trick to removing TR3 doors? Triumph 12
M TR2/3/3A Removing Wires From Stator Tube Triumph 7
BN6_2197 Removing connecting link between shock absorber and rear axle Austin Healey 4
T TR2/3/3A Requesting help on removing TR3A steering column and box Triumph 21
longbridgehealey Removing BN4 Bonnet Austin Healey 9
C Removing the Healey "Flash"? Austin Healey 11
Gliderman8 TR6 Removing Left Rear brake line... help! Triumph 9
maxwedge5281 Removing Complete Rear End From BN6 Austin Healey 5
Jim_Gruber Removing a Spridget Engine Checklist Spridgets 5
S TR2/3/3A removing the temp gauge needle Triumph 5
Sarastro General Tech Any good ideas for removing liners? Triumph 20
R TR2/3/3A Removing WD-40 Triumph 6
F Removing oil and water guage from BT7 dash Austin Healey 17
R TR2/3/3A Removing transmission Triumph 3
Joe Schlosser Removing Control Knobs Spridgets 9
W TR2/3/3A Tell me there is a trick to removing lower control arm pin... Triumph 45
Bona42na Spitfire Removing Transmission/Gearbox from underneath Triumph 3
pkmh Removing Passenger Rear Bearing Nut Austin Healey 26
BN6_2197 Advice on removing the float from the chamber Austin Healey 6
B TR6 Removing the ckoke/heater control knobs Triumph 4
Jim_Gruber Removing the Rear Axle Seal Spridgets 4
Jim_Gruber What is the correct tool for removing brake lines from a BE Master Cylinder Spridgets 10
K TR2/3/3A Removing windshield stanchions? Triumph 8
R TR2/3/3A removing sending unit from tank of TR-3. Triumph 8
Jim_Gruber Removing back Radius Arm Bolt Spridgets 12
KVH TR4/4A Removing Rear Differential Seal--Solid Axle Triumph 1
JimTR4 TR4/4A removing the rheostat Triumph 5
Z MGB 1979 Timing problems after removing distributor - Help Please! MG 28
M TR2/3/3A Can radiator be fixed without removing it? Triumph 20
KVH TR4/4A Removing Glass Windshield Triumph 4
KVH TR4/4A Removing the Differential Triumph 7

Similar threads

Top