auggie said:
I am ready to mount the TR3A body to the frame and have a couple of questions:
1. The outriggers have 2 holes with welded nuts, but the body bracket has 4 holes, is this standard? The rubber spacers that are used to level to the floor boards also have have 4 holes. Are the other two holes on the body brackets for something else?
2. The inner fender mounts in the engine bay comes with an few 3/16 inch slotted spacers, are all required to use or are they for some type of leveling?
Thanks,
Auggie
Q1 - The "body bracket" (do you mean floor pan?) should have 2 holes per outrigger mounting point - see photo below - yes, this is standard - note the rubber shim spacers and their holes that come with the kit are not 100% square - the holes are slightly offset - think ever so slightly rectangular, not square - be sure the holes are lined up. The tub <span style="font-weight: bold">center section</span> is bolted down by 12 bolts - see the pic below - all 6 tub bolts for the drivers side are clearly visible. The outriggers (2 per side) have 2 bolts each. As well there is a 3rd long bolt up front that passes through a tube in the frame (in the pic below look by the gas pedal) as well as one towards the back of the pan. I started with the suggested number of rubber shims equally on all 4 outriggers and it fell together perfectly - no further adjustment needed.
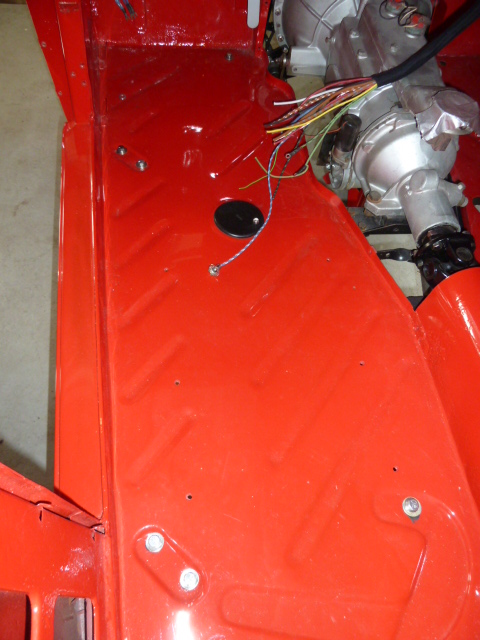
The body also has 8 more mounting bolts - one near the very front of the car - inner fenders, one at the very rear - inner fenders, and finally 2 per side on the sloped frame piece in the engine bay.
<span style="font-weight: bold">MAJOR TIP:</span> To put the tub on, <span style="font-weight: bold">always</span> start from the center outrigger bolts and work outwards. The trick is to make 8 "studs" (buy longer bolts from your local hardware store - I think I used 3.5" or 4" - longer is better, but too short doesn't work - and cut the heads off with your dremel tool) and screw them into the outriggers. Then drop the tub onto the studs - use the studs to guide the body home - making sure you have your rubber shims in place, and shift everything around on the studs until you get the rest of the bolts lined up. And then, remove the studs, and replace them with the proper body mounting bolts. If needed, you may have to grind a small bit of floor pan sheet metal if you have new floor pans installed - it depends on the quality of the floor pan and the accuracy of the pan placement - elongating a bolt hole is not a big deal. To install the body onto the frame any other way is a lesson in frustration - think of it also like torquing a cylinder head - always start from the center and work your way out. Sorry, Jerry - I must disagree with you starting at the ends and working in. The stud on outrigger method I describe above locates 8 of the bolts right away, and allows you to move the tub around and not lose your positioning on the main core bolts.
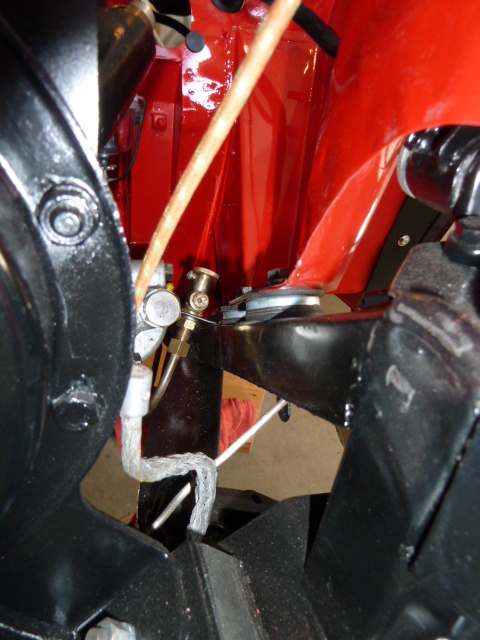
Q2 - Yes, here are 2 more mounting points per side on the slanted frame piece in the engine bay - be careful with these as <span style="font-weight: bold">the lower washer thickness is different top and bottom</span>. And yes, they are required. But, they have nothing to do with leveling the car or the body on the frame. See the 2 pictures below - one from the tire well, and the second from the engine side. Use the shims as shown.
Hoping this helps,
 Hey there Guest!
 Hey - did you know if you click on the title of a thread it will take you to the first unread post since you last visited that thread?
 but were afraid to ask:
  STOP!! Never post your email address in open forums. Bots can "harvest" your email! If you must share your email use a Private Message or use the
  smilie in place of the real @
 Pretty Please - add it to our Events forum(s) and add to the calendar! >>


 A friendly reminder - be careful what links you click on here. If a link is posted by someone you don't know, or the URL looks fishy, DON'T CLICK. Spammers sometimes post links that lead to sites that can infect your computer, so be mindful what you click.