• The Roadster Factory Recovery Fund - Friends, as you may have heard, The Roadster Factory, a respected British Car Parts business in PA, suffered a total loss in a fire on Christmas Day. Read about it, discuss or ask questions >> HERE. The Triumph Register of America is sponsoring a fund raiser to help TRF get back on their feet. If you can help, vist >> their GoFundMe page.
  • Hey there Guest!
    If you enjoy BCF and find our forum a useful resource, if you appreciate not having ads pop up all over the place and you want to ensure we can stay online - Please consider supporting with an "optional" low-cost annual subscription.
    **Upgrade Now**
    (PS: Subscribers don't see this UGLY banner)
Tips
Tips

front hub removal

Hoghead

Jedi Trainee
Offline
I need to change my front wheel bearings and the manual calls for a hub removal tool.

Is this tool really required and if so I do not see it at Moss

Anything special about the bearings and seal or is this a standard bearing house item
 

pkmh

Jedi Warrior
Country flag
Offline
FWIW, I took apart my front wheel bearings, cleaned, repacked and reinstalled.

I remember people here suggesting using special testing equipment for inspecting end float, etc. Is there more to know, but from my notes, I can offer the following...

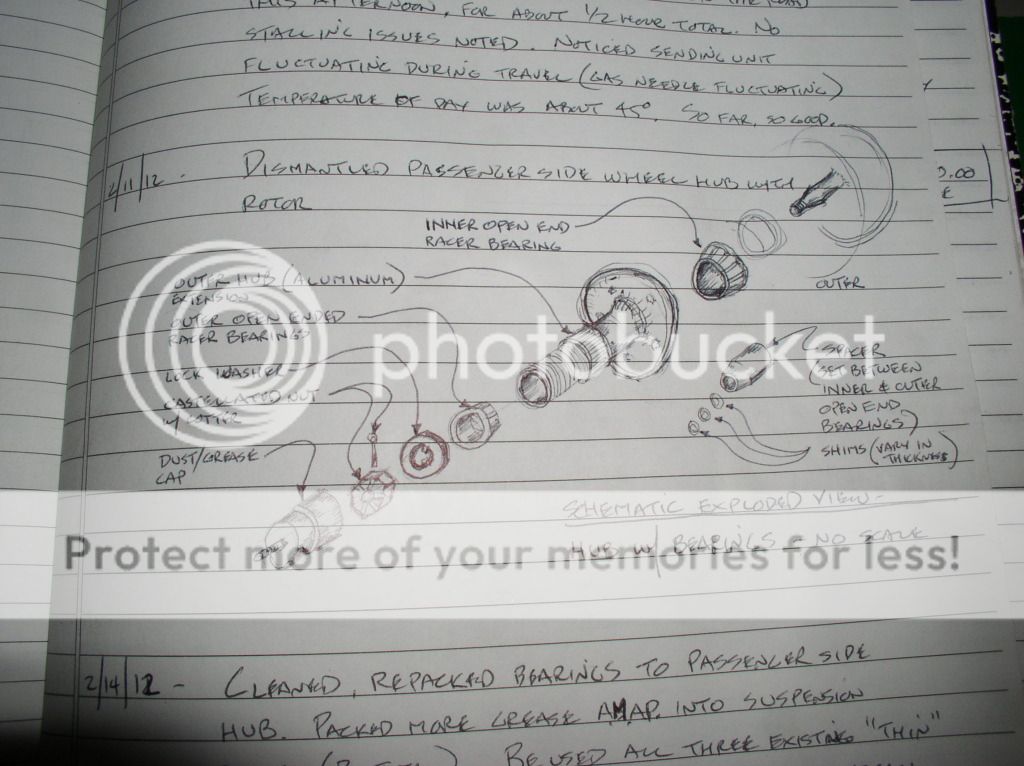
No special hub removal tool was needed for me. There is a dust/grease cap found within the outer hub and has a threaded stud in its center. For me, I was able to simply take a pair of pliers and pull on the threaded stud. Probably a more correct way to remove or if yours does not come out as easy as did mine.

Then you have a cotter holding in place a castellated nut. I took a screw driver/needle nose pliers and worked in prying the cotter straight and then pushed out through the one and only hole on the outer hub. You will then need a socket to remove the nut (don't recall the size socket offhand).

The biggest challenge for me was determining the end float and drag after reinstalling. Luckily, the existing shims were okay. Be careful when reinstalling the shims found between the spacer and the outer bearings. Very easy to deform if not properly positioned or may even slide out of position, in my case due to excessive grease.

Also, I've remember how retightening the constellated nut should be between 40 to 70 PSI. I would check this again and it would be handy to have a torque wrench.

Hope the above helps.

Paul

Below is a sketch I recorded as I was taking apart. But this is pretty much as already found in the workshop manual.
OuterHubSketch.jpg
 

glemon

Yoda
Country flag
Offline
I thought the caps just had a hole in them, I have popped them out with a slide hammer or anything long with an appropriate size thread then attach a vise grips and pull or pry it out.
 

pkmh

Jedi Warrior
Country flag
Offline
I do believe the caps are void of any openings.

Correct me if I'm wrong, but if they had holes, then I would find fault in calling them 'dust' caps for they would not be functioning in attempting to keeping out dust.
 
Country flag
Offline
Unless I've misunderstood the original question__it <span style="font-style: italic">could</span> happen__no, you do not need a hub puller to remove the front hubs.

At one time, and I'm really not sure where these wound up, it seems that I had a pair of BN4 drum brake/disc wheel hubs with ball bearings, and I'm pretty sure that they are the ones that required a "puller" to be removed from the stub-axles.

Or not...
 

glemon

Yoda
Country flag
Offline
I'll try again, I was wrong the big healey dust cap does have a threaded stub, I looked in my toolbox and found my "special tool" I used to pull the cap on my 100.

100_1417.jpg


A 5/16" threaded coupler and bolt, could only find coarse thread coupler looks like the cap on my car was fine and I tapped the one end. All parts readily available at a hardware store.

Anyway, screw it on, grab the end with a vise grips or wrench, pull it out. If it doesn't pull attach the wrench perpendicular to the puller and pry with a screwdriver or py bar or something.

No this is not a "hub puller" but it is the closest thing I could think of to a special tool you might need to do the job, once you get the dust cap, pin and castellated nut off the hub, bearing etc. should all just pull off with minimal effort. As others have stated only tricky part is getting the float right with the shims when you reassemble.
 
OP
H

Hoghead

Jedi Trainee
Offline
I am fine with setting end float using a dial gauge and shims, along with changing the wheel bearings
If a hub puller is not needed then off with it and on with the job
Thanks for the confirmation
 

pkmh

Jedi Warrior
Country flag
Offline
"As others have stated only tricky part is getting the float right with the shims when you reassemble."

Yep, I can speak from experience. Not having the tools to measure end float meant trial and error with what shims I had. All those times of putting together and then pulling off the wheel and then taking away one or more shims, etc., as adjustment. Later, I decided to purchase a bunch more of those shims and for now, just saving for another day.
 

Johnny

Darth Vader
Country flag
Offline
If my memory is correct the manual states to clean all shims and bearings and then soak in petrol. Then reinstall without grease to obtain the tightest fitting and still being able to rotate wheel easily. Then remove all again and grease thoroughly then re-assemble and tighten securely.

Worked for me.......
 
Country flag
Offline
Johnny said:
If my memory is correct the manual states to clean all shims and bearings and then soak in petrol. Then reinstall without grease to obtain the tightest fitting and still being able to rotate wheel easily. Then remove all again and grease thoroughly then re-assemble and tighten securely.

Worked for me.......
Yes, just lightly oiled for all tests, then packed with grease prior to final assembly.

(from the "Randy manual"...)

IMG_2618.jpg
 
OP
H

Hoghead

Jedi Trainee
Offline
My car seems to be missing the spacer between the bearings. All I have is the hub inner with 2 cutouts to drive out the bearing outer races.
No wonder I thought 1 of the wheel bearings were bad

Before I go and order these, am I correct in thinking that this is just like a motorcycle and is a loose fitting spacer between the bearings. My parts manual shows this as a seperate piece

Is that the snout of the spacer that I see sticking out in the Randy Manual pic
 
Country flag
Offline
That is indeed the spacer, postioned between the inner bearing (, shims) and outer bearing.

Proper set up allows the inner races (I.D.) of both bearings to be "clamped" securely (40 to 70 Lb-ft, allowing latitude for aligning the castleated nut to split-pin hole).
 
Country flag
Offline
Hoghead said:
Randy
Is it a loose fit between the two bearings
No, not at all__the inner races of both (inner & outer) wheel bearings are to be tightened together with the spacer (and shims) clamped in between.

Hence the need for the shims: to set the correct end-float on the bearings outer races.

Those are "taper" bearings right? So the spacing between them sets the width in which the hub "rides."

If it's not tight, how do you maintain proper clearance? You can't :wink:
 

BJ8Healeys

Jedi Warrior
Country flag
Offline
The proper installation of the bearings and spacer per the workshop manual requires different thicknesses of washer-shaped shims (0.003", 0.005", 0.010", etc., available from the usual suppliers. Order several shims of each thickness). The outer bearing can be trial fitted without grease until the proper thickness of shims is achieved, then lubricate the bearing for final installation after all adjustments are complete.

The hub/rotor assembly is installed with the spacer between the bearings and with a selection of shims so that when the hub nut is torqued there is detectable free-play when you move the hub in and out. Then, you try again after removing some shims and repeat until the free-play is gone, but the hub/rotor still rotates freely. It can be tedious, but ideally you want the free-play to be there, then remove a 0.003" shim and the free-play is gone.

It helps to lubricate the shims with grease so that they stick to each other and the spacer outer face and don't fall and get trapped out of place when you torque the nut. If that happens, you will smash and deform some of the shims.

Torque the hub nut to 40 - 70 lb-ft. If one of the castellations in the nut does not line up with the cotter pin hole between 40 - 70 lb-ft, you can use a suitable shim under the nut to adjust the position of the nut until it does line up at the correct torque.
 

BJ8Healeys

Jedi Warrior
Country flag
Offline
There has been a lot of discussion and disagreement over the years concerning the true function of the spacer. Some think it "stiffens" the stub axle when the nut is torqued and that helps prevent axle cracking. From an engineering mechanics point of view, that explanation doesn't really make sense to me. The tensile stress applied to the axle by torquing the nut is insignificant, but it would be ADDED to the tensile stress due to bending at the bottom side of the base of the axle. That would only increase the possibility of cracking, if anything.
My argument (supported at one time on the autox.team.net Healey list by a Timken bearing engineer) is that the shims and spacer allow the inherent freeplay of the bearings to be removed in a controlled manner, and thereby allows a more precise steering due to less looseness in the bearings.
 
OP
H

Hoghead

Jedi Trainee
Offline
My question on fitting loosely was poorly worded and I am trying to determine if this spacer is a loose fit on the stub axle.
From the subsquent comments it appears that is is a loose fit ont he stub axle just like a motorcycle.

Sorry for the confusion, and thanks for all the help
 

BJ8Healeys

Jedi Warrior
Country flag
Offline
Hoghead said:
My question on fitting loosely was poorly worded and I am trying to determine if this spacer is a loose fit on the stub axle.
From the subsquent comments it appears that is is a loose fit ont he stub axle just like a motorcycle.

Sorry for the confusion, and thanks for all the help

The spacer is a loose fit on the axle and merely slides onto it.
 

TRdarrel4

Freshman Member
Country flag
Offline
A little late in the discussion, but regarding that dust cap removal (which I found to be quite a bear on my barn-find BJ8): I made up a version of glemon's tool using a fully threaded bolt / flat washer stack / nut setup (along with the all-important coupler). As with his model, the coupler threads onto the dustcap offering. The washer is then pressed up against the hub extension and the nut is tightened up against the washer to supply the pull on the cap. I'm thinking this is along the lines of the "puller" that Randy had referred to. In any case - along with a liberal application of penetrating oil - it worked to extract <span style="text-decoration: underline">my</span> stubborn cap (and get me on to that pesky crown nut / cotter pin challenge).

fwiw
 
Similar threads
Thread starter Title Forum Replies Date
K TR2/3/3A Front brake hub removal to access Vertical Link bolts(screws) Attached pictures. Triumph 1
Scotsman TR2/3/3A tr3 front wheel hub stud removal Triumph 2
Monark192 MGB-GT 67 GT front hub removal MG 10
19_again front hub removal MG 3
C BT7 Front Hub Removal Austin Healey 4
19_again front hub removal MG 18
M Front Hub Grease Cap Removal MG 9
M Front Hub Removal Question Triumph 4
A Front Hub Removal Spridgets 3
P Front hub & rotor removal Austin Healey 12
Carlbanan56 MGB Front hub MG 4
K TR2/3/3A How to remove the front brake hub from the brake disc? Triumph 11
A BN7 Front Hub Stud Nuts Austin Healey 5
K TR2/3/3A Securing new brake disc to the front hub? Triumph 4
K TR2/3/3A Front Hub and Felt Seal Triumph 1
Tybalt Spitfire Spitfire vs GT6 Front Hub Question Triumph 0
MikeAH100M 100 Front Hub Spacer/Distance Piece Austin Healey 2
warwick-steve Missing grease cap in front hub Austin Healey 8
warwick-steve Front hub bearing grease repacking Austin Healey 28
K TR2/3/3A Front hub oil seal Felt? Triumph 1
K TR2/3/3A Front wheel hub "felt" again? Triumph 2
K TR2/3/3A Front hub wheel bearing nut? Triumph 1
aero3113 Front Hub Inner Bearing Seal Austin Healey 7
pkmh "Bearing Outer Race" Re-installation at Passenger Front Hub Extension Austin Healey 4
Jeepster Front hub replacement. Austin Healey 34
R TR2/3/3A front hub seal options Triumph 9
Bob_Spidell Securing Front Hub Bolts Austin Healey 8
T TR4/4A Front hub grease cap sizing - anyone had a cross reference part # for a FLAPS? Triumph 2
C Front Hub Castle Nut Austin Healey 8
B TR2/3/3A TR3 Front Hub Felt Seal questions Triumph 2
M_Pied_Lourd TR2/3/3A 59 TR3A Front Hub Oil Seal Triumph 2
R BJ7 front hub shim question Austin Healey 18
catfood Removing front hub Austin Healey 6
RAC68 Calculating Front Hub End-Play Austin Healey 32
S Correct way to remove grease retaining cup from front hub? Austin Healey 7
Jim_Gruber Removing front wheel bearings from hub Spridgets 6
bertl Front Hub Spacer Kit Triumph 1
BillD Front hub puller Spridgets 21
6 front hub options... Triumph 4
S Spitfire Question on front Hub for a triumph Spitfire. Triumph 4
pkmh Dismantling BJ8 Front Hub From Caliper Disc Austin Healey 20
Willie_P TR 3/4 Front Hub Install - question Triumph 15
J Front hub mystery Austin Healey 0
britndablood To install or not to install Front hub spacer Austin Healey 8
Lon_S What hub puller tool works well for the front hub? Spridgets 2
TR4nut Front Hub Felt Seal - Old vs New Triumph 15
D Need a front hub Austin Healey 1
S Front Hub Replacement Austin Healey 7
G Front hub Spridgets 2
TonyPanchot tork settings for 1997 front hub Jaguar 1

Similar threads

Top