• The Roadster Factory Recovery Fund - Friends, as you may have heard, The Roadster Factory, a respected British Car Parts business in PA, suffered a total loss in a fire on Christmas Day. Read about it, discuss or ask questions >> HERE. The Triumph Register of America is sponsoring a fund raiser to help TRF get back on their feet. If you can help, vist >> their GoFundMe page.
  • Hey there Guest!
    If you enjoy BCF and find our forum a useful resource, if you appreciate not having ads pop up all over the place and you want to ensure we can stay online - Please consider supporting with an "optional" low-cost annual subscription.
    **Upgrade Now**
    (PS: Subscribers don't see this UGLY banner)
Tips
Tips

TR2/3/3A The guide bolts to help gearbox install?

karls59tr

Obi Wan
Bronze
Country flag
Online
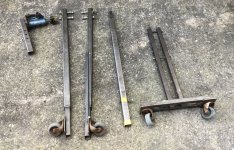
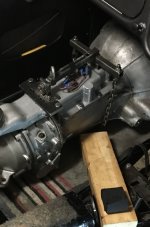
I need a memory refreshas I misplaced the first set I made. Are they 5/6" coarse or fine? How long should they be? Cut the head off the bolt and add a notch in the end to just screw them in. When inserting the guide bolts it's best to place them at 45 degrees or maybe 25 degrees...which is best?
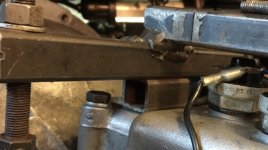
Also when installing a TR6 gearbox in a 3 wasn't there something about the 6 housing flange being thicker or thinner than the 3 flange so that would affect bolt length? My car is snowed in till Spring but I want to get the guide bolts done now anyway.:smile:
 

bobhustead

Senior Member
Gold
Country flag
Offline
Not saying it is bound to happen, but if for some reason the rear of the trans is not supported and the bell housing bolt holes wind up being a fulcrum I could certainly see the aluminum bolt holes breaking.
Bob
 

TR-3rg

Jedi Hopeful
Country flag
Offline
Hi, I have used guide bolts several times. The thread is 5/16 course. I use 4 bolts, about 5" long. Cut the heads off and screw them in the block. I put two at top, one on each side. Slide the gearbox in. I run nuts on the bolts and square up the gearbox to the engine, about 3.5" from the engine. Put the gearbox in 4th gear. Tighten up the nuts a 1/2 turn at a time while turning and pushing on the output flange. It should drop right in. Repeat a 1/2 turn on the nuts as needed.

Good luck, Roy
 

Graham H

Jedi Warrior
Country flag
Offline
If you are fitting a TR6 box to a 3 for the first time you will need all new longer bolts. The guide studs were in fact a permanent fitting in the top 3 bolt holes and would need nuts and washers to fit the box. If you have used a dummy output shaft to align the clutch plate the box should just slide in once the splines are alined.

Graham
 

Hamish Racing

Jedi Warrior
Country flag
Offline
this is an early tr6 box with A type OD in a 3A with a tr6 type clutch
i use 2 guide studs top one being slightly longer
they and the bell housing take the weight ok
the box will either slide in or not !! there is no middle ground.
if it won't after some struggling have a break
it will slide in when you try it again.
OD boxes are harder because they are so much heavier
the box needs to be at the same angle as the engine
easier with 2 people if you can borrow a mate for a while.
clutch properly lined up is a must
stick it in 4th so you can turn the gearbox output so the splines to the clutch line up.
and make sure the gearbox thrust bearing hasn't come off the fork whilst man handling the box into the car ( before the final mating up to engine).
good luck
 

Attachments

  • 65DE7BF5-70D1-4864-A9CC-1AB06F739FDA_1_201_a.jpeg
    65DE7BF5-70D1-4864-A9CC-1AB06F739FDA_1_201_a.jpeg
    252.3 KB · Views: 165
  • 0688E156-F216-4B41-9FA6-79578AA4371B_1_201_a.jpeg
    0688E156-F216-4B41-9FA6-79578AA4371B_1_201_a.jpeg
    208.2 KB · Views: 154
Last edited:

TuffTR250

Jedi Warrior
Country flag
Offline
I have found the guide bolts as a mixed help on both my TR250 and my TR3. Since I have found that the top of the transmission has to be cocked to the passenger side of the car to get the clutch lever to clear the floor and by then, normally the transmission shaft has started to enter the clutch plate. The guide bolts get in the way and do not allow the transmission to be turned toward the right.
Bob
 

Graham H

Jedi Warrior
Country flag
Offline
Sounds like you have done it a few times Hamish, certainly enough to learn all the tricks?

Graham
 

KVH

Darth Vader
Country flag
Offline
Guide bolts seem to me like a way to break the flange on the bell housing.
Bob
Yes, I think it's important to use them only as guides and with the spigot in the rear crank bushing, but also to get the other bolts in or started before allowing the transmission to just hang there. It happens, but always bothers me. Years ago I had a transmission with bell housing damage. Never felt good.
 

Hamish Racing

Jedi Warrior
Country flag
Offline
Sounds like you have done it a few times Hamish, certainly enough to learn all the tricks?

Graham
Yes rather too many times in my short ownership.
it’s as a result of my abuse of it via sprints and hillclimbs with very stick wide tyres
And a starting 64ft of about 2.4seconds from just 117bhp.

I am hoping for more relaxed starts but faster runs with the new engine.

a guy over here devised a great gearbox lift for TR’s made single handed removal and refitting a doddle I should have made one.
I’ll see if I can find pics to post
 

Hamish Racing

Jedi Warrior
Country flag
Offline
Ok so found some pictures
As you can see it’s box steel and a bottle jack. Long support legs on wheels that slide under a car on axle stands ( not too high)
The really clever bit it the harness frame that holds the gear box.
it has chains to threaded bolts to tension it up and a box steel spacer which is critical with the too frame and shallow loop even shallower crane hook.

i made the mistake of not making my own so have also struggled a few times by my self. They are heavy bloody things.
This is where I use the guide pins from the block,
And a trolley jack fire and aft on a wood sheet so I have the smoothest floor for the jack to move on to slide box home.
I also get the engine and clutch alignment spot on.
I also then use the level on top of the gearbox so I can see if the vertical axis is somewhere near.
the horizontal left to right is then a matter of giggling it about and turning the gearbox output so the splines align to slip home.
as I say if it doesn’t work in first 20mins have a break as you’ll be knackered and this just compounds the problems.
Also wire up the clutch cross shaft lever so the bearing doesn’t come off the fork ( that really does ruin your day.)

thanks to john Morrison in the uk for the crane design.

the pic are of my 3a with a re drilled flywheel to accept the later clutch
It’s also a tr6 OD gearbox.

There are other ways of doing this these are just 2 I use
 

Attachments

  • 7C2B25C8-7528-406D-806A-AAC212D39A97.jpeg
    7C2B25C8-7528-406D-806A-AAC212D39A97.jpeg
    169.1 KB · Views: 136
  • 12090DF0-6D98-4C01-ACA9-69187B4E00B4.jpeg
    12090DF0-6D98-4C01-ACA9-69187B4E00B4.jpeg
    178.4 KB · Views: 135
  • EEB6CEFC-1A2C-4E64-BE4B-A1F1580CFB4D.jpeg
    EEB6CEFC-1A2C-4E64-BE4B-A1F1580CFB4D.jpeg
    177.5 KB · Views: 132
  • DEB5EA3C-39B9-412B-A002-CFEFE79F7B0A.jpeg
    DEB5EA3C-39B9-412B-A002-CFEFE79F7B0A.jpeg
    166.9 KB · Views: 136
  • 19919936-CC58-400F-BB24-5B9B3B3B01A7.jpeg
    19919936-CC58-400F-BB24-5B9B3B3B01A7.jpeg
    415 KB · Views: 133
  • C59B5F9F-D51F-4DBB-889A-6ED25D4FB5A6.jpeg
    C59B5F9F-D51F-4DBB-889A-6ED25D4FB5A6.jpeg
    160 KB · Views: 135
  • A418D39B-7D6E-49E7-80DE-E87644B84627.jpeg
    A418D39B-7D6E-49E7-80DE-E87644B84627.jpeg
    150.1 KB · Views: 134
  • 3B840A63-F2F7-42A6-AC7A-DCBCC2A72EDF.jpeg
    3B840A63-F2F7-42A6-AC7A-DCBCC2A72EDF.jpeg
    159.9 KB · Views: 129
  • 5159022A-0E6D-4633-9C62-57CA2DE3B694.jpeg
    5159022A-0E6D-4633-9C62-57CA2DE3B694.jpeg
    192.8 KB · Views: 136
  • C891C790-48E2-4ADC-BFD8-57ADC38F6787.jpeg
    C891C790-48E2-4ADC-BFD8-57ADC38F6787.jpeg
    145.6 KB · Views: 135

GeneW

Freshman Member
Gold
Country flag
Offline
Since I've gotten old (20 years ago) I had to come up with a way to do it alone. Saves a lot of back pains.


220.JPG
223.JPG
 

Graham H

Jedi Warrior
Country flag
Offline
Very clever, why have you got the broomstick in the engine bay? I also note you have the 3 permanent guide studs at the top of the bell housing.

Graham
 
Last edited:

DavidApp

Yoda
Gold
Country flag
Offline
I was going to use my engine hoist but forgot to check the clearance under the car before I started. I found out too late that the hoist wheels would not go under the car frame.

Hamish Racing will that rig can the gearbox be turned to clear the clutch lever?

David
 

GeneW

Freshman Member
Gold
Country flag
Offline
Very clever, why have you got the broomstick in the engine bay? I also note you have the 3 permanent guide studs at the top of the bell housing.

Graham
Graham,

If I was so clever I'd know why the broomstick is in the engine bay!! Whatever the reason I'm sure it was a good one at the time. I have had good luck using the 3 guide studs. Having the transmission hanging in the air makes it quite a bit easier to wiggly it around for mating up to the engine.
 

Hamish Racing

Jedi Warrior
Country flag
Offline
I was going to use my engine hoist but forgot to check the clearance under the car before I started. I found out too late that the hoist wheels would not go under the car frame.

Hamish Racing will that rig can the gearbox be turned to clear the clutch lever?

David
Hi David
Yes the loop on the gearbox “frame” swivels


Very clever, why have you got the broomstick in the engine bay? I also note you have the 3 permanent guide studs at the top of the bell housing.

Graham
That’s not just any broom stick that’s Churchill tool TR009868 (W)
The bonnet removal and refitting stay. :ROFLMAO:;)
 

Attachments

  • 250047BD-E66C-42CF-B736-6689B43EBA22.jpeg
    250047BD-E66C-42CF-B736-6689B43EBA22.jpeg
    133.4 KB · Views: 126

RonC

Freshman Member
Country flag
Offline
Like Hamish I used a custom crane to install a J Type Overdrive transmission in my TR3A. I figured I wouldn't be using much so built one out of a bed frame. Worked great but I would modify to use a bottle jack under boom versus the threaded rod at end. The transmission was slung at balance point and in a manner to allow slight rotation.One extended 3.75" longer top stud was used to allow revolving gearbox counter clockwise to get wired forward clutch lever past floor pan edge to cutout near firewall. I was a bit concerned when I saw the single extended bolt flexing as I was adjusting up/down height so I'd say don't make too long and use good steel deeply threaded into block.
 

Attachments

  • Transmission Crane.jpeg
    Transmission Crane.jpeg
    47.2 KB · Views: 126

sp53

Yoda
Country flag
Offline
Very clever I stored that idea somewhere in my mind, maybe I will remember. A couple of years ago I through out an old bed frame out ---now I would save it thanks Ron.
 
Similar threads
Thread starter Title Forum Replies Date
A TR2/3/3A Stanchion Guide Triumph 9
S Wanted Used Austin-Healy 100/100-6/3000 Restoration Guide By Gary Anderson And Roger Moment Austin Healey Classifieds 14
S Wanted: AH Concours Registry Guide Austin Healey 2
C For Sale Parts, Factory Manual, Restoration Guide for 1959 100-6 Austin Healey Classifieds 4
BigGreen For Sale Anderson / Moment Restoration Guide for sale Austin Healey Classifieds 0
Basil MGB Buyers Guide MG 0
F Restoration Guide Austin Healey 2
Michael Oritt Anderson/Moment Restoration Guide for sale Austin Healey 8
J TR2/3/3A Manganese Bronze Valve Guide Clearance Triumph 14
J Wanted TR3 Windscreen guide plates Triumph Classifieds 7
J For Sale Healey Books: Anderson/Moment Restoration Guide; Robert Bentley; 100-6/3000 Factory Austin Healey Classifieds 7
M Wanted TR3 Hand Crank Guide Triumph Classifieds 3
ckeithjordan Wanted WTB: TR3 Crank Handle Guide Stays Triumph Classifieds 1
Zitch TR4/4A Window Guide Writeup Triumph 2
dougie Silodrome - Big Healey Buyer's Guide Austin Healey 4
Nunyas MGB Hagerty's MGB Buyer's Guide MG 0
D Another Valve Guide Question Austin Healey 1
K TR2/3/3A Windshield stanchions on a TR3b - guide plates?? Triumph 13
T TR2/3/3A Windscreen Stanchion Guide Plates Triumph 7
T TR2/3/3A How many guide holes in TR3 flywheel for crank pin? Triumph 2
Sarastro T-Series MG TD Valve Guide Replacement MG 8
PatGalvin TR2/3/3A Guide for SU Rebuilding Triumph 8
T TR2/3/3A Cyclinder Head work and valve guide issue Triumph 2
JFeher TR2/3/3A Installing valve guide seals on 59 TR3 Triumph 6
TulsaFred Bonnet Install [without guide marks] Spridgets 10
S eBook Version of Anderson/Moment Restoration Guide Available Austin Healey 21
H Austin-Healey 100, 100-6, 3000 Restoration Guide Austin Healey 14
PatGalvin TR5/TR250 TR-250 Buyers Guide Triumph 12
R Moment restoration guide Austin Healey 2
H restoration guide book Austin Healey 10
arizonamike TR4/4A Collector's Originality Guide Triumph TR2 TR3 TR4 Triumph 1
MGTF1250Dave TR2/3/3A TR3 Windscreen Stanchion Guide Plate Triumph 11
BN6_2197 Copy of Austin Healey Restauration Guide Austin Healey 9
S Austin healey Guide to Historic Colors Austin Healey 3
K Bill Piggots Triumph Originallity Guide? Triumph 11
T Ken [aka Poolboy] - water choke guide look right? Triumph 6
memphis Window Glass Guide Austin Healey 1
healeynut Semaphore Rebuilding? Guide Other British Cars 8
TR3TR6 TR2/3/3A TR3 Buyers Guide Triumph 28
AUSMHLY AH restoration guide...worth a lot of money! Austin Healey 26
5 Restoration Guide Austin Healey 4
R valve guide removal and installation Spridgets 5
Kurtis Valve guide seal replacement Spridgets 10
T Guide on installing Richard Good's TA bushes Triumph 4
J Window guide lubricant, or not? Austin Healey 2
MTribe Definitive guide to o-ring / seal lubrication? Triumph 2
RickB Sprite seat recovery - is there a "how to" guide? Spridgets 2
C Seat belt guide MG 0
W Up-date to the "Originality Guide" Spridgets 0
M Wiring Harness Replacement Guide? MG 11

Similar threads

Top