• Hey Guest!
    Yoda says: A FREE resource for the Little British Car community BCF is. Support us with an account upgrade, not many will (less than 1%) "Require" you to pay to play we don't, but if you find BCF helpful, appreciate no pop up ads, and want to ensure we stay online - Supporting us with an "optional" low-cost member upgrade you should. There are some benefits to upgrading!
    **Upgrade Now**
    (PS: Seeing this UGLY banner, you won't)
Tips
Tips

TA Repair Jig Up-date

BobbyD

Jedi Knight
Offline
TA Repair Jig Update

Sorry for the cross post but I can't remember who's where in the forums....... chalk it up to old age! :smile:

OK guys..... for those of you who wanted the TA repair jig, I did one side today with no problems at all. It was a very simple repair using the jig and the results are "spot on". Some of you were worried about there being enough "meat" in the the TAs to take the drilling and tapping and I can say that there's no evidence of anything breaking through. I told Rick to ship the units he has sold, so drop him an email to check on yours. It's well worth the $60 introductory price..........or split it with friends or your local club. Oh yea.... here's where I wrote it all up https://tr6.danielsonfamily.org/TAJig.htm ..... no navigation buttons yet but there's links at the bottom of each page.
 
Re: TA Repair Jig Update

So like a few others, I bought two trailing arms off eBay which have the original unstripped studs still in them. Is the concensus then that this is a better than stock upgrade? I assume that I would still tork to 16lbs? Finally, knowing that a few others have already bought this set-up, please let me know if your willing to share, as I would be happy to share the cost.
 
Re: TA Repair Jig Update

Larry,

I think that Doug in CO is looking for a partner in one of these. Mine is committed already here on the East Coast.

This is my thoughts on this unit. I too have a spare set of trailing arms that the threads are fine in. With the KeenSerts, you (according to their claim) are able to shear a grade 8 bolt off before the insert will yield. That to me would be better than the original aluminum would hold up if put under that stress, so I'll do mine.
 
Re: TA Repair Jig Update

And Bob, thanks for dreaming this up and working with Rick to bring it to the masses.

Great documentation as well. Saves me having to do it on my site. Now I can just pass along your great link.
 
Re: TA Repair Jig Update

Paul.......If I had a hunk of billet aluminum I'd love to see what kind of torque you can put on these. Shear a Grade 8 bolt....Hmmmmm... I think I'll ask Rick to try it :yesnod:

One Note: As currently designed, this only works with KeenSerts.... McMaster.com Part# 92070A250 which requires the "X" drill and 7/16-14 bottoming tap. If you want to use Heli-Coils, Rick needs to make the Drill and Tap insertion jig to the drill and tap specs for Heli-Coils. I think he was working with a Forum member on doing this but check with Rick.

Happy New Year everyone :savewave:
 
Re: TA Repair Jig Update

I am not questioning you, but why does Mcmaster recommend a x drill bit? when I look up the bit size for a 7/16-14 tap it says to use a size U. Any ideas?
 
Re: TA Repair Jig Update

I went on the McMaster site to check on this. Letter "U"=0.368" and letter "X"=0.397. I can only conclude that they want a looser fit on the threads so you can whack the locks in properly. If you look at the style that just has a nylon locking bump on them, the 7/16"-14 external thread uses a letter "U". However, that type is not available in thin wall design, so they are only available in 1/4" internal size when the 7/16"-14 external threads are used.

Edit: I would also recommend the use of two taps. A regular taper tap followed by the bottoming tap. A bottoming tap will work alot harder to tap the hole as there is only one thread doing the cutting. It's just more difficult to keep on course. A taper tap generally uses about three threads to gradually cut the threads...the last few threads should then be finished with the bottoming tap. ALthough it might be a moot point with the size of the hole (Letter "X") that they have you drilling, especially in aluminium! :laugh:
 
Re: TA Repair Jig Update

Bob,

I did order the X drill and the tap to match your specs. I ordered different numbers as I went with the Cobalt Steel for both.

Those guys are fast. I ordered them Sunday evening via web and they were at my door Tuesday morning.

Happy New Year!!
 
Re: TA Repair Jig Update

I went by what the KeenSerts people said figuring they had a reason to specify the "X" drill size rather then "U" which is what a 7/16-14 tap would normally use.

Art.....I can tell you that with Rick's jig, the bottoming tap went in smooth as butter using Tap Magic for aluminum. The insertion jig for the tap keeps it totally on line. He machined these parts to very tight tolerances.

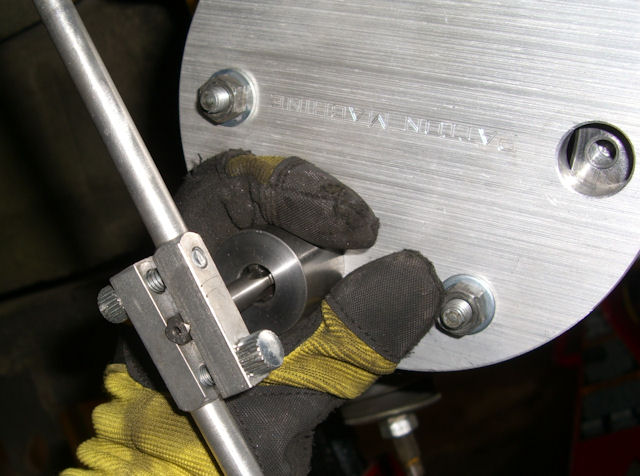
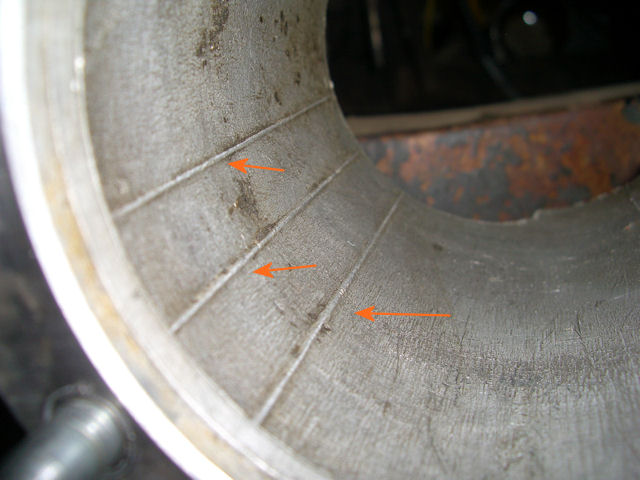
Paul....I did a test fit of the passenger side CVJ and had no interference in the hubs. The driver side is under 1/2" of melted snow from my wife's car. Maybe tomorrow or Friday I'll check that one. I think where you can have a problem is with the ridges in the TA hub. Picture below.

TapBob.jpg


TARidges.jpg
 
Re: TA Repair Jig Update

martx-5 said:
I went on the McMaster site to check on this. Letter "U"=0.368" and letter "X"=0.397. I can only conclude that they want a looser fit on the threads so you can whack the locks in properly. If you look at the style that just has a nylon locking bump on them, the 7/16"-14 external thread uses a letter "U". However, that type is not available in thin wall design, so they are only available in 1/4" internal size when the 7/16"-14 external threads are used.

Edit: I would also recommend the use of two taps. A regular taper tap followed by the bottoming tap. A bottoming tap will work alot harder to tap the hole as there is only one thread doing the cutting. It's just more difficult to keep on course. A taper tap generally uses about three threads to gradually cut the threads...the last few threads should then be finished with the bottoming tap. ALthough it might be a moot point with the size of the hole (Letter "X") that they have you drilling, especially in aluminium! :laugh:

The Recoil (other brand of coil inserts similar to HeliCoils) kit comes with a regular tap, no bottoming tap. I think the reasoning for this is you want somewhat of a tapered fit for the coil, which is indeed a stainless steel spring, unlike the solid Keen Sert. When I installed the 2 HeliCoils in my TA years ago, I "cemented" them with red Loctite. Not sure if this is really recommended.
 
Re: TA Repair Jig Update

I see that with that jig, the bottoming tap should work out fine in the aluminium, especially with the wider clearance hole. BTW, that Tap Magic for Aluminium is really good stuff. I use it at work all the time.

Looks like a real nice tool.
 
Re: TA Repair Jig Update

<div class="ubbcode-block"><div class="ubbcode-header">Quote:]The driver side is under 1/2" of melted snow from my wife's car.[/QUOTE]

What is THAT THING doing in your workshop????

Where did you guys get this Tap Magic stuff? Looks like I better check MSC.
 
Re: TA Repair Jig Update

Workshop?.....Hmmmm.. :nonod: in her eyes, it's called a garage and the only condition when I got the TR6 was that her car would always be garaged and my car was destined to remain outside. However, her car is way better in the snow then mine so here's what I have to deal with and this is after I've swept the water out once. Between the melting off of the car and the snowblower, it's a losing battle.
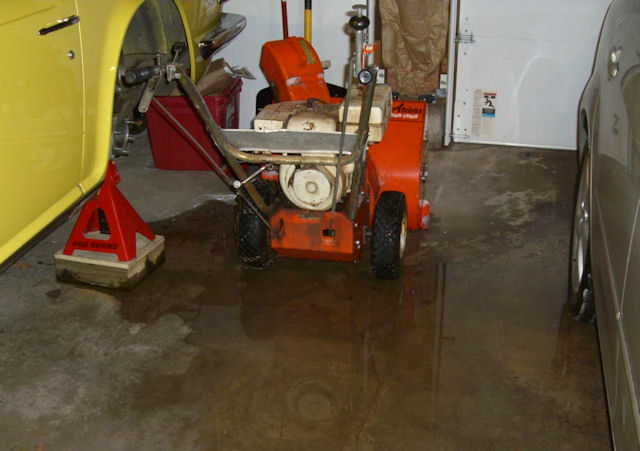
I got the Tap Magic from McMaster....and yes Paul, they are scary fast with their shipping. I envision a swarm of robots tied into their ordering system picking the parts as you type them into the order form. One time I put in an order at 1:30 and at 3:00 I had the tracking number! But any tap oil will do as long as they say it's for aluminum.

SnowMelt.jpg
 
Re: TA Repair Jig Update

Red Loctite is an excellent addition to any insert for "holding" the insert in the installed metal. You Done Good!
 
Re: TA Repair Jig Update

McMaster have a warehouse not too far from me, and I go whenever I can justify the trip. I really like the rather long wait at the will call desk, which is in a corner of an unbelievably large room, with racks all the way to the ceiling (50 feet or more) feeding all sorts of conveyor belts - it really is an amazing place. I have ordered online and gone straight to the car to drive there - arriving maybe half an hour after the order is placed, and the box is usually buried under lots more orders by the time I arrive!
 
Re: TA Repair Jig Update

Ron,

Would you still suggest the Red Loctite for these KeenSerts with the understanding that they can be removed if needed by removing the locks and turning them out? I'm undecided on whether to add that step or not.
 
Similar threads
Thread starter Title Forum Replies Date
Got_All_4 Wedge TR7 Speedo Problems Need a Repair Place Triumph 4
K TR2/3/3A Update on the head gasket repair......something is not right/ Triumph 8
B TR6 Thrust face repair Triumph 1
Hangtown Healey Cibie Z Beam Headlight Repair Austin Healey 0
C TR2/3/3A Frame repair and value Triumph 2
K TR2/3/3A head gasket repair wire Randall Triumph 1
B Windscreen Motor Repair Restoration & Tools 6
O Jaguar rear window trim repair Jaguar 1
G Smith's temp gauge repair Restoration & Tools 4
O TR2/3/3A Good Repair Shop In New Hamphire Triumph 2
Celtic 77 MGB B-pillar repair kit for convertible top MG 1
H TR4/4A Fender/Wing repair how to do Triumph 5
H TR4/4A Advise asked for front repair Triumph 1
Bayless How to repair broken vent window studs? Spridgets 1
AngliaGT MGB-GT Gauge Repair Recommendations? MG 4
O XKE series 2 thermo fan switch bung stud repair. Jaguar 9
D TR2/3/3A TR3 repair in Cincinnati Triumph 0
S TR2/3/3A Frame repair. Triumph 47
BritBite Transmission Repair Austin Healey 8
volunteer Wanted: Brake Master Cyl. Repair Kit for Daimler DS420 Other British Cars 18
M Capillary Tube repair Spridgets 4
D General TR Frame repair - recommendations for NJ area Triumph 3
S TR2/3/3A wire repair Triumph 7
SteveTheBrewer Spitfire More rust repair Triumph 1
M BJ8 Inner Body Panel Repair Austin Healey 2
Editor_Reid Leather Seat Repair Austin Healey 5
AngliaGT At a Local Repair Shop Spotted 1
humanoid For Sale - Haynes Trimumph TR7 (1975-1981) Automotive Repair Manual Triumph Classifieds 0
M TR2/3/3A Speedy Sleeve Repair Sleeves for Rear Axle Pinion and Half Shafts Triumph 1
J Steering Wheel Repair Austin Healey 32
F TR2/3/3A starting scuttle repair Triumph 27
L TR6 Rear Brakes Shoe Repair and Install Triumph 2
F TR2/3/3A Dash repair Triumph 7
D Steering Wheel Repair Austin Healey 2
Michael Oritt Trafficator repair and refinish recommendations Austin Healey 6
71TR6 TR2/3/3A Right Front Suspension Damage Repair? Triumph 50
T Speedometer Repair Problem Austin Healey 5
J TR2/3/3A TR3A gas tank repair Triumph 7
Upland Tonneau cover repair Spridgets 2
F TR2/3/3A Rear sheetmetal repair Triumph 73
Patrick67BJ8 HD8 Carb Repair Austin Healey 15
R Issue with odometer after repair Austin Healey 1
T TR2/3/3A Seeking advice on how to repair TR3 steering wheel broken spoke. Triumph 8
A Recommendations for body repair near NYC Restoration & Tools 2
R Windshield Washer Pump Repair Austin Healey 9
A Door hinge repair Austin Healey 2
R Wanted Rear-ended repair items Triumph Classifieds 3
Alfred E. Neuman For Sale Lot of TR4 repair books Triumph Classifieds 0
sparkydave Wiper switch repair Spridgets 5
R GT6 Looking to purchase GT6 Rust repair question? Triumph 4

Similar threads

Back
Top