• The Roadster Factory Recovery Fund - Friends, as you may have heard, The Roadster Factory, a respected British Car Parts business in PA, suffered a total loss in a fire on Christmas Day. Read about it, discuss or ask questions >> HERE. The Triumph Register of America is sponsoring a fund raiser to help TRF get back on their feet. If you can help, vist >> their GoFundMe page.
  • Hey there Guest!
    If you enjoy BCF and find our forum a useful resource, if you appreciate not having ads pop up all over the place and you want to ensure we can stay online - Please consider supporting with an "optional" low-cost annual subscription.
    **Upgrade Now**
    (PS: Subscribers don't see this UGLY banner)
Tips
Tips

TR2/3/3A Question on order of welding

Rubicon

Senior Member
Country flag
Offline
So I may be getting in over my head now, now I'm starting to have some second thoughts, but I'm too stupid to think other wise. So I've ordered some floor panels in, should be here by Monday, so I started to look at the floor and what I'll need to do to remove it...... So I stuck my hands in and pulled, at all came up except for a couple of spots, so I cut around them with tin snips, so now the floor is up, for good or bad.
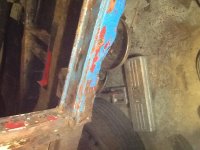
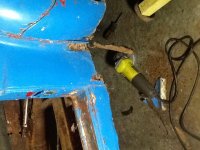
So I started to drill out the spot welds in the door opening, have most of them off now just a couple at the back edge I'm fighting with, but they will be off soon I hope, and I was looking around for some easy welding to do when I noticed that the front body mount is cracked and almost rusted thru, and the little bit I can see of the rear one it's looking the same. The "A" post is good except for the last couple of inches at the floor level, the fire wall where it angles down to the floor is the same, last couple of inches seem to be rotten. The rocker panel is rotten and pulling away from the inner sill at the bitter edge of it's so I'll be ordering a set if those as well, or patching them if I can. The inner sill looks good, just surface rust or so it seems won't know until I start cleaning up getting ready for paint and welding.
So now where do I begin in the welding?
Do I get the rest of the floor up ( drivers side) and repair the body mounts first? Or do I install the floor and then do the body mounts? Or is now a brace the living crap out of it and lift it off the frame, and then start where?
So far I've only started on one side ( driver), the passenger side is still rotten metal.
Thanks
 

CJD

Yoda
Country flag
Offline
The front body mounts are actually up under the front of the fenders. I think you are talking about the forward and rear mounts under the floor?? Those are connected to the inner sill? Your inner sill may be good, but from what you are describing, I would bet it is not. It rusts the most on the outside, and you will be able to tell once the outer sills come off.

You have a couple of options.

1). Brace everything and work from the inner sills up, replacing what you need to. This option allows you to rotate the body to gain better access to what you are welding...but, it has the most chance for miss-aligning parts if you are not careful.

2). Work with the body on the frame, using the frame to hold everything in alignment. You will end up having to tack most parts until you have everything in place, and then you can lift the finished, tacked body to finish weld.

In any event, only remove the minimum you have to at one time. Work on one side at a time. If you remove too much at once, the job will quickly get out of hand with alignment referencing.
 
OP
R

Rubicon

Senior Member
Country flag
Offline
Thanks CJD
Yes it is the ones one the sills, for sure the forward one is cracked, and the rear ones looks cracked as well but there is still some floor on it. The weight of the body is still on the sill bracket and holding the car up. I guess I'll be offering the door up to see how it fits!
The sill, I can't pound my pointed body hammer thru it, so at the moment I'm thinking they are good. The previous owners had a wood floor over the rotten floor, and then more metal pop riveted to the rotten floor, the original floor is like Swiss cheese.
I'm hoping the sills are still good! I'll get the rocker off Monday or Tuesday, and see what kinda shape the sill is in at that time I guess. I'm trying not to get too much off the car before I start reassemble. I'm thinking if I have to do major sill repair I'll be bracing the door jamb up and cross bracing it as well.
I don't plan on taking the body off the frame just yet, as this sounds like the easier of the two.
Thanks
 
OP
R

Rubicon

Senior Member
Country flag
Offline
Forgot to ask as well when I'm welding in the panels, I was thinking of weld thru primer, but keep hearing issues with it and I have to remove when painting, so I was thinking if BBQ paint and remove the paint where I need to have the weld, would this be a better option? Or is there something else that I should be looking at/thinking?
Looking at doing this to stop the dreaded tin worm, and it's infected this Triumph bad so any help in stoping in would be best!
 

CJD

Yoda
Country flag
Offline
The weld through primer works well, but it is trickier to strike an arc and it spatters more. More of an annoyance than a problem. The high temp paint would likely work, but it will take time removing it to weld. Personally, I think I'd prefer using the weld through, just for convenience. Either paint will infinitely improve the corrosion prevention compared to the original...nothing at all!
 
OP
R

Rubicon

Senior Member
Country flag
Offline
Thank you for the help, I'm figuring out what to start first, so I guess it's gonna be sill mounts and then into the floor if the sill is good, otherwise, I guess it's gonna be the floor and then sill. This way I can work around everything on the frame and not be messing up the alignment too much.
And BBQ paint here I come as I have left overs from doing some motorcycle parts
 

malbaby

Jedi Warrior
Country flag
Offline
I would remove the body from the chassis after first fitting substantial braces, then do the steel replacement one bit at a time as suggested by CJD.
Also, recommend replacing the inner sills with heavier gauge sheet metal than what the factory fitted. Go to your local sheet metal guy and have him fold some cut sheet for you.
Its a major job replacing all those panels as you have outlined, do it all correctly by removing the body.
 

CJD

Yoda
Country flag
Offline
Next week I will be starting my tub restoration. I'll have pics as I go...showing a real POS as a starting point!
 
OP
R

Rubicon

Senior Member
Country flag
Offline
I like pictures, this car of mine is as far gone as I think I'd would restore. Next time, I'll hunt for a better example. But I don't plan on doing another one anytime soon!
Once I get more time to play on the sills/floor I'll see what I'm up against, I'm gonna be pulling the outer rocker and seeing what's under there before I weld in the floor. If I need to bend up metal, I'll take in the sample with me to work and use the brake their. If I can bend one up, I'll be doing that instead of paying. I'm trying to do this on the cheep so to speak!
the body will be coming off the frame as soon as I'm ready to get it lifted off without doing more damage to it.
 
OP
R

Rubicon

Senior Member
Country flag
Offline
I'll try and get some pics up of what I'm dealing with just cause people like pictures. That will be Sunday or Monday.
Cheers
 

sp53

Yoda
Country flag
Offline
The inner sill is made open on the back end and uses the rear wheel arc to seal to the inner sill. Take a look at your rear wheel arc/inner fender, and see if you can peak into the inner sill from the back with a flashlight; that is if the rear inner fender is rotted at the bottom and they usually are. Plus when you replace the outer sill you will see a lot more.
My new floor pans came too long and had to be trimmed. If that is the case with yours, be careful what end you cut from because the floor frame mounting holes need to lineup. If you trim on the wrong end too much the holes will move front or back and miss the lineup. I would leave the tub on the frame when welding the floors; the frame will provide support, and the welding is from the top down.
If you find out that you will need inner sills after you remove the outer sills then you will need to lift the tub up to get the inner sill off. I would only do one side at a time for referencing back and forth regardless if you need to replace the inner sills or not. Moreover, if you do need inner sills then the frame becomes your guide for the 3 hole alignment of the floor, inner sill, and frame. I would put a lot of effort in saving the inner sills because once you have cut them away the door opening needs to reestablished on the new inner sill as well as the front and back clips of the tub.I started my welding on the floor at the door opening. It was an easy place to start and the new floor had a long straight run on that side.
 

M_Pied_Lourd

Darth Vader
Country flag
Offline
A couple of pics to illustrate the above :smile:

P1070269.jpg


P1070272.jpg


Cheers
Tush
 

sp53

Yoda
Country flag
Offline
I cannot see much of Tush’s inner sill, but from what I can see, I would use them. I have fixed/repaired ones like that before by taking a paint sponge dealie and attach that to like broom handle and paint the inside of the inner sill after I cleaned it out the best I could. I did that 20 years ago to tr3 and I am still driving it. Some of those rust encapsulating paints will outlive me I am afraid, but Jesus like’s tr3s so I am not worried.

On this last project, I replaced the inner sills ect… and the last picture is where I am now learning to do body wooork. The saw horses I made are long and tall enough to roll out the frame after everything was fitted. I am cramped for heated space and want to do the body work in a controlled environment, but I did primmer the tub pieces and frame outside. The frame in the pictures is an extra one that is rotted out in many places. Fortunately, I was able to save one from the west coast back in the seventies, and I will use it.
 
OP
R

Rubicon

Senior Member
Country flag
Offline
So as promised here are some pics of what I'm dealing with
the starting point on the floors once all the extra metal/plywood was removed.
image.jpg
Floor removed and rust on the fire wall
image.jpg
Here is the rusted/cracked body mount the rear one looks just as bad.
image.jpg
The outer sill is gonna come off today and see what the inner sill looks like after all.
 

Attachments

  • image.jpg
    image.jpg
    68.4 KB · Views: 82
  • image.jpg
    image.jpg
    83.2 KB · Views: 84
  • image.jpg
    image.jpg
    72.7 KB · Views: 84

CJD

Yoda
Country flag
Offline
Rub...that looks about par for our old TR3's. The years are not kind to them. Look forward to seeing your inner sills.

Steve, I get goose bumps seeing brand new sills! I grow weary dealing with nothing but rust pitted metal. It looks like you got the outer sills sorted out very well.
 
OP
R

Rubicon

Senior Member
Country flag
Offline
So the early repair to the outer sill was ???? So I wound up cutting them off below the top, not the best but at least I get to see what's under them today
.image.jpg
Drilled the spots out and removed the rusty lip.
then this is the rear section right in front of the rear wheel..... All gone by the looks of it, all the way to the body mount.image.jpg
A bit more rust...
..image.jpg
The rear section of the floor was rotten as well, so that's being cut away even as we speak, hope to have that section back in today
!image.jpg
Now time to decide if I should repair the sills or buy new, I'm leaning towards repair as I don't have funds to replace them, getting married this summer, that's gonna take some of play money. Plus no one will ever see the inner sills again. I just want a nice driver that about it, but I don't want to have issues down the road either. Decisions decisions....
 

CJD

Yoda
Country flag
Offline
The inner sill supports the body, and keeps everything surrounding the doors in alignment. Can't say from the pics what to do...but definitely make sure the sills are stable, or you will have issues later.
 

sp53

Yoda
Country flag
Offline
Thanks for noticing John. I did both sides at together and it had its pros and cons, but for sure I am happy to be out of the rust. Now I need to learn some body working skills, so post how you apply putty and paint for the beginner after you get out of the rust which by watching you should be soon.
 
OP
R

Rubicon

Senior Member
Country flag
Offline
Sp53, that's looking gorgeous, I just hope that mine will look that good one day! What made you decide to do both sides at once? Is it all new metal as well? Very nice work so far.
 
Similar threads
Thread starter Title Forum Replies Date
D Tri carb: order of installation question. Austin Healey 5
K Overdrive Screen Replacement Order Question Austin Healey 4
T Yet one more bushing question - which to order Spridgets 4
JPSmit Assembly Order Question #1 - Radiator Spridgets 1
DonC1948 TR6 A "CLASSIC" question. Triumph 6
71TR6 TR2/3/3A A TR3A wiring question Triumph 17
K TR2/3/3A Cylinder Head Bolt question.... Triumph 3
scottkilpatrick TR4/4A TR4 Rear Brake Drum Removal - Basic Question Triumph 16
scottkilpatrick TR4/4A Gear oil and choke question Triumph 4
B TR2/3/3A TR3A Gearbox fluid capacity question Triumph 7
D TR2/3/3A TR2 Flying Mile question Triumph 11
M New Member with an HD8 Carb Question Austin Healey 1
K TR2/3/3A Brand new brake caliper question... Triumph 8
Gliderman8 TR6 New shocks (damper) question Triumph 4
D TR2/3/3A Windshield assembly question Triumph 6
R TR6 question re: Engine Oil Triumph 3
glemon TR5/TR250 Answering My Own Question Rear Tube Shock Conversion Numbers TR4a-TR6 Triumph 0
T MGB Quick question about something that don't really matter just want to know. MG 9
CARSINC Throttle linkage question Spridgets 1
S TR6 Steering question you will not hear every day Triumph 1
K TR2/3/3A Further question re TR3 red ignition light. Triumph 1
Got_All_4 TR6 Triumph TR6 PDWA Brake Question Triumph 1
JPSmit Hypothetical Question of sorts - wheel bolts Restoration & Tools 12
E TR6 TR6 flip-up bonnet question Triumph 4
D TR2/3/3A headlight question Triumph 8
D A distributer question on the 1275 engine. Spridgets 7
P TR2/3/3A TR2 Headlight Trim Question: Triumph 8
SherpaPilot TR6 Ignition Switch Question Triumph 13
SherpaPilot TR6 Engine Mounting Question Triumph 3
5 TR2/3/3A TR3 fender patch panel question Triumph 10
WHT Oil Sump Question For Dougie Austin Healey 0
LD-Ordie Series II gear lube question Rover / Land Rover 3
T TR2/3/3A TR3A Windshield Question Triumph 4
K Usual 1275 rear main oil leak question Spridgets 0
Celtic 77 MGB factory hardtop question... MG 10
D Cam Timing question. Spridgets 11
jfarris TR2/3/3A Exhaust Hanger Question Triumph 4
T TR2/3/3A TR3A Disk Brake Question Triumph 10
JPSmit Distributor question Spridgets 0
Bayless Door seal question Spridgets 3
M T-Series TD/TF Steering Free Play Question MG 6
sail TR4/4A Piston Ring Question Triumph 6
B TR4/4A Basic Wiring Question Triumph 35
KLUTZ Wedge FASD wire question Triumph 1
T TR2/3/3A Brake system question - Triumph 4
drooartz MGB OD question - need to warm up? MG 8
J TR4/4A Sellers Reconcilliation Question Triumph 7
drooartz MGB Question on timing and vacuum MG 11
K TR2/3/3A British Wiring alternator conversion kit question. Triumph 3
T TR2/3/3A TR3 Fuse Question Triumph 14

Similar threads

Top