• The Roadster Factory Recovery Fund - Friends, as you may have heard, The Roadster Factory, a respected British Car Parts business in PA, suffered a total loss in a fire on Christmas Day. Read about it, discuss or ask questions >> HERE. The Triumph Register of America is sponsoring a fund raiser to help TRF get back on their feet. If you can help, vist >> their GoFundMe page.
  • Hey there Guest!
    If you enjoy BCF and find our forum a useful resource, if you appreciate not having ads pop up all over the place and you want to ensure we can stay online - Please consider supporting with an "optional" low-cost annual subscription.
    **Upgrade Now**
    (PS: Subscribers don't see this UGLY banner)
Tips
Tips

MKII BT7 Build Thread

NJHealy3000

Senior Member
Offline
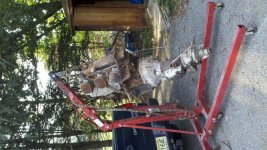
I started restoring my late fathers MKII BT7 that he purchased in the 70's from a friend. He never had this car running as shortly after he purchased it my mother gave birth to twins (me and my brother) so he parked the healey in the yard and it sat there until this past april.

I have a decent amount of body, welding and basic car mechanic experience, I've assisted in a couple of show car restorations but mostly body work. I'm fortunate enough to have a body shop at my best friends house, to own a powder coating setup and have friends that are top painters, metal platers and engine/performance guys.

I've never worked on a brtish car and haven't had too much experience with the more in depth mechanical stuff. I am going to post my progress and would love all your advice and opinions. I will most likely be looking to sell this car when I am through as I have several other projects I'd like to tackle.

Im located in Northern NJ if anyone is local and cares to come check out the restoration or assist.
 
OP
N

NJHealy3000

Senior Member
Offline
Here are some pics of the car, she has been sitting in this spot since 1987. THe 10yrs prior to that she was in a garage. Firts view after the tarps came off.

ahstart1.jpgahstart2.jpgahengine start.jpg
 
OP
N

NJHealy3000

Senior Member
Offline
Started the tear down process (why is everything held on with rivets, screws and bolts you can't reach!!)

AHengine1.jpgAHstrip1.jpg
 
Last edited by a moderator:
OP
N

NJHealy3000

Senior Member
Offline
After some work I got the panels remove and the engine/trans pulled (I don't recommend doing this by yourself)

ahafterengine.jpgahenginehoist.jpg
 

Attachments

  • ahenginehoist.jpg
    ahenginehoist.jpg
    104.1 KB · Views: 122
OP
N

NJHealy3000

Senior Member
Offline
Once the chasis was stripped I put it up on the Rotisserie to get the final pieces removed... the winter set in too quickly so I still have the rear leafs attached, come spring I will remove those, sandblast the chasis and start on the frame repairs... the bottom rails are overly rusted because the car was parked on the lawn and sunk so it was resting on the frame. I dont mind replacing the bottoms because it enables me to be able to sand balst and coat the internal frame. Also the floors and trunk floor will be completely replaced and the entire chasis either powder coated or painted with LIC40.

AHrotiss.jpg
 
Last edited:

Healey_Z

Jedi Warrior
Offline
Excellent build NJ. I love your "can do" attitude and keep us updated on how you are doing to stay under your $20k restoration projection.
 
OP
N

NJHealy3000

Senior Member
Offline
Body Work began this summer. The rust and body filler from the 70's was abundant. I media blasted every part down to the bare steel. All rust was cut out and new steel was welded in. All dents and high areas were hammered as I wanted to use minimal filler.

Patch Panels for the front fenders, rear dog legs and trunk were purchased form Victoria British and Moss. 20 gauge Aluminized Steel was used for the small patches on the doors.

ahdoorweld.jpg ahtrunkrust2.jpg

ahfrontfenderrust.jpg
ahdogleg.jpgahfrontfenderrust2.jpg
 
OP
N

NJHealy3000

Senior Member
Offline
The shrouds had a ton of filler, after media blast these were like golf balls, all dimpled ... i had to spend about 20hours hammering these. USC all metal was used on the couple small holes and splits. and several very thin coats of light weight filler were used to get everythign flush.

ahshrouds.jpg
 
OP
N

NJHealy3000

Senior Member
Offline
Body parts stage one complete. To recap, parts were media blasted, all rust was cut out and new steel welded in. Minimal filler was used. Filler was first blocked with 80 grit and finally 220. Parts were primed and inside of the fenders and doors were coated with rust encapsulator and then extreme chasis black.

Next step is off to the body shop to add a guide coat, use some USC Icing Glaze to fill any remaining low spots and then to spray a high build 2k primer. After the high build dries and shrinks for a couple weeks block sanding will begin with 400 grit and then 800. After that the parts will be sent to a top painter to finish the show quality paint.

View attachment 24851
 
Last edited:
Country flag
Offline
Looks to me like you have a good handle on this.

Note the front wing (fender) spears were installed backwards (the tapered end should be towards the front).
 
OP
N

NJHealy3000

Senior Member
Offline
Looks to me like you have a good handle on this.

Note the front wing (fender) spears were installed backwards (the tapered end should be towards the front).

There was also 2 extra hole sunderneath both making 5 total, is that normal or is that due to the incorrect mounting? Either way I welded the extra 2 shut.
 
OP
N

NJHealy3000

Senior Member
Offline
Lately I have been cleaning up every piece I can on the bench grinder and then powder coating, here is an example or one of the firewall plates. You have rusty original, after it was stripped and then the final powder coated piece.

ahplaterust.jpgahplatestrip.jpgahplatepc.jpg
 
OP
N

NJHealy3000

Senior Member
Offline
Here is the engine mount I did yesterday, rusty, then stripped and the 2 solid steel pieces were powder coated and the pieces with the rubber were stripped and then painted with extreme chasis black.
ahmountrust.jpgahmountstrip.jpgahmountpc.jpg
 
Last edited:
OP
N

NJHealy3000

Senior Member
Offline
Sent the front springs, sway bar, gas filler tube, front lower spring plates, engine heat shield and valve cover to the plater, getting a clear/blue zinc plating on them and then when they come back I will powder coat or paint them to double the protection (These parts will survive longer then all of us will)

Also started pulling some of the external engine parts off to clean them up, value cover nuts/cap and T-tube are all polished up and ready for powder coat or Green paint.

Valves, springs, and rockers all look really good, plus all the oil that i've drained looks very nice, doesn't appear to have any water in it.

ahenginehead.jpg
 
OP
N

NJHealy3000

Senior Member
Offline
Took the rear end completely apart, everything looks great but will prob change the bearings while everything is apart, Had to cut off one of the large nuts that holds the bearing/hub on but that was the only headache.

Started taking the front apart... got one stripped down to the king pin/trunion setup but can only get 3 of the 4 bolts that hold the dust plate on and all the heat and kroilin the world hasn't help get the 4th off.

The other one i could remove the dust cover in the hub to save my life, so i started to cut it out which has been ridiculous.

Also I can't get the lower arms seperated from the king pin or the trunion off... any advice??
 

BigGreen

Jedi Warrior
Silver
Country flag
Offline
I love to see your project
Please continue posting the results

Hans
 

British_Recovery

Jedi Warrior
Bronze
Country flag
Offline
The rear hub nuts are directional (sided left and right). Check to see if they are marked and reassemble correctly. Also a factory shop manual and parts book is invaluable in tearing down the king pin/trunnion assemblies, as there are locking pegs that must be loosened, but not removed. Get them if you don't have them. Good luck, Bob
 
Similar threads
Thread starter Title Forum Replies Date
A Healey 3000 MKII BT7 restomod Build Thread Austin Healey 67
R 3-point seat belts on late production BT7 MKII Austin Healey 7
N I need help: What are good Upgrades for my MKII BT7 Austin Healey 13
J 1962 3000 MKII BT7 Water pump replacement Austin Healey 3
A A.H. MKII BT7 Coil Spring Free Length Austin Healey 5
George Zeck SOLD!! 1964 AH Sprite MKII Spridgets Classified 0
L For Sale 1952 MG TD MkII MG Classifieds 2
Alfred E. Neuman Red MGA MkII Spotted 1
T Securing the Tonneau on a 3000 MkII Austin Healey 4
David Townsend MKII Sprite Illustrations Spridgets 7
T Parts Sources for '62 MKII Saloon? Jaguar 12
AngliaGT Selling Off All My MKII Cortina Parts Other British Cars 2
NutmegCT Daimler V8/250 or Jaguar MkI/MkII wanted. Other British Cars 0
NutmegCT Daimler V8/250 or Jaguar MkI/MkII wanted. TVR 0
NutmegCT Off Topic Daimler V8/250 or Jaguar MkI/MkII wanted. Triumph 1
NutmegCT Daimler V8/250 or Jaguar MkI/MkII wanted. Sunbeam (Rootes) 1
NutmegCT Daimlere V8/250 or Jaguar MkI/MkII wanted. Spridgets 7
NutmegCT Daimler V8/250 or Jaguar MkI/MkII wanted. Rover / Land Rover 0
NutmegCT Daimler V8/250 or Jaguar MkI/MkII wanted. British Motor Corp 0
NutmegCT Off Topic Daimler V8/250 or Jaguar MkI/MkII wanted. MG 17
NutmegCT Daimler V8/250 or Jaguar MkI/MkII wanted. Lotus 2
NutmegCT Daimler V8/250 or Jaguar MkI/MkII wanted. Jaguar 6
NutmegCT Daimler V8/250 or Jaguar MkI/MkII wanted Austin Healey 0
D Spitfire '65 Spitfire MKII tranny pblm Triumph 1
J WTB: NOS bugeye horn button, and MkII Sprite Hood Emblem Spridgets 1
NutmegCT MGA Motor Trend 1961 Review of MGA 1600 MkII MG 8
stuntflyr What is the length of the bare 3000 MkII frame? Austin Healey 5
D Spitfire '65 Spitfire MKII w/bad vibes Triumph 4
AH67 exhaust & Battery kill switch- mkii bn7 Austin Healey 13
K Converting a MkII with a V8 back to stock Jag 6? Jaguar 3
R 1963 Sprite MKII 1000 info needed Spridgets 2
M Smooth case gearbox in early MKII Sprite? Spridgets 23
D Spitfire MKII Spitfire brake light pblms Triumph 3
D Spitfire MKII cam in a MKII '65 Spit - pros and cons Triumph 2
AH67 62 MKII Tri Carb, done with some pictures Austin Healey 9
C Car of the Week [Mini Cooper S MkII] Racing 2
M New radiator for MKII Sprite Spridgets 11
M Trunk buffers for MKII Spridgets 22
M 3000 MKII racer Exhaust exit in rear fender Austin Healey 1
R mkII sprite floor reinforcement Spridgets 3
B Shouldn't the fuel pump on a 3000 MKII shut off... Austin Healey 3
G New Member + 3000 MKII project Austin Healey 16
S Aussie MkII Racer for sale Jaguar 2
S MkII Jag racer for sale in Australia Racing 5
R Best place for MKII parts? Austin Healey 12
E New Member/3000 MKII owner Austin Healey 2
M 1964 3000 MkII Austin Healey 11
B Seat Belts in a MKII? Spridgets 4
J MKII Fan Blade Color Austin Healey 6
J Windshield Washer Reservoir - MKII Austin Healey 6

Similar threads

Top