Hey Guest!

 Hey - did you know if you click on the title of a thread it will take you to the first unread post since you last visited that thread?
 but were afraid to ask:
  STOP!! Never post your email address in open forums. Bots can "harvest" your email! If you must share your email use a Private Message or use the
  smilie in place of the real @
 Pretty Please - add it to our Events forum(s) and add to the calendar! >>
SideShifter Tri-Carb
Senior Member
Offline
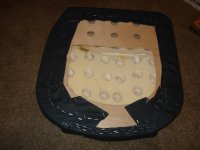
Just realized that the jute backing supplied by Heritage Upholstery and Trim does not correlate to Gary Anderson & Roger Moment's restoration guide. The guide indicated that the black side is suppose to be facing down (against the tunnel), and the brown side is glued to the back of the carpeting. This wouldn't have been a problem had they not cut the openings for the gear selector - which matters on a sideshift car. Turning it over, moves the opening to the right side.
I contacted Heritage to get their feedback and spoke with a guy named Bart. He indicated that their "expert" on Healey's had 20 years experience working on them and that Roger's book was incorrect and that it wasn't unusual to be incorrect. I also saw Rich's carpet installation guide and Rich was in agreement with Gary and Roger. It's laughable that someone in this field claims 20 (recent) years as their reason for their knowledge. I know Rich is no longer with us, but I put his history up against anyone at Heritage. Rich spoke highly about Heritage back in the day, which was why I used them.
Curious of others' thoughts on this - what's correct, and why does the exposed side color matter?
I know most here aren't as anal, but I spent a lot on this kit to be correct (which it is according to Bart). I guess I will install it as it was cut, but I would have thought Heritage would put more stock in the original restorer's notes. It will be one of those things that will bug me whenever I pull the carpet back to check the oil.