• Hey there Guest!
    If you enjoy BCF and find our forum a useful resource, if you appreciate not having ads pop up all over the place and you want to ensure we can stay online - Please consider supporting with an "optional" low-cost annual subscription.
    **Upgrade Now**
    (PS: Subscribers don't see this UGLY banner)
Tips
Tips

TR2/3/3A Headlight bucket color

Frank Canale

Jedi Warrior
Silver
Country flag
Offline
I am working on the headlight assembly and have the headlight buckets repaired and am ready to repaint them. I believe they were originally black. Can anybody confirm this and should it be gloss or satin? Frank
 

charleyf

Luke Skywalker
Country flag
Online
I am working on the headlight assembly and have the headlight buckets repaired and am ready to repaint them. I believe they were originally black. Can anybody confirm this and should it be gloss or satin? Frank
The buckets that I have seen have all been black.
I checked with the TRA Judging Standards and could not find any reference to the headlight buckets. Somewhere in those standards I recall reading that the black used was equivalent to semi-gloss unless matte black was specified.
I am unaware of the difference between semi-gloss and satin. But I have always gone with the semi-gloss.
Charley
 

mctriumph

Jedi Warrior
Silver
Country flag
Offline
Gloss black, no primer, to ensure premature peeling (the factory just did not ever dream of our hobby).
Mad dog
 

sp53

Yoda
Country flag
Offline
Gloss Black; to me the old original paint felt like lacquer or something. Not thick like most paints just a bight black coat of film that was thin and rust would come through the black probably because of no primmer like MD suggested.
Steve
 
OP
F

Frank Canale

Jedi Warrior
Silver
Country flag
Offline
The PO had drilled an extra hole in one headlight bucket and a huge slot in the other so I decided to do the repairs to keep original headlight buckets. Another case of $150 labor to save spending $60 on new parts. The headlight buckets seem like they have been rattle can sprayed with bar-b-q black but when you wipe that paint off you can see that it looks like gross black. The headlight buckets are glass bead blasted now. I was thinking about getting them powder coated gloss black but I may wait till it warms up in the spring and just paint them myself. Thank you for the input Frank
headlight bucket with hole.jpg
 

Attachments

  • headlight bucket with repair plug.jpg
    headlight bucket with repair plug.jpg
    1.1 MB · Views: 36
  • headlight bucket plug tacked.jpg
    headlight bucket plug tacked.jpg
    1.1 MB · Views: 34
  • headlight bucket repair finished.jpg
    headlight bucket repair finished.jpg
    1.2 MB · Views: 31
  • headlight bucket with slot.jpg
    headlight bucket with slot.jpg
    816.4 KB · Views: 31
  • headlight slot repair plug.jpg
    headlight slot repair plug.jpg
    1.1 MB · Views: 31
  • headlight bucket slot repair finished..jpg
    headlight bucket slot repair finished..jpg
    1.1 MB · Views: 33

mctriumph

Jedi Warrior
Silver
Country flag
Offline
The OE paint was straight synthetic enamel from WW2, No primer was used (GOK) why, costs I suppose.
Dont overthink this detail ,self etch primer, rattle can it gloss black. As you are doing this, the horns have
the same issue.
Mad dog
 
OP
F

Frank Canale

Jedi Warrior
Silver
Country flag
Offline
Thank you Mad Dog, excellent advice ! since you brought it up I am looking for a set of horns to repair as my car had no horns. If anybody has a set of non working original horns I am interested. I love finding and fixing the original stuff bringing it back to original or better than original. This is how I expand my knowledge tool box . Frank
 
Last edited:

charleyf

Luke Skywalker
Country flag
Online
Thank you Mad Dog, excellent advice ! since you brought it up I am looking for a set of horns to repair as my car had no horns. If anybody has a set of non working original horns I am interested. I love finding and fixing the original stuff bringing it back to original or better than original. This is how I expand my knowledge tool box . Frank
Frank,
I have a set of TR3 horns that I can send you.
I will send a PM to you.
Charley
 

sp53

Yoda
Country flag
Offline
Nice welds and hole plugging Frank. I have been practicing my mig welding, but still not impressed with my skill level. When you made those 3 tacks on the round hole, were you a low setting of the machine? Or, do you have the welding machine set toward the higher side of thin metal and then weld with short 2 second burst. Your machine probably has a much higher amperage setting than mine, so my question is non-applicable.

steve
 

LionelJrudd

Jedi Trainee
Country flag
Offline
Frank the welds and metal finish look brilliant. Show me the inside!!! Can we see a photo of the car in its current state. Mine is still waiting on a lot of fettling while I work on other people's jobs. Lionel
 

Graham H

Jedi Warrior
Country flag
Offline
Frank, it is good to see you are restoring the original parts at least you know they should fit and do the job.

Graham
 
OP
F

Frank Canale

Jedi Warrior
Silver
Country flag
Offline
Thank you Steve, Lionel, and Graham. Steve, I am a welder by trade, self taught when I started in a small job shop that did custom fabrication. I started out doing a lot of grinding, swapping out gas bottles for other welders, changing spools of wire in the welding machines and then i asked one of the welders if he would teach me to weld. He said there is the welder give it a try, and so I did. To this day approximately 45 years later I continue to learn and practice and get better with every weld. My favorite type of welding is TIG welding and for the majority of the welding on my car is TIG welded. This type of welding is ideal for thin sheetmetal. Putting the body back together takes a lot of measurements since I had nothing in the middle to go by, to be sure it does not create a problem down the road. I am very confident that I have the front correct. I have had the floor pans , transmission cover and back half all assembled several times and it goes back together with the floor pan holes lining up so bolts go back in by hand. Both floor pans have 3 bolt holes that are aligned with no clearance so they go back together each time in the same place. The front has several cleco fasteners to align it with the floor pans as well as the back. The transmission tunnel has all the mounting bolts aligned so they go in by hand. I am waiting til I am confident I don't have to make any changes to get the front wings and the front valance to line up before I start welding. I know I am over thinking this but once it is welded together it is much harder to make changes if necessary. The last photo is the headlight bucket slot welded in. No need to make it pretty , it all gets finish sanded. welded one pass plenty of penetration so both sides were able to be finished and no one will ever know what was done many years ago. The plugs for the repairs were pre formed so there was almost no metal work done after welding. Yes Graham, I fix as much as I can and what I don't have or can't fix I make new. That is why my car is taking so long but before I bought my car( not knowing what I was getting into) that was what I decided, and do not regret taking this path, yes it is harder and takes longer but much more satisfying for me.Frank
 

Attachments

  • headlight bucket inside plug.jpg
    headlight bucket inside plug.jpg
    1.2 MB · Views: 22
  • headlight bucket inside slot.jpg
    headlight bucket inside slot.jpg
    1.2 MB · Views: 20
  • front with floor pans ready to weld.jpg
    front with floor pans ready to weld.jpg
    1.5 MB · Views: 19
  • body back section.jpg
    body back section.jpg
    1.6 MB · Views: 25
  • TIG weld.jpg
    TIG weld.jpg
    1.2 MB · Views: 24

CJD

Yoda
Country flag
Offline
As always...nice work!

I finally broke down and bought a TIG rig. You are right, I wish I had it for the Triumph restorations. To learn TIG well, I started building an aluminum framed Greenhouse for the Stearman...uuhh...I mean, the Wife. After at least 1500 hours behind the TIg at all angles and orientations, I am having trouble remembering how to MIG or Oxi-acetylene weld?!? To learn Stainless I will soon start building stainless planter boxes for the house...

SDZ8TyX.jpg
 
OP
F

Frank Canale

Jedi Warrior
Silver
Country flag
Offline
Nice job John. I will make a product plug that I am not compensated for but I bought a TIG button at 6061.com and have to say it is a game changer. I have not used the foot pedal since I hooked it up. It is a pressure sensitive button on the torch handle that allows you to vary the amperage at the handle instead of the foot pedal. no more squeezing the pedal between knees when out of position. The TIG button is a very good product and worth the investment. Frank
 

Graham H

Jedi Warrior
Country flag
Offline
As always...nice work!

I finally broke down and bought a TIG rig. You are right, I wish I had it for the Triumph restorations. To learn TIG well, I started building an aluminum framed Greenhouse for the Stearman...uuhh...I mean, the Wife. After at least 1500 hours behind the TIg at all angles and orientations, I am having trouble remembering how to MIG or Oxi-acetylene weld?!? To learn Stainless I will soon start building stainless planter boxes for the house...

SDZ8TyX.jpg
John any updates on the Stearman?
 

CJD

Yoda
Country flag
Offline
Frank, I hear ya'! Long ago a friend told me to do the button whenever I did invest in a TIG rig. I am using the Miller dial, that straps to the torch. I don't like the fact it takes more than one roll of my thumb to go to full power (or back to off), but I have gotten used to it. It also took forever to remember which way to roll the dial when switching from right to left hands or different grips on the torch. I still like the foot pedal when working at the bench, but as you can imagine, there was no way to use a pedal while hanging on a ladder doing framework. I will have to look into an easier "button", though. Still, glad to see you are back to work on the TR!

Graham, I finished the fuselage, but ran out of garage space to do anything else...thus the greenhouse!?! I will finish the greenhouse this month and get back to work on the Stearman. I am looking forward to getting back to it. Here we took a photo op when one of my Uncles came to visit...you can see the lack of room.

xS1dNF4.jpg
 
OP
F

Frank Canale

Jedi Warrior
Silver
Country flag
Offline
Same here John, I have run out of shop space. Planning to add a 40’ shipping container to the back of the shop. Waiting on a container to be emptied and I get it for a very reasonable price. Hope to get it soon. Frank
 

sp53

Yoda
Country flag
Offline
Fabulous greenhouse John, we got ours at Costco in box, delivered. I believe it something like 12’by 12’, something custom like that is very special. Keep up the great work; it will keep you young.

Steve
 

CJD

Yoda
Country flag
Offline
I have been a big YouTube watcher the last few years. After all these years of bodyworking, I came across several tools that I did not know about. I am sure you guys have heard of them, but here is the list I just ordered...for the next bodywork project! I still have a lot of aluminum sheet metal work on the Stearman, so I am very excited to add these tools to the toolbox.

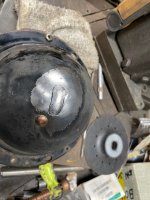
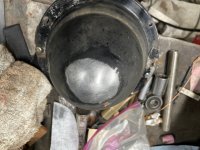
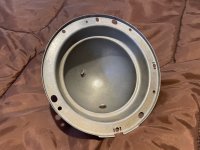
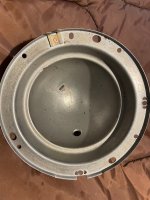
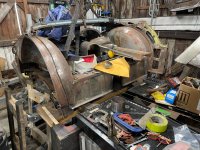
First, the shrinking disc is used on a grinder. This gradually shrinks high spots back down to level. You use the disc to heat the metal, and then quench with water. Same as torch shrinking, but much more subtle:


Next is the spoon. This is just like a body hammer, to be used with a backing dolly. The difference is sometimes the hammer is too small. I used to use another dolly to hammer with...but this is the preferred solution. Use it to "slapp" off dolly to bring up low spots:


This is a cool tool that works to remove the little "dots" of metal that are left after a lot of metal shaping...the bullseye pick. It is used to pic at the little low spots, by hitting a small area "off dolly", which means you are tapping slightly away from the backing dolly. The pick and dolly are on the same tool:


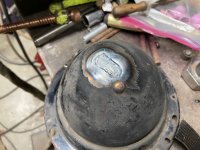
This is a pneumatic orbital sander. I have needed one forever, but finally bit the bullet. It is good for all sanding needs, but for bodywork you use it quickly over the area you are working to highlight the highs and lows:


Finally, here is a body file that can be adjusted to the shape you need. By turning the nut on top, you can bend the file to a convex or concave shape. This makes following the shape of the panel much easier:


Like I said, I am sure you guys knew about most, if not all of these tools...I'm slow. But, I am looking forward to trying them out.
 
Last edited:
Similar threads
Thread starter Title Forum Replies Date
F TR2/3/3A Headlight bucket clip Triumph 2
AUSMHLY Led headlight conversion kit with Lucas headlight bucket Austin Healey 37
B Sizes of Headlight Bucket Recess Austin Healey 8
taskadog Headlight bucket clips Spridgets 1
bugedd Headlight bucket wanted Spridgets 2
bighealeysource Mounting of headlight bucket on 1959 BN6 Austin Healey 3
Hangtown Healey Cibie Z Beam Headlight Repair Austin Healey 0
Healey Nut Headlight buckets Jaguar 3
B Headlight Dip Switch Austin Healey 4
D TR2/3/3A headlight question Triumph 8
P TR2/3/3A TR2 Headlight Trim Question: Triumph 8
Rob Glasgow Wanted Headlight Lucas Austin Healey Classifieds 4
Bocaray TR2/3/3A Headlight Dimmer conversion to dash switch Triumph 6
RJS General TR Warm White H4 LED Headlight Bulbs Triumph 1
Rob Glasgow For Sale Used headlight rims for sale Austin Healey Classifieds 1
AngliaGT For Sale Lucas Headlight - used MG Classifieds 0
Guido36 LED Headlight Upgrade Austin Healey 1
Healey Nut TR6 Headlight size Triumph 58
D BJ8 Headlight Rims Austin Healey 0
D TR2/3/3A snap on headlight rims restore Triumph 10
steveg TR6 Headlight switch - can it be rebuilt? Triumph 4
dbenichou289 TR2/3/3A Headlight outer trim ring Triumph 6
K TR2/3/3A Headlight Hi beam floor button fail? Triumph 5
dbenichou289 TR2/3/3A headlight switch removal Triumph 10
Spock TR6 '72 Headlight Relays Triumph 4
Upland 3 position headlight switch is now 2 Spridgets 1
D TR2/3/3A Headlight Trim Triumph 17
P TR6 ^%$#headlight rim Triumph 4
KVH General TR Headlight going out Triumph 9
Rob Glasgow Weird Lucas Headlight Austin Healey 7
D Wanted TR3 Headlight [lamp] chrome rim Triumph Classifieds 1
P TR6 Headlight problem Triumph 3
M Headlight relays Austin Healey 17
T TR4/4A Attaching headlight trim ring Triumph 6
S TR4/4A Headlight switch wiring. Please help Triumph 2
GTP1960 TR2/3/3A LED headlight question Triumph 11
K TR4/4A 4A chrome headlight rim installation? Triumph 2
T Question regards headlight ring 'thickness' for bugeye Spridgets 3
S TR2/3/3A Tr3 headlight buckets Triumph 3
healeyblue XK 120 headlight mounting Jaguar 1
Jim_Gruber Headlight Trim Rings on my BE - Removal - Best Methods Spridgets 5
4tecdog Headlight relays the easy way Austin Healey 13
M For Sale E-Type S1 Plexi Headlight Covers Jaguar Classifieds 0
Rut Headlight relay question Spridgets 3
JPSmit Question four - headlight trim ring Spridgets 9
princetn1 MGB Headlight Grille MG 7
TomMull General Tech Headlight upgrade Triumph 9
S Replacement Headlight Switch Spridgets 4
jaegzie Headlight buckets Spridgets 3
CJD TR2/3/3A Headlight bulb rating Triumph 18

Similar threads

Top