• Hey there Guest!
    If you enjoy BCF and find our forum a useful resource, if you appreciate not having ads pop up all over the place and you want to ensure we can stay online - Please consider supporting with an "optional" low-cost annual subscription.
    **Upgrade Now**
    (PS: Subscribers don't see this UGLY banner)
Tips
Tips

TR2/3/3A TR3B Static Timing

af3683

Jedi Trainee
Country flag
Offline
I would appreciate a little help with the static timing of a TR3B:

1) When aligning the timing mark on the crankshaft pulley with the pointer on the engine's timing cover, it is impossible to see if the 2 marks are aligned standing in front of the car. Is there any sort of "trick" to be certain that these 2 marks are exactly aligned when standing on the passenger side of the car and looking down at an angle?

2) Also regarding the thumbscrew, I've read that you should initially set it at mid range. Is this best done by turning it as far as it will go in either direction, then counting the number of "clicks" back to the opposite stop and then dividing by 2?

Also, to set the timing at 4 degrees before TDC do you turn the thumbscrew 2 "clicks" in the "A" direction? I'm confused because I read somewhere that you must turn the thumbscrew 1/2 turn to get 4 degrees before TDC.

Any help would be appreciated. Thanks.

Art
 

TR3driver

Great Pumpkin - R.I.P
Offline
1) I've never worried about getting it "exactly aligned". All you need do is get the engine running, and then make any fine adjustments using the "road test" method.

2) I have never understood that advice. Seems to me that you want it to wind up at roughly midrange, after dialing in the 4 degrees of advance. So I start by setting it 4 degrees retarded from center, then bring it back after static timing to TDC.

3) The clicks are much finer than one degree. If you look at the hash marks on the barrel of the vacuum module, each mark represents 4 degrees at the crankshaft. ISTR that is more like two turns of the thumbwheel, but since I never bother counting turns, I'm not sure about that.
 
OP
af3683

af3683

Jedi Trainee
Country flag
Offline
Thanks Randall. I guess I'm still confused about the initial vernier setting and the final setting to obtain the 4 degrees BTDC.

The Practical Hints manual states that <span style="font-style: italic">"to advance ignition, rotate the knurled screw on the distributor. Each division (full turn ??) on the distributor vernier scale represent 2 degrees on the distributor i.e., 4 degrees on the crankschaft." However, the manual is silent on how to set the static timing or the initial vernier setting.
</span>

Mark Macy's web site states:

<span style="font-style: italic">"Begin by turning the thumbscrew as far as it will go in either direction, then count the number of turns as you move it to the opposite stop. Divide that number in half, and return the screw to the middle of its range. Now you’ll have adequate adjustment in either direction should you need it later."

Then after setting the static timing, in order to set the timing to 4 degrees BTDC "just turn the external thumbscrew in the “A” direction (advance) as indicated by the arrow. There is a reference line through the middle the thumbscrew, and one complete turn is equal to 8 degrees of adjustment. Therefore, note the position of the reference line and turn the screw ½ turn in the “A” direction to set your ignition timing at the factory recommended 4 degrees BTDC." </span>

Art
 

TR3driver

Great Pumpkin - R.I.P
Offline
Well, where you start from really isn't all that important, as long as there is enough range to get from there to where you end up.

I was curious, so I just made some measurements on an old advance unit. The threads are 32 tpi, so one full turn moves the unit by .03125". Using my dial calipers, 3 of the hash marks total just about .125" so that is .04167 per mark or .0104" per degree. So one full turn of the nut moves it by about 3 degrees.

Why Mark Macy thinks it moves by 8 degrees, I don't know. Maybe you should ask him. He is a professional (meaning he gets paid for his work), but I'll bet I've got more miles logged in the drivers seat of a TR3/A and I've always done my own work.
 
OP
af3683

af3683

Jedi Trainee
Country flag
Offline
Thanks again. I checked the Haynes manual and they say to start by turning the vernier clockwise to fully retard the timing, and then after setting the static timing, to turn the vernier anticlockwise until the specified number of divisions ( 1 division = 1 turn? ) are visible. They go on to say that each complete division corresponds to 4 crankshaft degrees. I think this may be similar to your methodology.

Art
 

martx-5

Yoda
Country flag
Offline
Look carefully at the hash marks on the vernier. The one in the "middle" is larger (longer) then the others. That's where I've always started from as the 0° mark. It's then easy to see where your at when readjusting per your road tests, which I agree with Randall, should determine where the timing should be set as each car is different.
 

sp53

Yoda
Country flag
Offline
My understanding is the vernier scale was put on the distributor to help compensate for different octane fuel and to help you dial that in as you went on your travels. I put the vernier scale in the center and set the timing with a timing light at about 3/8 past the little hole on the pulley then I drive the car and see how it performs. If it is doggie, I advance the timing by moving the knurled, and if the motor is hopping around I retard it. It is not a big deal just spin the knurled nut up and down until you get a feel for it. Let the force be with you. But first make sure you have good quality set of points that are set right on the button because when you change the points you change the timing. Moreover, a distributor with a nice and true shaft is imperative with the correct springs and weights or your timing will be all over the place and you will never get it right. I guess BPN sells a new stock aftermarket distributor for around 100.00
 
M

Member 10617

Guest
Guest
Offline
The Lucas Fault Diagnosis Service Manual contains the following:

Two suitable methods are shown --

(a) Static Ignition Timing
(b) Stroboscopic Timing

STATIC IGNITION TIMING

"Rotate the engine until No. 1 piston is just before TDC, on the compression stroke. At this point the rotor arm shoud be pointing to the distributor cap segment connected to No. 1 spark plug.

"The contact breaker points should be just at the point of opening in the direction of rotation. This can be verified by connecting a voltmeter between the distributor L.T. terminal and a good earth. At the previse moment the contacts open, the voltmeter will register battery voltage. Should the ignition timing be incorrect, centralise themicrometer adjuster, slacken the distributor clamp bolt andposition the distributor to the point of contacts about to open and re-tighten clamp bolt.

"It must be remembered an incorrect contact gap can afect igniton timing...

"The ignition timing is now set with sufficient accuracy to be able to start and run the engine. Final adjustment may be carried out usng the stroboscopic timing light and the micrometer adjustment."


NOTE: According to most manuals, the static ignition timing for the Triumph is 4 degrees BTDC at idle. However, if you have had your distributor rebuilt and the timing curve has been modified for modern fuels, etc., it could be 12 to 15 degrees BTDC at idle. There is no magic number... and each car is different. Moreover, the initial setting was determined 50 years ago when these cars were new and tested in England.

One of the very confusing things that I found is that manuals don't always distinguish between "crank degrees" and "distributor degrees." So when they speak of setting your timing to X degrees BTDC, it isn't always clear if they mean distributor or crank degrees, but I believe that they are talking about "crank degrees." I do know that the vernier adjuster's increments are 4 crank degrees per mark (one full turn of the wheel for each degree. (BTW: you can measure crank degrees with a timing light).

Perhaps someone in the Forum far more informed than I can explain this clearly.
 
OP
af3683

af3683

Jedi Trainee
Country flag
Offline
Both Practical Hints manual and Haynes manual state that <span style="font-weight: bold">each division (assumed to be 1 full turn ??) on the distributor vernier scale represents 2 degrees on the distributor i.e.,] 4 degrees on the crankschaft. </span>

Only Haynes gives any indication of where to set the <span style="font-weight: bold">initial vernier setting which they say is in the fully clockwise or fully retarded.</span>

Art
 

TR3driver

Great Pumpkin - R.I.P
Offline
LexTR3 said:
One of the very confusing things that I found is that manuals don't always distinguish between "crank degrees" and "distributor degrees." So when they speak of setting your timing to X degrees BTDC, it isn't always clear if they mean distributor or crank degrees, but I believe that they are talking about "crank degrees." I do know that the vernier adjuster's increments are 4 crank degrees per mark (one full turn of the wheel for each degree. (BTW: you can measure crank degrees with a timing light).

Perhaps someone in the Forum far more informed than I can explain this clearly.

I think you've covered it quite well, Ed. The problem is that Lucas (who made the distributor) stated everything in terms of distributor degrees. This is a 4-stroke engine, which means the distributor shaft (and camshaft) only makes one turn for every two turns of the crankshaft (since it takes two crankshaft revolutions to complete an entire suck-squeeze-pop-fooey cycle). So the distributor shaft only moves by 2 degrees while the crankshaft moves by 4 degrees.

Some places in the Triumph documentation identify whether the number is crank or cam degrees, but many do not. And, although the convention is to use crankshaft degrees, some of the places that do not identify are actually in cam degrees. The later manuals are even worse, one of the Stag workshop manuals actually has some numbers that are clearly mis-identified.

Just be grateful you don't have vacuum retard. It gets <span style="font-weight: bold">really </span>confusing!
 

Geo Hahn

Yoda
Country flag
Offline
LexTR3 said:
NOTE: According to most manuals, the static ignition timing for the Triumph is 4 degrees BTDC at idle. However, if you have had your distributor rebuilt and the timing curve has been modified for modern fuels, etc., it could be 12 to 15 degrees BTDC at idle...

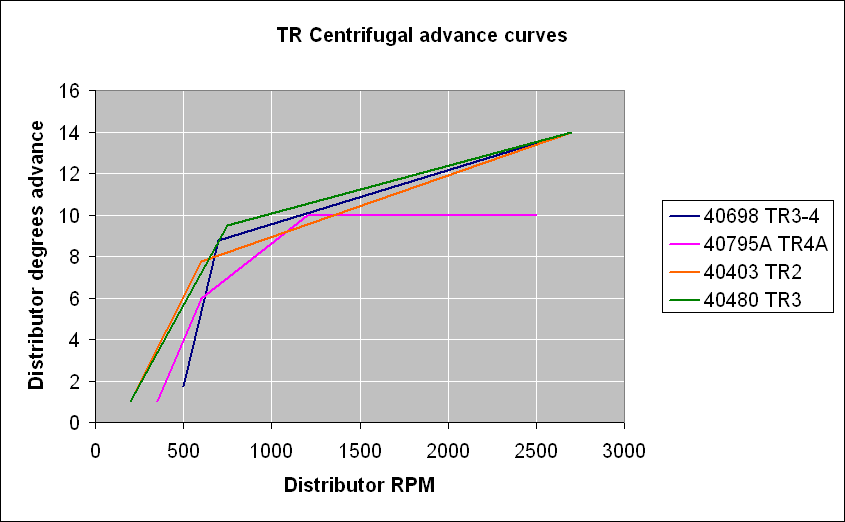
'Static' is not the same as 'at idle'. An engine set at 4° BTDC static will be considerably more advanced at idle. On a TR3A for example the advance begins at 225 RPM, the primary (thin spring) at 350 RPM and the secondary (knee in the 'curve') comes in at 750 RPM -- so an idling engine is seeing about 18° advance (crank degrees).

Lucas_Distributor_Advance_Curves.gif


As noted, where on the vernier you start from is not critical -- it is good to leave some room for adjustment both ways. On the road you will sometimes get some not-so-good gas and will find you need to retard the timing a bit, the vernier makes it easy to do that and to move it back to the right spot later.

You can also use it to retard the timing a bit if you are starting the engine with the hand crank and you find it tries to bite you.
 

TR3driver

Great Pumpkin - R.I.P
Offline
Geo Hahn said:
On a TR3A for example the advance begins at 225 RPM, the primary (thin spring) at 350 RPM and the secondary (knee in the 'curve') comes in at 750 RPM -- so an idling engine is seeing about 18° advance (crank degrees).

Not unless it idles really high. Note that both rpm and degrees in that chart are measured at the distributor. So with initial timing set at 4 BTDC, and idling at 1000 rpm (already kind of high), total advance for the green line would only be 16 degrees.

But I agree with your basic point. These engines (unlike most) have the advance curve starting way down low. I don't know why they did it that way, but my guess is so that the initial advance could be low for easier starting with the crank handle and still have enough advance for good operation at higher rpm.
 
M

Member 10617

Guest
Guest
Offline
Randall and George,

As usual, many warm thanks for your good and clear explanations.

The instructions I received with my rebuilt distributor were to set the (initial)timing at 12-15 degrees BTDC at idle, without vacuum, and then road test and adjust. If the advance curve has not been changed from the original setting, I assume one should set the timing at 4 degrees BTDC at idle, without vacuum, and then road test and adjust.

If one were setting the timing at "static," I assume one would go through the test light or voltmeter procedure first, and then advance the timing X degrees (as recommended) using the micrometer adjuster.

I have to admit that I lean toward using an advance timing light to set the timing at idle, followed by road test and adjustment.

Bottom line: when talking about degrees, think "crankshaft degrees" -- 4 crank degrees per mark on the vernier scale (one full turn of the wheel = 1 degree).
 

TR3driver

Great Pumpkin - R.I.P
Offline
LexTR3 said:
The instructions I received with my rebuilt distributor were to set the (initial)timing at 12-15 degrees BTDC at idle,
Your distributor was NOT rebuilt to original specifications; but rather modified to what Jeff thinks is a more appropriate advance curve. That is why he also gave you modified instructions for adjusting the timing.

<div class="ubbcode-block"><div class="ubbcode-header">Quote:]If the advance curve has not been changed from the original setting, I assume one should set the timing at 4 degrees BTDC at idle, without vacuum, and then road test and adjust.[/QUOTE]

And, as Geo and I explained above, you would be wrong in your assumption.

<div class="ubbcode-block"><div class="ubbcode-header">Quote:]I have to admit that I lean toward using an advance timing light to set the timing at idle, followed by road test and adjustment.[/QUOTE]

Well, nothing wrong with that, if that is what you prefer. But to my way of thinking it represents an extra step and wasted effort. You have to get the initial timing within the ballpark to start the engine the first time. If it will start and run, why not take it out for a test drive and adjust the timing as needed? I've got lots of other things to do, no sense doing something if I am immediately going to do it over again.

<div class="ubbcode-block"><div class="ubbcode-header">Quote:](one full turn of the wheel = 1 degree). [/QUOTE]

Nope, not correct. See above.
 

Geo Hahn

Yoda
Country flag
Offline
TR3driver said:
...Note that both rpm and degrees in that chart are measured at the distributor...

D'oh. I got it that the advance was distributor degrees and must be doubled for the crank degrees we usually speak of -- but missed that the RPM shown must also be doubled to get engine RPM. Thanks!
 

poolboy

Yoda
Country flag
Offline
LexTR3 said:
Randall and George,

As usual, many warm thanks for your good and clear explanations.

The instructions I received with my rebuilt distributor were to set the (initial)timing at 12-15 degrees BTDC at idle, without vacuum, and then road test and adjust. If the advance curve has not been changed from the original setting, I assume one should set the timing at 4 degrees BTDC at idle, without vacuum, and then road test and adjust.

If one were setting the timing at "static," I assume one would go through the test light or voltmeter procedure first, and then advance the timing X degrees (as recommended) using the micrometer adjuster.

I have to admit that I lean toward using an advance timing light to set the timing at idle, followed by road test and adjustment.

Bottom line: when talking about degrees, think "crankshaft degrees" -- 4 crank degrees per mark on the vernier scale (one full turn of the wheel = 1 degree).
Is this deja vu all over again ? :crazyeyes:
 
M

Member 10617

Guest
Guest
Offline
Nope.... just seeking further clarification. Information from various sources not only varies but often is downright contradictory.

Randall. Yep... I know that Jeff changed the advance curve, and that's why he recommended 12-15 degrees BTDC (at idle). But IF the curve had not been changed but left as original, then I assumed that the timing should be set at 4 degrees BTDC (static), as per the manuals.

As for one turn of the wheel = 1 degree, that information came with my rebuilt distributor. Just passing it on.

And, I agree. Using the static procedure to get initial timing to get the car going the first time is certainly the way to go. But then, as Lucas suggests, timing can be checked from thereafter with a timing light (at idle). Chaque'un a son gout.
 

Don Elliott

Obi Wan
Offline
Randall and others have mentioned the "road test method". That's all I have ever used to time my 1958 TR3A over the last 54 years and 188,000 miles.

I get the timing and idle about right in the driveway at home and take it out for a run on a quiet straight road (preferably a road where you can safely pull onto the shoulder of the road). During the run, while in 4th gear I step on the gas at about 1000 RPM. The engine will either "lug" along or it will accelerate with a pinking sound. If it's lugging, I safely pull off, and set the vernier to be a bit more advanced. Then I pull back onto the road and try it again. I repeat this till I hear the engine start to "pink". Then I pull off again and set the vernier back a bit towards retard.

If on the first run of the test drive, you accelerate and the engine is pinking at 1000 RPM, then start to re-set the vernier towards retard a bit at a time till you can't hear the pinking anymore.

I have never used a timing light.

As for the pointer on the timing chain cover and the hole on the pulley for the fan belt on the front end of the crankshaft extension, I have added some white paint on the tip of the pointer and in the hole to help see what's happening down there.
 

Attachments

  • 28559.jpg
    28559.jpg
    76.9 KB · Views: 222
M

Member 10617

Guest
Guest
Offline
Don,

The road test method has been mentioned numerous time in this Forum, but I believe you are the first person to actually describe it. Many thanks.

One request: can you describe "pinking" (is it the same as "pinging" or "knocking")and "lugging" (is it running an engine at higher load/lower rpm?)for those of us who may not be able to distinguish these sounds or behaviors from many others one hears or feels in one of these cars? Sorry to be so dense.
 

martx-5

Yoda
Country flag
Offline
"Pinking" is the way the British describe pinging/knocking. You have the description of lugging correct.
 
Similar threads
Thread starter Title Forum Replies Date
af3683 TR2/3/3A Set Static Timing on TR3B - Car Runs Poorly Triumph 27
C For Sale 1963 Triumph TR3b-TCF Triumph Classifieds 5
G For Sale NEW PHOTOS: Triumph TR3 Chassis Frame + Front Suspension, Fits TR2,TR3,TR3A,TR3B Triumph Classifieds 1
AngliaGT TR2/3/3A Value of a One Owner,Excellent Condition TR3B ? Triumph 12
glemon TR2/3/3A TR3B Triumph 10
af3683 TR2/3/3A TR3B Anti-Freeze Change Triumph 23
P TR2/3/3A TR3B SU carbs Triumph 10
C TR2/3/3A Three completely different questions from a TR3B newbie - thanks for any input! Triumph 6
P TR3B Coil Issue? Triumph 7
P TR2/3/3A TR3B Panel Light Switch Triumph 20
S For Sale Triumph TR2/TR3/TR3A/TR3B Workshop on CCD/ROMManual – 1953 - 1962 Models Triumph Classifieds 0
K TR2/3/3A TR3B Tire/Wheel Advice Triumph 2
af3683 TR2/3/3A TR3B Oil Drain Plug Triumph 10
J TR2/3/3A TR3b Tyres Triumph 6
T General TR Request pictures of TR3B & TR4 electric temperature gauges Triumph 15
W TR2/3/3A TR3B ‘TCF’ on BAT Triumph 10
S For Sale Triumph tr3 tr3a tr3b tr4 tr4a differential cover new old stock Triumph Classifieds 0
Lukens For Sale Classic center armrest/console for tr2, tr3, tr3a, tr3b, and tr4 Triumph Classifieds 0
S For Sale Tr3 tr3a tr3b tr4 tr4a differential cover new old stock Triumph Classifieds 0
tr3guy TR2/3/3A Late TR3A, TR3B windshield assemply Triumph 5
K TR2/3/3A Windshield stanchions on a TR3b - guide plates?? Triumph 13
M TR2/3/3A Need Help With Carb ID On My TR3B Triumph 8
M TR2/3/3A After Market Oil Filter - TR3B Triumph 8
M TR2/3/3A Technical Assistance Needed - TR3B Carb Adjustment Triumph 5
D TR2/3/3A Best TR3B seats - repair or replacement? Triumph 11
K TR2/3/3A Broken exhaust manifold TR3b Triumph 13
D TR2/3/3A TR3B Tire sizes? Triumph 10
S TR2/3/3A 155/15 Vredestein Sprint Classic on a 4.5" Wire Wheel as TR3B Spare? Triumph 6
J Restoring a '62 TR3B Restoration & Tools 2
M TR2/3/3A TR3B Door Cables Triumph 5
M Door Cables - 62 TR3B Spridgets 1
B TR2/3/3A Are these seat slides for a TR3B? how do you paint them? Triumph 8
B TR2/3/3A carpet snap questions tr3B Triumph 1
B TR2/3/3A TR3b lower door seal question Triumph 3
B TR2/3/3A tr3b center exhaust hanger Triumph 3
B TR2/3/3A steering box seal replacement TR3B Triumph 4
af3683 TR2/3/3A TR3B Exhaust Manifold Gaskets Triumph 15
C General TR TR3B Cylinder Head Triumph 7
af3683 TR2/3/3A TR3B Signal Flasher Problem? Triumph 2
B TR2/3/3A where to buy oversize thrust washers for TR3B? Triumph 16
B TR2/3/3A Identify the Mystery Bolts from TR3B front and interior Triumph 2
T TR2/3/3A TR3B fuel gauge Triumph 3
T TR2/3/3A TR3B stanchion to frame scew size Triumph 8
T TR2/3/3A TR3B alternator leak Triumph 4
T TR2/3/3A TR3B steering wheel cover Triumph 25
T TR2/3/3A TR3B VB windshield Triumph 11
M TR2/3/3A TR3B Front suspension Triumph 5
T TR2/3/3A TR3B gas cap Triumph 0
T TR2/3/3A TR3B steering column felt bushing Triumph 2
V TR2/3/3A TR3B Engine Oil Triumph 8

Similar threads

Top