• The Roadster Factory Recovery Fund - Friends, as you may have heard, The Roadster Factory, a respected British Car Parts business in PA, suffered a total loss in a fire on Christmas Day. Read about it, discuss or ask questions >> HERE. The Triumph Register of America is sponsoring a fund raiser to help TRF get back on their feet. If you can help, vist >> their GoFundMe page.
  • Hey there Guest!
    If you enjoy BCF and find our forum a useful resource, if you appreciate not having ads pop up all over the place and you want to ensure we can stay online - Please consider supporting with an "optional" low-cost annual subscription.
    **Upgrade Now**
    (PS: Subscribers don't see this UGLY banner)
Tips
Tips

TR2/3/3A TR3 Rear Leaf Spring Front Pin Removal

karls59tr

Obi Wan
Bronze
Country flag
Offline
I found a write up in an old Triumph Register newsletter about how to make the tool to do the removal. I understand that it can be a pain because of rust issues. They recommend soaking the pin in penetrating oil for a few nights. Is it possible to do the removal with the body on the frame? Also...are there upgraded bushings for the rear spring other than stock?
 

TexasKnucklehead

Jedi Knight
Country flag
Offline
TRF has these: RFK1716
Moss has: Rear Axle Locator Kit

I didn't remove mine and the body is still off the frame. Why are you removing the pins?
 

MGTF1250Dave

Jedi Knight
Silver
Country flag
Offline
Aloha Karl,

I think that you have to remove the pin to change the rear leaf spring if the body is on the chassis. The pin need to be pulled out toward the center of the car through the frame rail after the outer spring retaining nut is removed. This should also have a cotter pin holding the nut. I believe stainless steel pins are also available.
 

TR3driver

Great Pumpkin - R.I.P
Offline
karls59tr said:
Is it possible to do the removal with the body on the frame?
Yup, I just did that with my 56 last year. Soaked mine for two weeks, with occasional beating on both ends of the pins to loosen things up. The key IMO is to make a good, strong puller. I bought hardened threaded rod, nuts and thick washers from MMC; then replaced the rod & nuts between pins. I also used a bottoming tap to clean the threads in the head of the pin as deep as possible, so the threaded rod would get a good grip on the pin.

You'll need a stack of spacers so you can start out with just one and then add more later. There isn't enough room (at least there wasn't on my two TR3s) to do the job with just one spacer. Note that the first spacer should fit fairly close around the head of the pin, but still fit over the tab on the frame that keeps the pin from turning. If it's too much larger than the head of the pin, you increase the chances of pulling the tube out of the frame instead of the pin out of the tube.

Mine came out reasonably easy, although my arms sure did get tired of cranking that wrench! I would suggest something like a box-end GearWrench rather than a deep socket, to minimize the side force somewhat.

There is an alternate method that I have heard the dealership mechanics used : Drill a hole through the rocker panel, so you can stick a big punch through the hole and drive the pin out with a large BFH. Afterwards, stick a chromed plug in the hole. :laugh:

<div class="ubbcode-block"><div class="ubbcode-header">Quote:]Also...are there upgraded bushings for the rear spring other than stock? [/QUOTE]
Only for the rear shackle bushings AFAIK. The front bushing is a special bonded rubber thing, not just a simple bushing. I installed the Nylatron shackle bushings from TRF, but I'm not convinced that they made any real difference. The rear half of the spring just doesn't do that much as far as locating the axle to the car, most of the side force is taken at the front.
 

sp53

Yoda
Country flag
Offline
I did a couple awhile back with the body off and it was difficult. I just cavemaned them out with a big hammer and oil. If I do it again, I am going to do something like Randall suggests. If I remember correct, there is a small perhaps 5/16 threaded hole that you are supposed to use in conjunction with a wrench and pull or something. That worked one time for me, but the pin was kinda loose anyway, and I doubt if that is good way to go after it. Once I actually chopped up the tub, don’t do that. One thing you might try is one of those commercial weld cleaners. They basically pneumatically rattle the slag off the weld with a lot punch. If you Could get one of those on edge of the pin head that perhaps will help move some oil into the tube and maybe break it lose will all the rattling. I think it is one of those jobs that require a lot of prayer and patients.
Steve
 

Geo Hahn

Yoda
Country flag
Offline
A timely post as I just discovered a broken leaf in one of my springs.

Randall's method sounds good, I have already begun a recurring course of PBlaster soakings. I was able to clean up the threads in the pin part way but did not have a tap for a blind hole, maybe I can grind down a tap to make one.

BTW -- threads in there are 5/16 x 24.

Randall -- what did you use for spacers? pieces of iron pipe? short sockets?

I'm thinking that the hole-in-the-body method may produce a hole that is concealed by the small inner stone guard, but I haven't really scoped that out... yet.
 
OP
K

karls59tr

Obi Wan
Bronze
Country flag
Offline
The reason I asked is I upgraded the front suspension of the 3 and thought I 'd do the same for the rear. I think I'll just do the rear shackle bushes and leave well enough alone at the front pin if replacing the bush isn't really necessary.
 

TR3driver

Great Pumpkin - R.I.P
Offline
Geo Hahn said:
Randall -- what did you use for spacers? pieces of iron pipe? short sockets?
Sorry, Geo, I don't recall the source. There is a whole drawer in my rollaway where I keep various bits I've fabricated over the years. Was a time when I could tell you what each piece was for, but now I just look in there when I need something and it's usually there
grin.gif

The piece I used against the frame might have started life as pipe, but it's quite a bit thicker than ordinary iron pipe and just barely fits over the pin head. It might have been cut from the front cover of a transmission from another car.

Then I used a short socket on top of that (once the pin was out by a few inches); and then finally another spacer between the two of them. You can only use one socket, because the pin won't fit through the drive hole.
 

TR3driver

Great Pumpkin - R.I.P
Offline
karls59tr said:
I think I'll just do the rear shackle bushes and leave well enough alone at the front pin if replacing the bush isn't really necessary.
Well, those things don't last forever, and getting this stuff apart is a major pain, IMO. I replaced the front bushings even though the old ones weren't broken, just because I hope to never remove the springs again.
 

TimK1955tr2

Senior Member
Offline
Great info above!!

My two cents is that the front pins can be a real frustrating pain to remove, this is definitely a job to think hard about and prepare well. They can really be frozen in the frame AS WELL as the bushing itself.

I have found the force needed by prying or pulling can actually start to distort the frame metal if applied to weaker area, use plates or supports that spread the load as wide as possible.

Getting the car jacked up high and accessible can make all the difference.

Honestly, I would try to confirm that the front bushing are indeed bad, I have found the rubber didn't seem to deteriorate like the other suspension bushings.

Also, I found replacement bushings to vary slightly, I think the Moss ones were almost an interference fit, I reamed them slightly with a large drill bit since I couldn't press them on with the body on frame. The recent TRF ones slid right onto the pin.

Hope this helps!!
 

TexasKnucklehead

Jedi Knight
Country flag
Offline
I didn't remove or replace the pins (and I was thinking I took everything apart), but I did replace the bushings. They looked good, but it was one of those 'may as well' moments. I'm glad I did, because the rubber was really dried up. They were more difficult to get out than I would have expected.

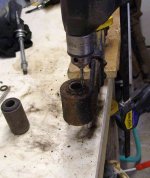
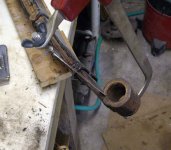
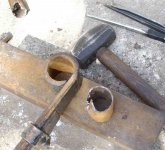
Here is the steps (and pictures) I found to be easier to remove them. 1) drill out the rubber 2) use a hacksaw that fits in the small groove at the end of the spring to cut through the remaining sleeve 3)pound out the sleeve.

I used common threaded rod and washers to pull new ones back in.
 

Attachments

  • 23857.jpg
    23857.jpg
    66.8 KB · Views: 350
  • 23858.jpg
    23858.jpg
    66 KB · Views: 341
  • 23859.jpg
    23859.jpg
    66.6 KB · Views: 335

sp53

Yoda
Country flag
Offline
Well Geo I am curious if you are getting those pins out. It is just one of those things that is sticking in my mind. At least on one car if I had it to do over again, I would lift tub just high enough to pull the leaf spring off and leave the pin right where it is. I dug through my old tools and found an old weld slag cleaner that would pound that pin sense less. However, it might damage something, most likely the pin. Let me know if you want to try that and I will mail down to you to use.
Steve
 

Geo Hahn

Yoda
Country flag
Offline
Winter is still driving season here so too soon to take it off the road. I've got the broken bit secured (appears it is not a recent break) so I drive for now and work later.

I have access to a lift so I will try finesse (after lots of PBlaster soakings) before I call in heavy artillary support.
 

Don Elliott

Obi Wan
Offline
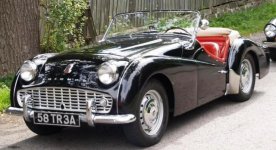
I drove my 1958 TR3A a total of 80,350 miles between 1958 and 1972 when I let it sit idle in my garage till 1987. It was then I found out those long front pins were rusted ito place and no amound of trying could get them out. But since I was doing a total body-off restoration, I had no problem with rmoving the springs and putting the original ones back on because the body was off.

But in 2000 with a total of 135,000 miles from new, I broke the rear spring on the RHS. So I removed the rear bumperettes, with their long bolts, the 2 flat-head screws in the rear floor, the 4 near the "B" posts and the 4 near the "A" posts. I loosened the one under the gas pedal and the other on the passenger's side and also loosened the 4 under the carbs and under the coil a bit.

Then I placed a piece of plywood on the lift head of my rolling jack, slid it under the spare wheel well under the car and lifted the rear tail about 8". This took me about 3 hours, replaced both springs with new ones (about 3 hrs) and lowered the TR back onto the frame and tightened all the body bolts. This was easy as all the bolts on my TR3A are stainless steel. In all it took me a full day to finish the job and I didn't have to take out those rusted-in long pins.

I've driven about another 50,000 miles with no issues here and I calculate I'll have to do this in another 25 years or so. By then I'll be 98 years old so I may have to explain to someone else how to do it.
 

Attachments

  • 23964.jpg
    23964.jpg
    50.2 KB · Views: 279

Mkutz

Jedi Hopeful
Country flag
Offline
I talked to a fellow who restores TR3/4/6 frames for a living. I distinctly remember him telling me that the front pin is actually spot welded to the frame, from the interior of the frame that is, and that for him to remove them that he would have to cut open the top of the frame and grind out all the welds.
 

TR3driver

Great Pumpkin - R.I.P
Offline
I guess that shows that even the pros don't always know how things work. There is a tube that is welded to the inside of the frame, but the pin is only welded to the tube by rust.
 

TimK1955tr2

Senior Member
Offline
The frame does have a welded tab on the inside section that keeps the pin from spinning. The pin's head is "D" shaped, that tab rests against the flat side.

I could see how someone might mistake that as the pin welded in, especially if covered by years of road dirt or gunk but a pro should definitely know better...
 
Similar threads
Thread starter Title Forum Replies Date
K TR2/3/3A TR3 Rear Leaf Spring Shackle Bushes Upgrade Triumph 14
H TR2/3/3A TR3- installing rear leaf springs = nightmare.... Triumph 5
jfarris For Sale TR3 Rear Sway Bar Triumph Classifieds 0
Donald1107 TR2/3/3A TR3 Rear Shocks Triumph 11
B Wanted TR3 Hardtop Rear Stiffener Brackets Triumph Classifieds 0
J TR2/3/3A TR3 Rear seat Triumph 11
K For Sale TR3 rear rebound brackets Triumph Classifieds 0
J For Sale Triumph TR3 rear differential and rear brake assembly - Northern Illinois Triumph Classifieds 1
E For Sale Tr3 rear axle, rear end Triumph Classifieds 6
K For Sale TR3 rear cockpit center capping Triumph Classifieds 0
J Wanted Need tr3 rear axle housing Triumph Classifieds 0
D TR2/3/3A TR3 Engine dumping Coolant out its rear end - HELP Triumph 5
A TR2/3/3A Newbie wrestling with TR3 rear wheel studs Triumph 3
Tinkerman TR2/3/3A TR3 A REAR WING BOLTS order of assembly? Triumph 3
Got_All_4 TR2/3/3A Tr3 rear differential seal Triumph 7
J TR2/3/3A Tramp bar for rear of TR3 or?? Triumph 7
mgedit TR2/3/3A Steady Springs Rear Brakes 56 TR3 Triumph 0
jfarris TR2/3/3A Wanted - TR3 Monza Muffler - Rear Section Only Triumph 1
M TR2/3/3A TR3 overdrive trans rear speedi sleeve Triumph 6
K TR2/3/3A TR3 Exhaust header's proximity to rear of generator? Triumph 4
J TR2/3/3A Strange fiberboard panel behind rear seat in TR3 Triumph 10
1937dodge TR2/3/3A Anyone have any photos of TR3's sporting rear finned aluminum brake drums? Triumph 8
T TR2/3/3A TR3 Rear wheel cylinder attachment clips Triumph 6
mgedit TR2/3/3A Rear Drum Brakes 56 TR3 Triumph 2
rckuhlman TR2/3/3A TR3 Castle Nut on Right Rear Axle Triumph 3
K TR2/3/3A TR3 4:11 gears in rear Diff Triumph 6
S TR2/3/3A rear brakes tr3 Triumph 1
S TR2/3/3A tr3 rear main Triumph 24
M TR2/3/3A Topping off rear shocks on TR3 Triumph 11
Kleykamp TR2/3/3A TR3 rear fender bolts Triumph 2
RickAnderson TR2/3/3A Wanted: TR3 Rear Bumper Overrider - any condition. Triumph 2
M TR2/3/3A TR3 rear axle hub gasket ???? Triumph 4
S TR2/3/3A rear fender vinyl tr3 Triumph 6
mgedit TR2/3/3A Rear capping 56 TR3 Triumph 4
M TR2/3/3A Topping off rear shocks on TR3 Triumph 13
Kleykamp TR2/3/3A TR3 rear fender needed Triumph 18
K TR2/3/3A TR3 rear overider distance from body? Triumph 3
Tr3aguy TR2/3/3A Rear Lettering TR3 post 60000 Triumph 3
luke44 TR2/3/3A TR3 Rear Bumper Overriders - Upside Down? Triumph 12
T TR2/3/3A The light came on: my TR3 rear apron. Triumph 12
S TR2/3/3A tr3 rear interior panels Triumph 6
J TR2/3/3A TR3 Rear Apron Replacement Triumph 4
K TR2/3/3A TR3 Rear Overider Bracket "distance tube"? Triumph 10
J TR2/3/3A stainless steel rear spring pins for TR3 Triumph 19
O TR2/3/3A TR3 Rear Main Seal Triumph 5
A TR2/3/3A More TR3 Rear main seal problems. Please Help!! Triumph 8
J TR2/3/3A '56 TR3 Brakes and rear axle advice Triumph 7
tinman58 TR2/3/3A Rear main seal TR3 Triumph 11
O TR2/3/3A TR3 Rear Turn lights Versus Rear Stop Tail lights? Triumph 5
S TR2/3/3A tr3 brakes-Rear wheel Triumph 2

Similar threads

Top